以下のサイトにサンプルがあるので、それに沿ってやっていきます。
Azure ADのディレクトリを作る
というわけでさくっとクラシックポータルからAzure ADのディレクトリを作ります。
ここでは、okazukimultitenanttestという名前で作りました。
アプリケーションも作りましょう。multitenanttestappという名前でWebアプリケーションとして作っておきます。
サイオンオンURLと応答URLを、以下のような感じにします。
https://これから作るWebAppsの名前.azurewebsites.net/
アプリケーション ID/URIを以下のようにします。
https://<テナント名>.onmicrosoft.com/なんか適当
テナント名は今回はokazukimultitenanttestなのでhttps://okazukimultitenanttest.onmicrosoft.com/multitenantappみたいにしました。
アプリケーションの追加から、Microsoft Graphを追加してデリゲートされたアクセス許可にSign in and read user profileを選択します。
そして、キーを生成してメモっておきます。
アプリの作成
空のASP.NET Webアプリケーションを作ります。MVCにチェックを入れておきましょう。 クラウドにホストするを選んでAzureのWeb appsにデプロイできるようにしておきます。(後からでもできる)
ControllersフォルダにHomeControllerを作ります。Indexに対してViewも作っておきましょう。ここら辺は、Indexアクションを右クリックしてビューを追加を選ぶと楽です。
NuGetの追加
NuGetを使って以下のパッケージをインストールします。
- Microsoft.Owin.Host.SystemWeb
- Microsoft.Owin.Security.OpenIdConnect
- Microsoft.Owin.Security.Cookies
Startup.csの追加
OWINのスタートアップのクラスを作ります。Visual StudioにOWIN Stgartupクラスのテンプレートがあるので、そこから選んで作りましょう。
using System;
using System.Threading.Tasks;
using Microsoft.Owin;
using Owin;
using Microsoft.IdentityModel.Protocols;
using System.Configuration;
using Microsoft.Owin.Security;
using Microsoft.Owin.Security.Cookies;
using Microsoft.Owin.Security.OpenIdConnect;
using System.IdentityModel.Tokens;
using System.IdentityModel.Claims;

[assembly: OwinStartup(typeof(MultiTenantApp.Startup))]

namespace MultiTenantApp
{
    publicclass Startup
    {
        publicvoid Configuration(IAppBuilder app)
        {
            var clientId = ConfigurationManager.AppSettings["ida:ClientId"];
            var authority = "https://login.microsoftonline.com/common";

            app.SetDefaultSignInAsAuthenticationType(CookieAuthenticationDefaults.AuthenticationType);
            app.UseCookieAuthentication(new CookieAuthenticationOptions());

            app.UseOpenIdConnectAuthentication(
                new OpenIdConnectAuthenticationOptions
                {
                    ClientId = clientId,
                    Authority = authority,
                    TokenValidationParameters = new TokenValidationParameters
                    {
                        // 自分でやるのでfalse
                        ValidateIssuer = false,
                    },
                    Notifications = new OpenIdConnectAuthenticationNotifications
                    {
                        RedirectToIdentityProvider = ctx =>
                        {
                            var appBaseUrl = $"{ctx.Request.Scheme}://{ctx.Request.Host}{ctx.Request.PathBase}";
                            ctx.ProtocolMessage.RedirectUri = appBaseUrl;
                            ctx.ProtocolMessage.PostLogoutRedirectUri = appBaseUrl;
                            return Task.FromResult(0);
                        },
                        SecurityTokenValidated = ctx =>
                        {
                            // ここで本当はテナントIDとかのチェックをする
                            var issuer = ctx.AuthenticationTicket.Identity.FindFirst("iss").Value;
                            var upn = ctx.AuthenticationTicket.Identity.FindFirst(ClaimTypes.Name).Value;
                            var tenantId = ctx.AuthenticationTicket.Identity.FindFirst("http://schemas.microsoft.com/identity/claims/tenantid").Value;

                            // 上記値をチェックして不正なテナントやユーザーだったら// SecurityTokenValidationExceptionを投げるreturn Task.FromResult(0);
                        },
                        AuthenticationFailed = ctx =>
                        {
                            // エラーの時のリダイレクト
                            ctx.OwinContext.Response.Redirect("/Home/Error");
                            ctx.HandleResponse();
                            return Task.FromResult(0);
                        }
                    }
                });
        }
    }
}
画面の作成
サインインして情報を表示するプログラムを書いてみましょう。HomeControllerを以下のように書き換えます。
using System;
using System.Collections.Generic;
using System.IdentityModel.Claims;
using System.Linq;
using System.Web;
using System.Web.Mvc;

namespace MultiTenantApp.Controllers
{
    [Authorize]
    publicclass HomeController : Controller
    {
        // GET: Homepublic ActionResult Index()
        {
            var ctx = this.HttpContext.GetOwinContext();
            var issuer = ctx.Authentication.User.FindFirst("iss").Value;
            var upn = ctx.Authentication.User.FindFirst(ClaimTypes.Name).Value;
            var tenantId = ctx.Authentication.User.FindFirst("http://schemas.microsoft.com/identity/claims/tenantid").Value;

            this.ViewBag.Issuer = issuer;
            this.ViewBag.Upn = upn;
            this.ViewBag.TenantId = tenantId;

            return View();
        }

        public ActionResult SignOut()
        {
            this.HttpContext.GetOwinContext().Authentication.SignOut();
            return Redirect("/Home");
        }
    }
}
Authorize属性をつけている点とOwinContext経由で認証情報を取っているところがポイントです。
Index.cshtmlでは以下のようにViewBagの情報を画面に出しています。
@{
    ViewBag.Title = "Index";
}

<h2>Index</h2><ul><li>@this.ViewBag.Issuer</li><li>@this.ViewBag.Upn</li><li>@this.ViewBag.TenantId</li></ul>
Web.configへの設定の追加
Web.configに設定を追加します。ADにアプリ作ったときに取得できるクライアントIDとキーをappSettingsのida:ClientIdとida:Passwordに設定します。
<add key="ida:ClientId"value="クライアントID" /><add key="ida:Password"value="パスワード" />
実行して動作確認
デプロイして実行してみると以下のようにログイン画面が出ます。(httpsでアクセスしてね) ログインが求められるのでお手持ちのAzure ADのテナントに登録されているユーザーでログインしてみます。(無ければAzureクラシックポータルから作ってください)
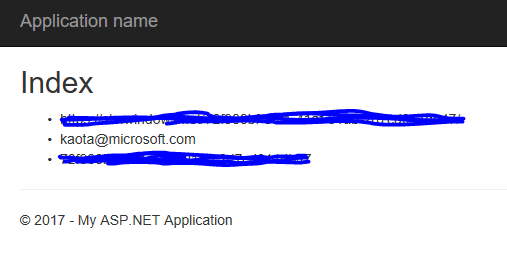
ログインすると、以下のように情報が表示されます。

テナントIDの取得方法
Azure ADのテナントIDの取得方法ですが、以下のようにして取得できるみたいです。
以下のURLにアクセス
https://login.windows.net/YOURDIRECTORYNAME.onmicrosoft.com/.well-known/openid-configuration
出てきたJSONのauthorization_endpointにあるGUIDっぽいのがテナントIDになります。