しばらく目を離してると手順がガラッと変わっててびっくりしてる今日この頃。
WPF on .NET Core 3.0 で XAML Islands を試してみたいと思います。
プロジェクトの構成
前は WPF プロジェクトにライブラリ追加して…という感じだったのですが今は UWP プロジェクトを追加して…となってました。びっくり。 ということで一般的な XAML Islands を WPF で使う場合は、以下の 3 プロジェクト構成になることが多い感じです。
- UWPApp (普通の UWP アプリプロジェクト)
- UserControlLibrary (UWP のクラスライブラリ)
- WPFApp (普通の WPF アプリプロジェクト)
UWPApp プロジェクトは XAML Islands を WPF でホストするための特殊な XamlApplication クラスをアプリケーションプロジェクトに持つ UWP アプリです。WPFApp から参照して使います。
UserControlLibrary は UWP のクラスライブラリプロジェクトで、UWP のユーザーコントロールを作って WPF アプリに追加したい場合は、ここに定義します。
WPFApp プロジェクトは、UWPApp と UserControlLibrary プロジェクトを参照していて Microsoft.Toolkit.Wpf.UI.Controlsパッケージを参照に追加してます。
やってみよう
空のソリューションから始めてみます。
UWP プロジェクトの作成
まず、普通の UWP アプリケーションを作成します。選択する Windows のバージョンは 1903 です。XAML Islands の現在の対応バージョンです。ここら辺は来年出るという Windows UI Library 3.0 が出ると Creators Update 以降に対応になりますが今のところ 1903 です。

MainPage.xaml/MainPage.xaml.csは使わないので消します。
さて、ここから追加するライブラリーは基本的に何も言及していない場合は、最新のプレビューバージョンです。
UWP のプロジェクトに Microsoft.Toolkit.Win32.UI.XamlApplicationの NuGet パッケージを追加します。
追加したら App.xaml を以下のように書き換えます。
<xaml:XamlApplicationx:Class="UWPApp.App"xmlns="http://schemas.microsoft.com/winfx/2006/xaml/presentation"xmlns:x="http://schemas.microsoft.com/winfx/2006/xaml"xmlns:xaml="using:Microsoft.Toolkit.Win32.UI.XamlHost"xmlns:local="using:UWPApp"></xaml:XamlApplication>
そして App.xaml.cs を以下のようにします。シンプルですね。
using Microsoft.Toolkit.Win32.UI.XamlHost;

namespace UWPApp
{
    sealedpartialclass App : XamlApplication
    {
        public App()
        {
            Initialize();
        }
    }
}
WPF プロジェクトの作成
.NET Core の WPF プロジェクトを作って Microsoft.Toolkit.Wpf.UI.Controlsの NuGet パッケージを追加します。
そして、UWP プロジェクトへの参照を WPF のプロジェクトに追加します。

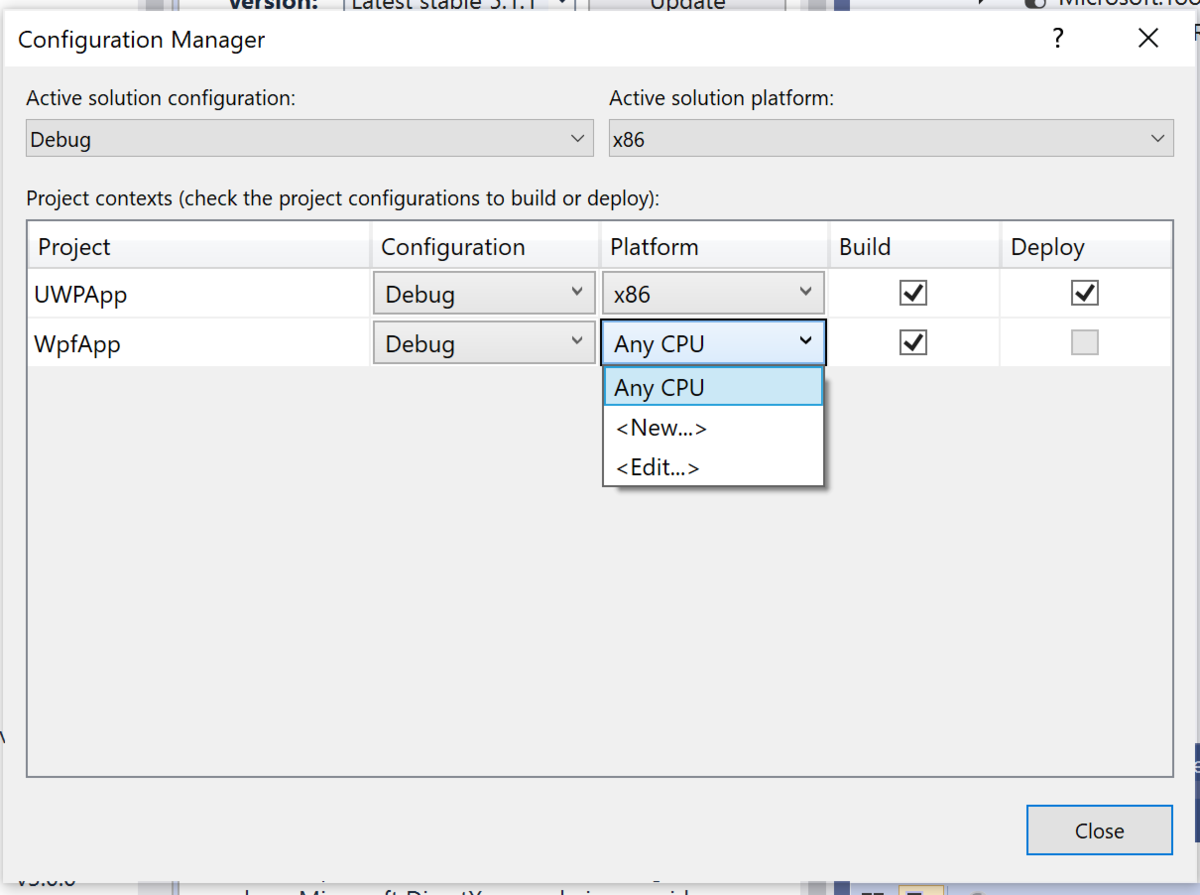
Configuration Manager (Visual Studio のツールバーの x86 とか書いてある部分のドロップダウンから開けたりします)で WPF のプロジェクトが Any CPU になっているものを x86 のときは x86、x64 のときは x64 になるように変更します。Debug と Release 両方で構成しておきましょう。

コントロールを置いてみよう
InkCanvas などのラップ済みコントロールがある場合はそれをそのまま置いたりできます。無い場合は WindowsXamlHostクラスで InitialTypeNameプロパティに型名を指定して、ChildChangedイベントでコントロールのプロパティを設定します。
例えば、TextBox を指定したい場合はこんな感じ。
<Window x:Class="WpfApp.MainWindow"xmlns="http://schemas.microsoft.com/winfx/2006/xaml/presentation"xmlns:x="http://schemas.microsoft.com/winfx/2006/xaml"xmlns:d="http://schemas.microsoft.com/expression/blend/2008"xmlns:mc="http://schemas.openxmlformats.org/markup-compatibility/2006"xmlns:local="clr-namespace:WpfApp"xmlns:xaml="clr-namespace:Microsoft.Toolkit.Wpf.UI.XamlHost;assembly=Microsoft.Toolkit.Wpf.UI.XamlHost"mc:Ignorable="d"Title="MainWindow"Height="450"Width="800"><Grid><xaml:WindowsXamlHost InitialTypeName="Windows.UI.Xaml.Controls.TextBox"ChildChanged="WindowsXamlHost_ChildChanged" /></Grid></Window>
using Microsoft.Toolkit.Wpf.UI.XamlHost;
using System;
using System.Windows;

namespace WpfApp
{
    /// <summary>/// Interaction logic for MainWindow.xaml/// </summary>publicpartialclass MainWindow : Window
    {
        public MainWindow()
        {
            InitializeComponent();
        }

        privatevoid WindowsXamlHost_ChildChanged(object sender, EventArgs e)
        {
            var host = (WindowsXamlHost)sender;
            var textBox = host.Child as Windows.UI.Xaml.Controls.TextBox;
            if (textBox != null)
            {
                textBox.PlaceholderText = "xxxxxxx";
            }
        }
    }
}
これで実行すると、WPF には無い(何故無い)ウォータマークのついた TextBox が出来ます。

こんなのは望んでない
俺は XAML で書きたいんだ!!InkCanvasとかは提供されてるということは、何か方法があるはずだ!ということでリポジトリで InkCanvasの実装を見ます。
ふむふむ、WindowsXamlHostBaseクラスを継承して作るのね…ということでこんな感じで
using System;
using System.Windows;
using UWP = Windows.UI.Xaml.Controls;

namespace WpfApp
{
    publicclass UwpTextBox : Microsoft.Toolkit.Wpf.UI.XamlHost.WindowsXamlHostBase
    {
        publicstring PlaceholderText
        {
            get { return (string)GetValue(PlaceholderTextProperty); }
            set { SetValue(PlaceholderTextProperty, value); }
        }

        publicstaticreadonly DependencyProperty PlaceholderTextProperty =
            DependencyProperty.Register("PlaceholderText", typeof(string), typeof(UwpTextBox), new PropertyMetadata(null));

        publicstring Text
        {
            get { return (string)GetValue(TextProperty); }
            set { SetValue(TextProperty, value); }
        }

        publicstaticreadonly DependencyProperty TextProperty =
            DependencyProperty.Register("Text", typeof(string), typeof(UwpTextBox), new PropertyMetadata(null));

        public UwpTextBox() : base(typeof(UWP.TextBox).FullName)
        {
        }

        protectedoverridevoid OnInitialized(EventArgs e)
        {
            // Bind dependency properties across controls// properties of FrameworkElement
            Bind(nameof(Style), StyleProperty, UWP.TextBox.StyleProperty);
            Bind(nameof(MaxHeight), MaxHeightProperty, UWP.TextBox.MaxHeightProperty);
            Bind(nameof(FlowDirection), FlowDirectionProperty, UWP.TextBox.FlowDirectionProperty);
            Bind(nameof(Margin), MarginProperty, UWP.TextBox.MarginProperty);
            Bind(nameof(HorizontalAlignment), HorizontalAlignmentProperty, UWP.TextBox.HorizontalAlignmentProperty);
            Bind(nameof(VerticalAlignment), VerticalAlignmentProperty, UWP.TextBox.VerticalAlignmentProperty);
            Bind(nameof(MinHeight), MinHeightProperty, UWP.TextBox.MinHeightProperty);
            Bind(nameof(Height), HeightProperty, UWP.TextBox.HeightProperty);
            Bind(nameof(MinWidth), MinWidthProperty, UWP.TextBox.MinWidthProperty);
            Bind(nameof(MaxWidth), MaxWidthProperty, UWP.TextBox.MaxWidthProperty);
            Bind(nameof(UseLayoutRounding), UseLayoutRoundingProperty, UWP.TextBox.UseLayoutRoundingProperty);
            Bind(nameof(Name), NameProperty, UWP.TextBox.NameProperty);
            Bind(nameof(Tag), TagProperty, UWP.TextBox.TagProperty);
            Bind(nameof(DataContext), DataContextProperty, UWP.TextBox.DataContextProperty);
            Bind(nameof(Width), WidthProperty, UWP.TextBox.WidthProperty);

            Bind(nameof(Text), TextProperty, UWP.TextBox.TextProperty);
            Bind(nameof(PlaceholderText), PlaceholderTextProperty, UWP.TextBox.PlaceholderTextProperty);

            base.OnInitialized(e);
        }
    }
}
そして、MainWindow.xaml で、これを使います。
<Window x:Class="WpfApp.MainWindow"xmlns="http://schemas.microsoft.com/winfx/2006/xaml/presentation"xmlns:x="http://schemas.microsoft.com/winfx/2006/xaml"xmlns:d="http://schemas.microsoft.com/expression/blend/2008"xmlns:mc="http://schemas.openxmlformats.org/markup-compatibility/2006"xmlns:local="clr-namespace:WpfApp"mc:Ignorable="d"Title="MainWindow"Height="450"Width="800"><Grid><local:UwpTextBox PlaceholderText="xxxxxxx" /></Grid></Window>
実行すると、同じ結果ですけど XAML が健康的になりました。

ユーザーコントロールを使いたい
UWP のクラスライブラリープロジェクト(ターゲットは 1903)をつくって、そこにユーザーコントロールを追加します。
プロジェクトをアンロードして、</Project>の前の行に以下の定義を追加します。
<PropertyGroup><EnableTypeInfoReflection>false</EnableTypeInfoReflection><EnableXBindDiagnostics>false</EnableXBindDiagnostics></PropertyGroup>
プロジェクトをロードして WPF と UWP のプロジェクトの両方に参照を追加します。
そして、ユーザーコントロールを追加して XAML を以下のようにします。
<UserControlx:Class="MyUserControls.MyUserControl1"xmlns="http://schemas.microsoft.com/winfx/2006/xaml/presentation"xmlns:x="http://schemas.microsoft.com/winfx/2006/xaml"xmlns:local="using:MyUserControls"xmlns:d="http://schemas.microsoft.com/expression/blend/2008"xmlns:mc="http://schemas.openxmlformats.org/markup-compatibility/2006"mc:Ignorable="d"d:DesignHeight="300"d:DesignWidth="400"><StackPanel><TextBox /><Button Content="Greet" /></StackPanel></UserControl>
WindowsXamlHostでさくっと WPF 上に置きます。
<Window x:Class="WpfApp.MainWindow"xmlns="http://schemas.microsoft.com/winfx/2006/xaml/presentation"xmlns:x="http://schemas.microsoft.com/winfx/2006/xaml"xmlns:d="http://schemas.microsoft.com/expression/blend/2008"xmlns:mc="http://schemas.openxmlformats.org/markup-compatibility/2006"xmlns:local="clr-namespace:WpfApp"xmlns:xamlhost="clr-namespace:Microsoft.Toolkit.Wpf.UI.XamlHost;assembly=Microsoft.Toolkit.Wpf.UI.XamlHost"mc:Ignorable="d"Title="MainWindow"Height="450"Width="800"><Grid><xamlhost:WindowsXamlHost InitialTypeName="MyUserControls.MyUserControl1" /></Grid></Window>
おk

これも XAML の平和のためにラッパ=を作ろうとしたらアプリが落ちました。残念。
ViewModel を共有したい
これは試行錯誤中ですが、動くのは出来ました。
WPF 側のプロジェクトに Prism.Core (stable 版の最新) を入れます。
そして、適当に ViewModel をこしらえます。
using Prism.Commands;
using Prism.Mvvm;

namespace WpfApp
{
    publicclass MainWindowViewModel : BindableBase
    {
        privatestring _input;
        publicstring Input
        {
            get { return _input; }
            set { SetProperty(ref _input, value); }
        }

        privatestring _output;
        publicstring Output
        {
            get { return _output; }
            set { SetProperty(ref _output, value); }
        }

        private DelegateCommand _convertCommand;
        public DelegateCommand ConvertCommand =>
            _convertCommand ?? (_convertCommand = new DelegateCommand(ExecuteConvertCommand, CanExecuteConvertCommand)
                .ObservesProperty(() => Input));

        privatevoid ExecuteConvertCommand()
        {
            Output = Input.ToUpper();
        }

        privatebool CanExecuteConvertCommand()
        {
            return !string.IsNullOrWhiteSpace(Input);
        }
    }
}
そして Window の DataContext に設定します。ついでに Output プロパティを WPF の TextBlock にバインドしておきます。
<Window x:Class="WpfApp.MainWindow"xmlns="http://schemas.microsoft.com/winfx/2006/xaml/presentation"xmlns:x="http://schemas.microsoft.com/winfx/2006/xaml"xmlns:d="http://schemas.microsoft.com/expression/blend/2008"xmlns:mc="http://schemas.openxmlformats.org/markup-compatibility/2006"xmlns:local="clr-namespace:WpfApp"xmlns:xamlhost="clr-namespace:Microsoft.Toolkit.Wpf.UI.XamlHost;assembly=Microsoft.Toolkit.Wpf.UI.XamlHost"mc:Ignorable="d"Title="MainWindow"Height="450"Width="800"><Window.DataContext><local:MainWindowViewModel /></Window.DataContext><StackPanel><xamlhost:WindowsXamlHost InitialTypeName="MyUserControls.MyUserControl1"ChildChanged="WindowsXamlHost_ChildChanged" /><TextBlock Text="{Binding Output}" /></StackPanel></Window>
WindowsXamlHost の ChildChanged イベントで DataContext を伝搬させます。
using Microsoft.Toolkit.Wpf.UI.XamlHost;
using MyUserControls;
using System;
using System.Windows;

namespace WpfApp
{
    /// <summary>/// Interaction logic for MainWindow.xaml/// </summary>publicpartialclass MainWindow : Window
    {
        public MainWindow()
        {
            InitializeComponent();
        }

        privatevoid WindowsXamlHost_ChildChanged(object sender, EventArgs e)
        {
            var host = (WindowsXamlHost)sender;
            var control = host.Child as MyUserControl1;
            if (control != null)
            {
                control.DataContext = DataContext;
            }
        }
    }
}
そして UWP 側のユーザーコントロールで Binding します。(x:Bindじゃないのが残念な点)
<UserControlx:Class="MyUserControls.MyUserControl1"xmlns="http://schemas.microsoft.com/winfx/2006/xaml/presentation"xmlns:x="http://schemas.microsoft.com/winfx/2006/xaml"xmlns:local="using:MyUserControls"xmlns:d="http://schemas.microsoft.com/expression/blend/2008"xmlns:mc="http://schemas.openxmlformats.org/markup-compatibility/2006"mc:Ignorable="d"d:DesignHeight="300"d:DesignWidth="400"><StackPanel><TextBox Text="{Binding Input, Mode=TwoWay, UpdateSourceTrigger=PropertyChanged}"/><Button Content="Greet"Command="{Binding ConvertCommand}"/></StackPanel></UserControl>
OK 動いた。

デプロイどうするの?
WPF のプロジェクトを publish するとエラー。

Visual Studio の Configuration を Release にすると Visual Studio がフリーズ。(待てば戻ってくるのかな…?)

とりあえず時間切れなのでデプロイなどについては後日調べてみることにします。