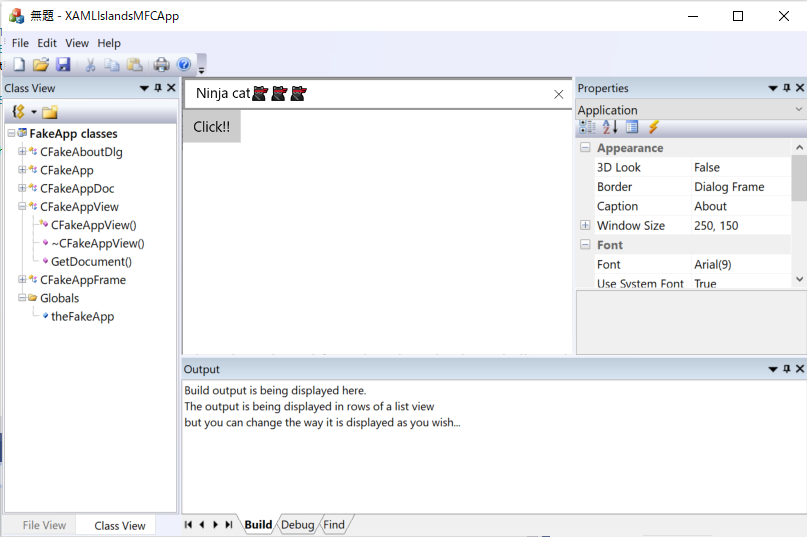
MFC に UWP のコントロール置けるってさ。
やってみよう
MFC アプリを新規作成します。今回は XAMLIslandsMFCApp という名前で SDI アプリケーションでいってみたいと思います。残りはデフォの設定で作成!実行するとこんな感じです。 懐かしい。(Borland C++ Builder を昔はメインに使ってたけど、少しだけ MFC もかじってた)

パッケージングしよう
とりあえず msix にパッケージングします。しなくてもできるのですが、なんか自分のところだとうまくいかなかったので今回は妥協という感じで。 Windows アプリケーション パッケージ プロジェクトをさくっと追加してアプリケーションノードに MFC アプリのプロジェクトを追加します。
現時点では Windows 10 1903 でしかサポートされてないので、プロジェクトを作るときは Target version と Minimum version できちんと 1903 を選びましょう。

ソリューションエクスプローラーは以下のような感じになります。

次に MFC アプリに C++/WinRT の NuGet パッケージを追加します。
- Microsoft.Windows.CppWinRT
そして XAML Islands 用のパッケージも追加します。
- Microsoft.Toolkit.Win32.UI.SDK (現時点では rc1 なのでプレビューパッケージにチェックを入れてインストールしてください)
pch.hに XAML Islands 関連や UWP 関連のヘッダーファイルの includeを追加します。pragmaや undefは、今のところこれを追加しないとコンパイルエラーになるバグの回避用です。将来的にはいらなくなるでしょう。ここか、各ファイルに使う機能の入ったヘッダーファイルの include を追加します。
// pch.h: This is a precompiled header file.// Files listed below are compiled only once, improving build performance for future builds.// This also affects IntelliSense performance, including code completion and many code browsing features.// However, files listed here are ALL re-compiled if any one of them is updated between builds.// Do not add files here that you will be updating frequently as this negates the performance advantage.#ifndef PCH_H#define PCH_H// add headers that you want to pre-compile here#include "framework.h"#pragma push_macro("TRY")#undef GetCurrentTime#undef TRY#include <winrt/base.h>#include <winrt/Windows.Foundation.h>#include <winrt/Windows.Foundation.Collections.h>#include <winrt/Windows.UI.Xaml.h>#include <winrt/Windows.UI.Xaml.Controls.h>#include <winrt/Windows.UI.Xaml.Controls.Primitives.h>#include <winrt/Windows.UI.Xaml.Hosting.h>#include <winrt/Windows.UI.Popups.h>#include <windows.ui.xaml.hosting.desktopwindowxamlsource.h>#pragma pop_macro("TRY")#pragma pop_macro("GetCurrentTime") #endif//PCH_H
XAMLIslandsMFCApp.hを開いて CXAMLIslandsMFCAppApp (プロジェクトの名前付けミスった…!) クラスの private なメンバー変数に winrt::Windows::UI::Xaml::Hosting::WindowsXamlManager型の変数を追加します。
class CXAMLIslandsMFCAppApp : public CWinAppEx
{
public:
    CXAMLIslandsMFCAppApp() noexcept;

private:
    winrt::Windows::UI::Xaml::Hosting::WindowsXamlManager _windowsXamlManager{ nullptr }; // add// Overridespublic:
    virtual BOOL InitInstance();
    virtualint ExitInstance();

// Implementation
    UINT  m_nAppLook;
    BOOL  m_bHiColorIcons;

    virtualvoid PreLoadState();
    virtualvoid LoadCustomState();
    virtualvoid SaveCustomState();

    afx_msg void OnAppAbout();
    DECLARE_MESSAGE_MAP()
};
そして CXAMLIslandsMFCAppAppクラスの InitInstanceメソッドの CWinAppEx::InitInstanceメソッドの呼び出しの前あたりに XAML Islands の初期化処理を書きます。
BOOL CXAMLIslandsMFCAppApp::InitInstance()
{
    // InitCommonControlsEx() is required on Windows XP if an application// manifest specifies use of ComCtl32.dll version 6 or later to enable// visual styles.  Otherwise, any window creation will fail.
    INITCOMMONCONTROLSEX InitCtrls;
    InitCtrls.dwSize = sizeof(InitCtrls);
    // Set this to include all the common control classes you want to use// in your application.
    InitCtrls.dwICC = ICC_WIN95_CLASSES;
    InitCommonControlsEx(&InitCtrls);

    winrt::init_apartment(winrt::apartment_type::single_threaded); // add
    _windowsXamlManager = winrt::Windows::UI::Xaml::Hosting::WindowsXamlManager::InitializeForCurrentThread(); // add

    CWinAppEx::InitInstance();

        ... 省略 ...
}
これで下準備が出来ました。コントロールを追加していきます。
CXAMLIslandsMFCAppViewクラスに XAML Islands をホストするウィンドウを管理してくれる winrt::Windows::UI::Xaml::Hosting::DesktopWindowXamlSourceクラスのメンバー変数を作ります。
private:
    winrt::Windows::UI::Xaml::Hosting::DesktopWindowXamlSource _xamlIsland{ nullptr };
クラスウィザードを使って CXAMLIslandsMFCAppViewクラスに WM_CREATEと WM_CLOSEと WM_SIZEのメッセージハンドラーを追加します。
OnCreateメソッドで DesktopWindowXamlSourceのインスタンスを作ってコントロールを置いていきます。
int CXAMLIslandsMFCAppView::OnCreate(LPCREATESTRUCT lpCreateStruct)
{
    if (CView::OnCreate(lpCreateStruct) == -1)
        return -1;

    // create a DesktopWindowXamlSource instance
    _xamlIsland = winrt::Windows::UI::Xaml::Hosting::DesktopWindowXamlSource{};
    auto interop = _xamlIsland.as<IDesktopWindowXamlSourceNative>();
        // attach to current view
    interop->AttachToWindow(GetSafeHwnd());

    // create uwp controls
    winrt::Windows::UI::Xaml::Controls::TextBox textBox;
    winrt::Windows::UI::Xaml::Controls::Button button;
    button.Content(winrt::box_value(winrt::hstring(L"Click!!")));

    winrt::Windows::UI::Xaml::Controls::StackPanel panel;
    panel.Children().Append(textBox);
    panel.Children().Append(button);
    // set the uwp control instance to the DesktopWindowXamlSource instance
    _xamlIsland.Content(panel);

    return0;
}
DesktopWindowXamlSourceがウィンドウで、この上に UWP のコントロールが置けます。そして、このウィンドウに UWP のコントロールを置く感じです。
OnCloseでは後しますをします。
void CXAMLIslandsMFCAppView::OnClose()
{
    _xamlIsland.Close();
    _xamlIsland = nullptr;

    CView::OnClose();
}
OnSizeではViewのサイズに応じて DesktopWindowXamlSourceのサイズを調整します。
void CXAMLIslandsMFCAppView::OnSize(UINT nType, int cx, int cy)
{
    CView::OnSize(nType, cx, cy);

    // fit to this viewauto interop = _xamlIsland.as<IDesktopWindowXamlSourceNative>();
    HWND islandHwnd = NULL;
    winrt::check_hresult(interop->get_WindowHandle(&islandHwnd));
    RECT viewRect{};
    GetWindowRect(&viewRect);
    ::SetWindowPos(islandHwnd, NULL, 0, 0,  viewRect.right - viewRect.left, viewRect.bottom - viewRect.top, SWP_SHOWWINDOW);
    auto p = _xamlIsland.Content().as<winrt::Windows::UI::Xaml::Controls::StackPanel>();
    p.UpdateLayout();
}
実行してみましょう。UWP のコントロールが表示されます。

イベントハンドラーも追加してみましょう。
イベント購読解除用の winrt::event_revokerとイベントハンドラー用のメンバー関数を CXAMLIslandsMFCAppViewに追加します。
private:
    winrt::Windows::UI::Xaml::Controls::Button::Click_revoker _clickRevoker;
    winrt::Windows::Foundation::IAsyncAction OnButtonClick(winrt::Windows::Foundation::IInspectable const& sender, winrt::Windows::UI::Xaml::RoutedEventArgs const& e);
OnCreateでイベントの登録処理を追加して
// ボタンを作った直後くらいにこの処理を入れる
_clickRevoker = button.Click(winrt::auto_revoke, { this, &CXAMLIslandsMFCAppView::OnButtonClick });
OnCloseには購読解除処理も入れておきます。
void CXAMLIslandsMFCAppView::OnClose()
{
    _clickRevoker.revoke();
    _xamlIsland.Close();
    _xamlIsland = nullptr;

    CView::OnClose();
}
そして、イベントハンドラーに適当に処理を追加します。今回は入力した内容をそのままメッセージボックスに出します。
winrt::Windows::Foundation::IAsyncAction CXAMLIslandsMFCAppView::OnButtonClick(winrt::Windows::Foundation::IInspectable const& sender, winrt::Windows::UI::Xaml::RoutedEventArgs const& e)
{
    auto input = _xamlIsland
        .Content()
        .as<winrt::Windows::UI::Xaml::Controls::StackPanel>()
        .Children()
        .GetAt(0)
        .as<winrt::Windows::UI::Xaml::Controls::TextBox>()
        .Text();
    winrt::Windows::UI::Popups::MessageDialog dialog{ input };
    co_await dialog.ShowAsync();
}
実行すると、こんな感じになります。

まとめ
ここまでで見た目は出来た雰囲気です。 でもフォーカス制御やメッセージをディスパッチしてあげるなどの処理がまだ必要です…。つらたん…。詳細はここにあるのですがまだよくわからんのですよ。