ReactivePropertyとは
Reactive ExtensionsをベースとしたMVVMパターンのアプリケーションの作成をサポートするためのライブラリです。特徴としては、Reactive Extensionsをベースとしているため、全てをIObservable
サポートしているプラットフォーム
現時点の最新版(0.4.5-beta3)で以下のプラットフォームをサポートしてます。
- WPF(.NET4, .NET4.5)
- Windows store app 8.1
- Windows Phone 8, 8.1
- Universal Windows app
- MonoAndroid(alphaチャネルで動作確認)
- MonoTouch(環境が無いから試せてないけど恐らく…)
基本機能
ReactivePropertyは、名前の通りReactiveProperty<T>クラスをViewModelクラスのプロパティとして定義します。そのかわりMVVMフレームワークと異なり、ViewModelの基本型を強制することはありません。
ReactivePropertyクラス
ReactivePropertyクラスは、以下の機能を持つクラスです。
- Valueプロパティで現在の値を設定・取得
- Valueプロパティの値が変かする度に以下の動作をする
- IObservableのOnNextが発生する
- PropertyChangedイベントが発生する
- 値の検証を設定してる場合は、ObserveErrorChangedにエラーがOnNextで通知される
プロパティ自体がIObservableで、プロパティのエラーもIObservableとして表現されているのが特徴です。
ReactivePropertyの作成方法
ReactivePropertyクラスの特徴がわかったので、次は作り方です。int型の値を持つReactivePropertyの作り方。
new ReactiveProperty<int>();
シンプルにnewで作れます。こういうシンプルさ大事だと思います。では、初期値100の場合は?
new ReactiveProperty<int>(100);
コンストラクタで指定できます。そして、特徴的なのがIObservable<T>からReactivePropertyへの変換が出来る点です。
Subject<int> s = new Subject<int>();
ReactiveProperty<int> p = s.ToReactiveProperty(); // IO<T> -> RxProp<T>へ変換
基本的に、この3つのインスタンス化の方法を使ってReactivePropertyをつくります。
使用例
ReactivePropertyを使用したシンプルなViewModelクラスの定義は、以下のようになります。
publicclass MainViewModel
{
    public ReactiveProperty<string> Input { get; private set; }

    public ReactiveProperty<string> Output { get; private set; }

    public MainViewModel()
    {
        // 通常のインスタンス化this.Input = new ReactiveProperty<string>();

        // ReactiveProperty<T>はIObservable<T>なので、LINQで変換してToReactivePropertyで// ReactiveProperty化。this.Output = this.Input
            .Select(s => s != null ? s.ToUpper() : null)
            .ToReactiveProperty();
    }
}
これをDataContextに設定して画面にバインドするとこうなります。
<Windowxmlns="http://schemas.microsoft.com/winfx/2006/xaml/presentation"xmlns:x="http://schemas.microsoft.com/winfx/2006/xaml"xmlns:local="clr-namespace:WpfApplication9"x:Class="WpfApplication9.MainWindow"Title="MainWindow"Height="350"Width="525"><Window.DataContext><local:MainViewModel/></Window.DataContext><StackPanel><TextBox Text="{Binding Input.Value, Mode=TwoWay, UpdateSourceTrigger=PropertyChanged}" /><TextBlock Text="{Binding Output.Value}" /></StackPanel></Window>

Inputプロパティの値が変換されてOutputに流れていることがわかると思います。この例では単純に入力→変換→出力をVとVM内で完結させていますが、MVVMすべての層で一連の流れとして記述するのがReactivePropertyの特徴になります。
IObservableじゃないものとの接続
世の中、全てがIO<T>だったらいいのですが、一般的なPOCOなどはそうじゃありません。そういうもののためにINotifyPropertyChangedのPropertyChangedイベントをIO
以下のようなカウンタークラスがあるとします。
publicclass Counter : INotifyPropertyChanged
{

    publicevent PropertyChangedEventHandler PropertyChanged;

    privateint count;

    publicint Count
    {
        get { returnthis.count; }
        privateset
        {
            this.count = value;
            var h = this.PropertyChanged;
            if (h != null)
            {
                h(this, new PropertyChangedEventArgs("Count"));
            }
        }
    }

    publicvoid Increment()
    {
        this.Count++;
    }

    publicvoid Decriment()
    {
        this.Count--;
    }
}
このクラスのCountプロパティの連続的な変化をIO
publicclass MainViewModel
{
    private Counter counter = new Counter();

    public ReactiveProperty<int> Count { get; private set; }

    public MainViewModel()
    {
        this.Count = this.counter
            // IO<T>に変換するプロパティを指定
            .ObserveProperty(c => c.Count)
            // IO<T>になったのでReactivePropertyに変換可能
            .ToReactiveProperty();

    }
}
このように、POCOのModelとの接続も行えます。
コマンドはIObservable<bool>とIObservable<object>
ReactivePropertyが提供するICommandの実装は、ReactiveCommandといいます。ReactivePropertyでは、ICommandのCanExecuteChangedイベントをIObservable<bool>とみなして、IObservable<bool>からReactiveCommandを生成する機能を提供しています。
ReactiveCommandのExecuteメソッドは、IObservable<T>として動作します。
var s = new Subject<bool>(); // 何かのIO<bool>
ReactiveCommand command = s.ToReactiveCommand(); // コマンドに変換
command.Subscrive(_ =>
{
  // コマンドのExecute時の処理
});
例えば、先ほどのCounterクラスが10になるまでインクリメントできて、0になるまでデクリメントできる2つのコマンドを持ったViewModelクラスは以下のようになります。
publicclass MainViewModel
{
    private Counter counter = new Counter();

    public ReactiveProperty<int> Count { get; private set; }

    public ReactiveCommand IncrementCommand { get; private set; }

    public ReactiveCommand DecrementCommand { get; private set; }

    public MainViewModel()
    {
        this.Count = this.counter
            // IO<T>に変換するプロパティを指定
            .ObserveProperty(c => c.Count)
            // IO<T>になったのでReactivePropertyに変換可能
            .ToReactiveProperty();

        // Countの値が10以下の場合インクリメント出来るthis.IncrementCommand = this.Count
            // IO<bool>へ変換
            .Select(i => i < 10)
            // コマンドへ変換
            .ToReactiveCommand();
        // Executeが呼ばれたらインクリメントthis.IncrementCommand
            .Subscribe(_ => this.counter.Increment());

        // Countの値が0より大きい場合デクリメントできるthis.DecrementCommand = this.Count
            // IO<bool>へ変換
            .Select(i => i > 0)
            // コマンドへ変換
            .ToReactiveCommand();
        // Executeが呼ばれたらデクリメントthis.DecrementCommand
            .Subscribe(_ => this.counter.Decriment());

    }
}
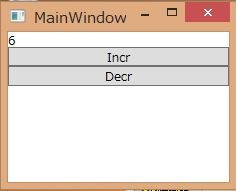
このViewModelを以下のようなViewと接続します。
<Windowxmlns="http://schemas.microsoft.com/winfx/2006/xaml/presentation"xmlns:x="http://schemas.microsoft.com/winfx/2006/xaml"xmlns:local="clr-namespace:WpfApplication9"x:Class="WpfApplication9.MainWindow"Title="MainWindow"Height="350"Width="525"><Window.DataContext><local:MainViewModel/></Window.DataContext><StackPanel><TextBlock Text="{Binding Count.Value}" /><Button Content="Incr"Command="{Binding IncrementCommand, Mode=OneWay}"/><Button Content="Decr"Command="{Binding DecrementCommand, Mode=OneWay}"/></StackPanel></Window>
Countの値の変化に応じて自動的に実行可否が変わることが確認できます。


値の検証
ReactivePropertyには、入力値の検証機能も組み込まれています。一番簡単な検証は、アトリビュートで検証ルールを指定することです。検証ルールをReactiveProperty>T<のプロパティに設定して、インスタンスを作成するタイミングでSetValidateAttributeで自分自身が、なんのプロパティであるか指定する必要があります。
publicclass MainViewModel
{
    // System.ComponentModel.DataAnnotationsの属性で検証ルールを指定
    [Required(ErrorMessage = "必須です")]
    public ReactiveProperty<string> Input { get; private set; }

    public MainViewModel()
    {
        this.Input = new ReactiveProperty<string>()
            // 検証ルールをReactivePropertyに設定する
            .SetValidateAttribute(() => this.Input);
    }
}
以下のようにViewと接続すると、値の検証が働いていることがわかります。
<Windowxmlns="http://schemas.microsoft.com/winfx/2006/xaml/presentation"xmlns:x="http://schemas.microsoft.com/winfx/2006/xaml"xmlns:local="clr-namespace:WpfApplication9"x:Class="WpfApplication9.MainWindow"Title="MainWindow"Height="350"Width="525"><Window.DataContext><local:MainViewModel/></Window.DataContext><StackPanel><TextBox Text="{Binding Input.Value, UpdateSourceTrigger=PropertyChanged}" /></StackPanel></Window>


エラーメッセージを出すには、以下のようにObserveErrorChangedから目的のエラーメッセージだけを取り出すクエリを書けばOKです。
publicclass MainViewModel
{
    // System.ComponentModel.DataAnnotationsの属性で検証ルールを指定
    [Required(ErrorMessage = "必須です")]
    public ReactiveProperty<string> Input { get; private set; }

    public ReactiveProperty<string> InputErrorMessage { get; private set; }

    public MainViewModel()
    {
        this.Input = new ReactiveProperty<string>()
            // 検証ルールをReactivePropertyに設定する
            .SetValidateAttribute(() => this.Input);
        // エラーメッセージを出力するプロパティを作成するthis.InputErrorMessage = this.Input
            // エラーが発行されるIO<IE>を変換する
            .ObserveErrorChanged
            // エラーがない場合nullになるので空のIEにする
            .Select(e => e ?? Enumerable.Empty<object>())
            // 最初のエラーメッセージを取得する
            .Select(e => e.OfType<string>().FirstOrDefault())
            // ReactiveProperty化
            .ToReactiveProperty();
    }
}
このInputErrorMessageをXAMLでTextBlockにバインドすればエラーメッセージの表示が出来ます。
初期状態ではエラーメッセージは表示されません(仕様)

値を変更して、エラーの条件に合致するようになるとエラーが表示されます。

また、SetValidateNotifyErrorメソッドを使うことでカスタム検証ロジックを含めることができます。こちらはnullを返すことでエラーなし。それ以外の値を返すことで、エラーがあるという結果になります。 このメソッドで返した値はObserveErrorChangedに流れていきます。
コレクション
ReadOnlyReactiveCollection<T>を提供しています。これは読み取り専用のコレクションで、IObservable<CollectionChanged<T>>か、シンプルにIObservable<T>から生成する方法があります。前者は登録・更新・削除・リセットに対応していて、後者は、登録とリセットに対応しています。
ToReadOnlyReactoveCollectionは、値が発行されるたびにコレクションに値を追加します。オプションとして、何かOnNextが発生するとコレクションをリセットするIObservable<Unit>が渡せます。
例として、入力値のログをコレクションとして保持しているが、resetという入力がされるとクリアされるものを作ります。
publicclass MainViewModel
{
    public ReactiveProperty<string> Input { get; private set; }

    public ReadOnlyReactiveCollection<string> InputLog { get; private set; }

    public MainViewModel()
    {
        this.Input = new ReactiveProperty<string>();

        this.InputLog = this.Input
            // Inputの値が発行されるたびに追加されるコレクションを作成
            .ToReadOnlyReactiveCollection(
                // リセットのきっかけはInputがresetになったときthis.Input
                    .Where(s => s == "reset")
                    .Select(_ => Unit.Default));
    }
}
以下のような画面と紐づけて実行します。
<Windowxmlns="http://schemas.microsoft.com/winfx/2006/xaml/presentation"xmlns:x="http://schemas.microsoft.com/winfx/2006/xaml"xmlns:local="clr-namespace:WpfApplication9"x:Class="WpfApplication9.MainWindow"Title="MainWindow"Height="350"Width="525"><Window.DataContext><local:MainViewModel/></Window.DataContext><Grid><Grid.RowDefinitions><RowDefinition Height="Auto" /><RowDefinition /></Grid.RowDefinitions><TextBox Text="{Binding Input.Value, UpdateSourceTrigger=PropertyChanged}" /><ListBox Grid.Row="1"ItemsSource="{Binding InputLog}" /></Grid></Window>
入力値のログをとっているが

入力値がresetになるとクリアされる

細かな制御を行うコレクション
先ほど紹介した方法では、追加かリセットしかできないですが、これから紹介する方法では登録・更新・削除を制御することができます。
追加・更新・削除・リセットを制御するにはReactivePropertyのCollectionChanged>T<型のIObservableからToReadOnlyReactiveCollectionメソッドで作成します。
CollectionChanged<T>型には、staticメソッドでAdd, Remove, Replaceが定義されていて、static readonlyなフィールドでResetという値が定義されています。これらの値を流すIObservableを作成することで、柔軟にコレクションの変更が出来るようになります。例えば、ボタンが押された時間を表す文字列を記録するアプリを考えます。以下のように4つのコマンドと選択項目を表すプロパティ、そして、記録を残すコレクションをプロパティに持ち、これらを組み合わせて登録更新削除などを行います。
publicclass MainViewModel
{
    public ReactiveProperty<string> SelectedItem { get; private set; }
    public ReactiveCommand AddCommand { get; private set; }
    public ReactiveCommand ResetCommand { get; private set; }
    public ReactiveCommand UpdateCommand { get; private set; }
    public ReactiveCommand DeleteCommand { get; private set; }

    public ReadOnlyReactiveCollection<string> TimestampLog { get; private set; }

    public MainViewModel()
    {
        this.SelectedItem = new ReactiveProperty<string>();

        this.AddCommand = new ReactiveCommand();
        this.ResetCommand = new ReactiveCommand();
        this.UpdateCommand = this.SelectedItem.Select(v => v != null).ToReactiveCommand();
        this.DeleteCommand = this.SelectedItem.Select(v => v != null).ToReactiveCommand();

        this.TimestampLog = Observable.Merge(
            this.AddCommand
                .Select(_ => CollectionChanged<string>.Add(0, DateTime.Now.ToString())),
            this.ResetCommand.Select(_ => CollectionChanged<string>.Reset),
            this.UpdateCommand
                .Select(_ => this.SelectedItem.Value)
                .Select(v => CollectionChanged<string>.Replace(this.TimestampLog.IndexOf(v), DateTime.Now.ToString())),
            this.DeleteCommand
                .Select(_ => this.SelectedItem.Value)
                .Select(v => CollectionChanged<string>.Remove(this.TimestampLog.IndexOf(v))))
            .ToReadOnlyReactiveCollection();
    }
}
MergeメソッドでAddCommand、ResetCommand、UpdateCommand、DeleteCommandを1本のIObservable<CollectionChanged<T>>にまとめてからコレクションに変換しています。このような合成もReactivePropertyがIObservableである故の強みです。
他のMVVMライブラリとの連携
ReactivePropertyは、シンプルにプロパティとコマンドとコレクションと、いくつかのReactive Extensionsを拡張するユーテリティメソッドから構成されています。そのためMVVMのフル機能はカバーしていません(例としてメッセンジャーとか)。 これらの機能が必要な場合は、お好みのMVVMライブラリを使うことが出来ます。プロパティ定義とコマンドをRxPropertyにして、メッセンジャーを既存ライブラリのものにすればOKです。メッセンジャーをIObservableにする拡張メソッドを用意したり、逆の変換を行うメソッドを用意すると、よりシームレスに使えるようになるかもしれません。