Expressを使ってサーバーサイドをTypeScriptで開発。Reactを使ってクライアントサイドをTypeScriptで開発。 1言語で開発できるって素晴らしいことですよね。
個人的にはC#でやりたい!すごくやりたい!
環境
- Windows 10
- Visual Studio Code
- Node
npmで以下のコマンドがインストールされていること。
npm install -g typescript
npm install -g gulp
npm install -g tsd
npm install -g webpack
プロジェクトの作成
プロジェクトを作っていきます。といってもフォルダを作るところから。
mkdir typescriptapp
cd typescriptapp
そして、npm initでpackage.jsonを作っていきます。
npm init -y
そしたら、Visual Studio Codeを起動します。
code .
サーバーサイドの開発
サーバーサイドを作っていきます。expressを使って開発します。今回はあまり意味がないですがテンプレートエンジンにはjadeを使っていきたいと思います。
型定義ファイルのインストール
VS Codeを立ち上げたばかりですが、以下のコマンドをコマンドプロンプトで打ち込んで必要なパッケージをインストールします。
npm install --save express jade
サーバーサイドはserverフォルダで開発します。なのでserverフォルダを作ります。
mkdir server
cd server
serverフォルダに必要な型定義ファイルを作っていきます。
tsd init -y
tsd install express -save
TypeScriptの設定ファイルの準備
Visual Studio Codeでserverフォルダにtsconfig.jsonというファイルを作成します。 このファイルにTypeScriptの設定を記述していきます。 このファイルはインテリセンスが効くのでサクサクと書けます。
server/tsconfig.json
{"compilerOptions": {"module": "commonjs",
        "target": "es5"},
    "exclude": []}
TypeScriptファイルの作成
Expressのファイルを作っていきます。 まずはapp.tsです。
server/app.ts
import express = require('express');
import path = require('path');
import index from './routes/index';

var port = process.env.PORT || 3000;
var app = express();

app.set('views', path.resolve('./server/views'));
app.set('view engine', 'jade');

app.use(express.static(path.resolve('./server/public')));
app.use('/', index);

app.listen(port);
ここで読み込んでるroutes/indexは、以下のようなファイルです。indexにtitleを渡しているだけです。
server/routes/index.ts
import express = require('express');

var router = express.Router();

router.use('/', (req, res, next) => {
    res.render('index', { title: 'Hello TypeScript world!!'});
});

exportdefault router;
viewも作りましょう。
server/views/index.jade
html
    head
        meta(charset='utf-8')
        title= title
    body
        h1= title
gulpfileの作成
TypeScriptをコンパイルするタスクを書いていきます。必要なファイルをnpmでインストールします。
npm install gulp gulp-typescript gulp-sourcemaps --save-dev
そして、以下のようなgulpfile.jsを用意します。
gulpfile.js
var gulp = require('gulp');
var ts = require('gulp-typescript');
var sourcemaps = require('gulp-sourcemaps');

gulp.task('build', ['serverBuild']);

gulp.task('serverBuild', function() {var project = ts.createProject('./server/tsconfig.json');
    return gulp.src('./server/**/*.ts')
        .pipe(sourcemaps.init())
        .pipe(ts(project))
        .js
        .pipe(sourcemaps.write())
        .pipe(gulp.dest('./server'));
});
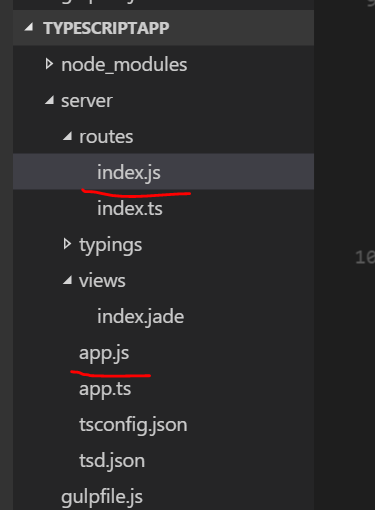
Visual Studio CodeでCtrl + Shift + Bを押すとbuildタスクが実行されます。app.jsとindex.jsが生成されたことが確認できると思います。

実行して動作確認
実行するためにF5を押してみます。 どの環境で実行するか聞かれるのでNode.jsを選択します。

生成されたJSONファイルのconfigurationsのprogramをserver/app.jsに書き換えて保存します。
.vscode/launch.json
{"version": "0.2.0",
    "configurations": [{"name": "Launch",
            "type": "node",
            "request": "launch",
            "program": "server/app.js",
            "stopOnEntry": false,
            "args": [],
            "cwd": ".",
            "runtimeExecutable": null,
            "runtimeArgs": ["--nolazy"],
            "env": {"NODE_ENV": "development"},
            "externalConsole": false,
            "sourceMaps": false,
            "outDir": null},
        {"name": "Attach",
            "type": "node",
            "request": "attach",
            "port": 5858
        }]}
F5を押すとデバッグ実行が始まります。http://localhost:3000にアクセスすると以下のようなページが表示されます。

サーバー側の土台が出来ました。
クライアントサイドの作成
次にクライアントサイドの開発を行います。
ライブラリのインストール
まず、必要なreactのインストールをします。コマンドプロンプトでプロジェクトのルートフォルダ(Visual Sutdio Codeの右クリックメニューからOpen in command plomptがお手軽)に移動して以下のコマンドを打ちます。
npm install react react-dom --save
フォルダの作成
クライアントサイドは、clientフォルダで開発を行います。続けて以下のコマンドを打ち込んでclientフォルダを作成します。
mkdir client
cd client
型定義ファイルのインストール
clientフォルダで以下のコマンドを打ち込んで型定義ファイルをインストールします。
tsd init -y
tsd install react react-dom -save
TypeScriptの設定ファイルの作成
サーバーサイドでも作成したtsconfig.jsonを作成します。クライアントサイドはreactを使うので、TypeScriptのコンパイルもreactに対応した設定を行います。
client/tsconfig.json
{"compilerOptions": {"target": "es5",
        "module": "commonjs",
        "jsx": "react",
        "sourceMap": true},
    "exclude": []}
スクリプトの作成
次にReactを使ったHello worldを書いていきます。
client/app.tsx
import * as React from 'react';
import * as ReactDOM from 'react-dom';

class App extends React.Component<{}, {}> {
    render() {return (
            <h1>こんにちはTypeScriptの世界へ</h1>
        );
    }}

ReactDOM.render(
    <App />,
    document.getElementById('content')
);
ビルドタスクの作成
gulpfile.jsでコンパイルするタスクを定義します。タスク内で使用するgulp-webpackとts-loaderをnpmでインストールします。
npm install gulp-webpack ts-loader --save-dev
webpack用の設定ファイルを作成します。
webpack.config.js
var webpack = require('webpack');
var path = require('path');
module.exports = {
    entry: './client/app.tsx',
    output: {
        filename: 'bundle.js'},
    devtool: 'source-map',
    resolve: {
        root: [path.join(__dirname, 'node_modules')],
        extensions: ['', '.ts', '.tsx', '.js']},
    plugins: [new webpack.optimize.UglifyJsPlugin()
    ],
    module: {
        loaders: [{ test: /\.tsx?$/, loader: 'ts-loader'}]}}
gulpfile.jsでクライアントサイドのスクリプトとwebpackで処理するようにします。
gulpfile.js
var gulp = require('gulp');
var ts = require('gulp-typescript');
var sourcemaps = require('gulp-sourcemaps');
var webpack = require('gulp-webpack');

gulp.task('build', ['serverBuild', 'clientBuild']);

gulp.task('serverBuild', function() {var project = ts.createProject('./server/tsconfig.json');
    return gulp.src('./server/**/*.ts')
        .pipe(sourcemaps.init())
        .pipe(ts(project))
        .js
        .pipe(sourcemaps.write())
        .pipe(gulp.dest('./server'));
});

gulp.task('clientBuild', function() {var config = require('./webpack.config.js');
    return gulp.src('./client/app.tsx')
        .pipe(webpack(config))
        .pipe(gulp.dest('./server/public/scripts'));
});
これでCtrl + Shift + Bをすると最終的にserver/public/scripts/bundle.jsとserver/public/scripts/bundle.js.mapが出力されます。
viewの更新
jadeファイルを以下のように更新して作成したbundle.jsを読み込むようにします。
server/views/index.jade
html
    head
        meta(charset='utf-8')
        title= title
    body
        div(id='content')
        script(src='scripts/bundle.js')
実行して動作確認
ビルドしてF5を押して実行してhttp://localhost:3000/にアクセスすると以下のようにReactで作られた画面が表示されます。

まとめ
これで、サーバーサイドはTypeScript + Expressで、クライアントサイドはTypeScript + Reactで開発することが出来る土台が出来上がりました。 同じ言語で開発できるというのは、それだけで思考を遮らない素敵なものだと思うので何かの機会にやってみたいなぁと思います。そのときのための備忘録として。
参考サイト
Angular2 TypeScript Gulp and ExpressJSblog.edenmsg.com
ソース
GitHubにあげておきました。