過去記事
- Xamarin.AndroidでHello world - かずきのBlog@hatena
- Xamarin.Androidで画面遷移してみよう - かずきのBlog@hatena
- Xamarin AndroidでActivityにライフサイクルを確認してみた - かずきのBlog@hatena
LinearLayout
要素を縦と横に並べることができるレイアウトです。android:layout_width、android:layout_height、andorid:layout_gravity、android:layout_weightを使ってレイアウト内のコントロールの表示を制御できます。 android:layout_widthとandroid:layout_heightは10dpのように数値で指定することもできますし、wrap_contentかmatch_parentと指定することが出来ます。wrap_contentでは、表示サイズは、コントロール内のコンテンツの大きさによって決まります。match_parentは、親要素いっぱいにひろがります。
<?xml version="1.0" encoding="utf-8"?><LinearLayout xmlns:android="http://schemas.android.com/apk/res/android"android:orientation="vertical"android:layout_width="match_parent"android:layout_height="match_parent"><Buttonandroid:id="@+id/MyButton"android:layout_width="match_parent"android:layout_height="wrap_content"android:text="@string/Hello" /></LinearLayout>
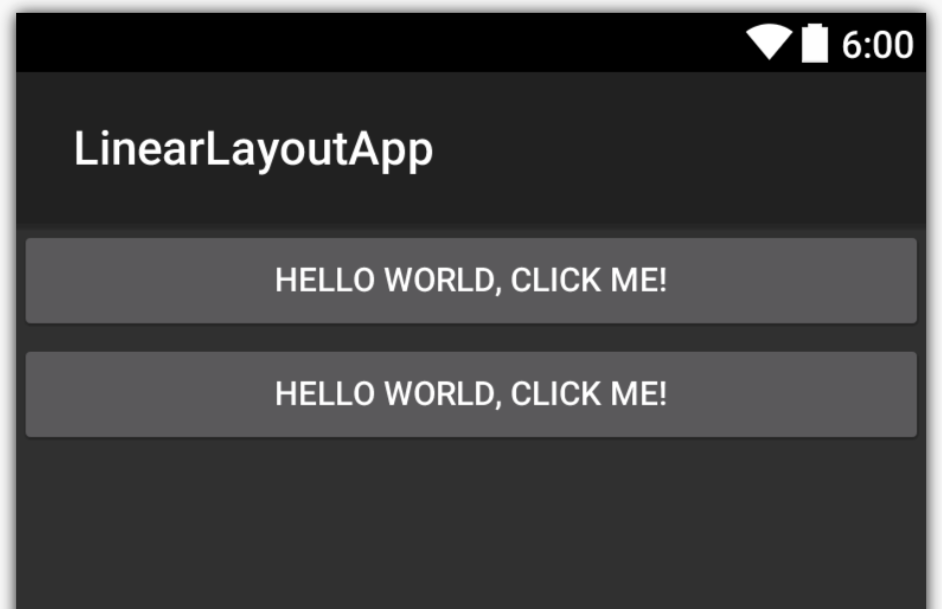
上記のようなaxmlではボタンの横幅が親要素いっぱいに表示され、縦幅がコンテンツの内容の高さになります。LinearLayoutのandroid:orientationでvertical、horizontalで縦並びか横並びを指定できます。つまり、以下のようにもう1つボタンを置いたとすると縦に2個並びます。
<?xml version="1.0" encoding="utf-8"?><LinearLayout xmlns:android="http://schemas.android.com/apk/res/android"android:orientation="vertical"android:layout_width="match_parent"android:layout_height="match_parent"><Buttonandroid:id="@+id/MyButton"android:layout_width="match_parent"android:layout_height="wrap_content"android:text="@string/Hello" /><Buttonandroid:id="@+id/MyButton2"android:layout_width="match_parent"android:layout_height="wrap_content"android:text="@string/Hello" /></LinearLayout>
以下のように表示されます。

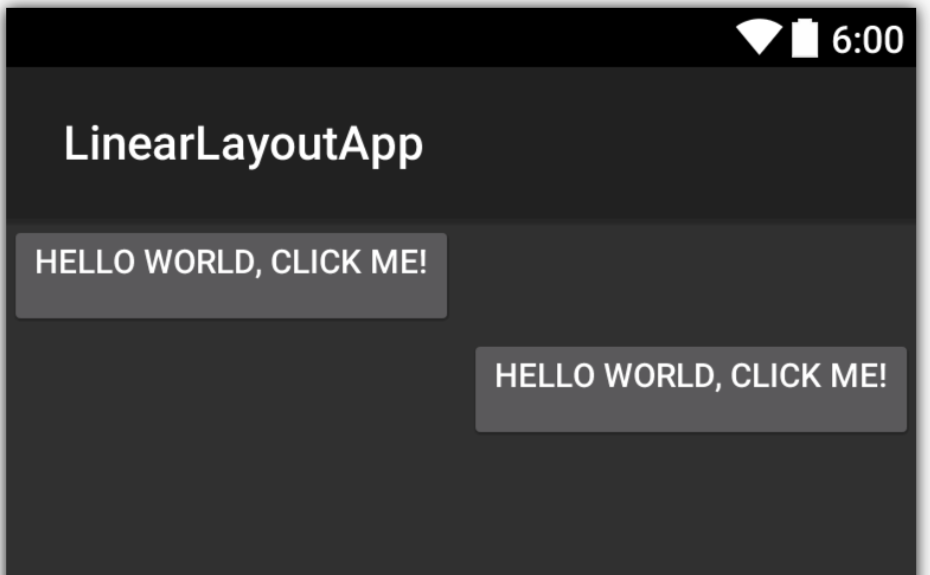
android:layout_gravity属性を指定すると、上下左右どちらに寄せるのか中央寄せにするのかなどが指定できます。例えば、以下のようにボタンの幅をwrap_contentにしてandroid:layout_gravityをleftとrightに指定すると左寄せ(デフォルト)と右寄せになります。axmlを以下に示します。
<?xml version="1.0" encoding="utf-8"?><LinearLayout xmlns:android="http://schemas.android.com/apk/res/android"android:orientation="vertical"android:layout_width="match_parent"android:layout_height="match_parent"><Buttonandroid:id="@+id/MyButton"android:layout_width="wrap_content"android:layout_height="wrap_content"android:text="@string/Hello"android:gravity="left" /><Buttonandroid:id="@+id/MyButton2"android:layout_width="wrap_content"android:layout_height="wrap_content"android:text="@string/Hello"android:layout_gravity="right" /></LinearLayout>
表示は以下のようになります。

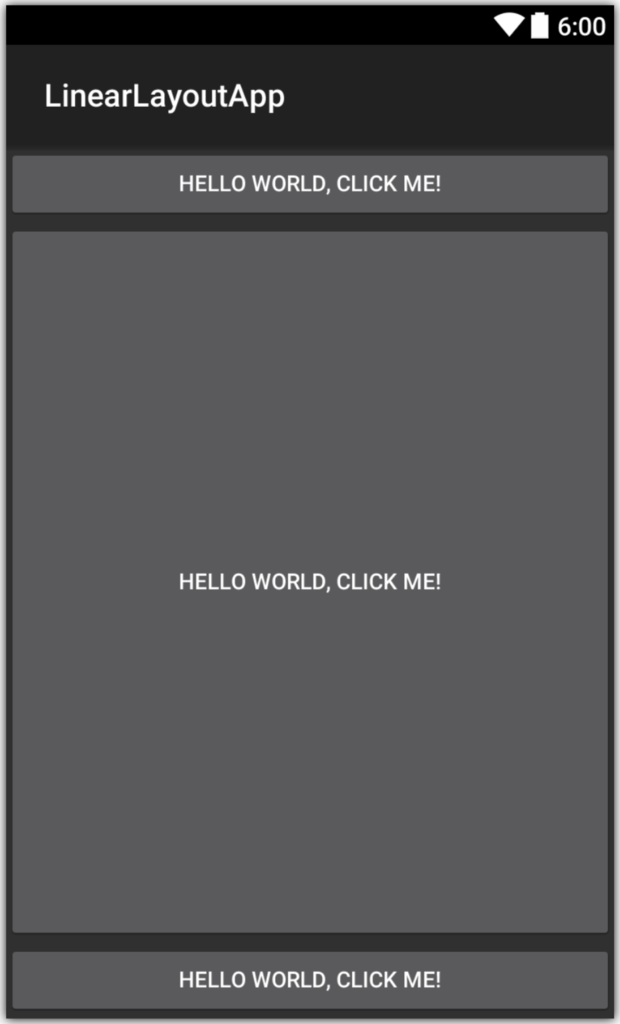
android:layout_weightを使うと、レイアウトで余った余白部分を、どのような比率で分け合うかということが指定できます。例えば、ボタンが3つあって2つ目のボタンを画面の余白いっぱいに表示したい場合は以下のようなaxmlになります。
<?xml version="1.0" encoding="utf-8"?><LinearLayout xmlns:android="http://schemas.android.com/apk/res/android"android:orientation="vertical"android:layout_width="match_parent"android:layout_height="match_parent"><Buttonandroid:id="@+id/MyButton"android:layout_width="match_parent"android:layout_height="wrap_content"android:text="@string/Hello"/><Buttonandroid:id="@+id/MyButton2"android:layout_width="match_parent"android:layout_height="wrap_content"android:text="@string/Hello"android:layout_weight="1"/><Buttonandroid:id="@+id/MyButton3"android:layout_width="match_parent"android:layout_height="wrap_content"android:text="@string/Hello" /></LinearLayout>
表示は以下のようになります。

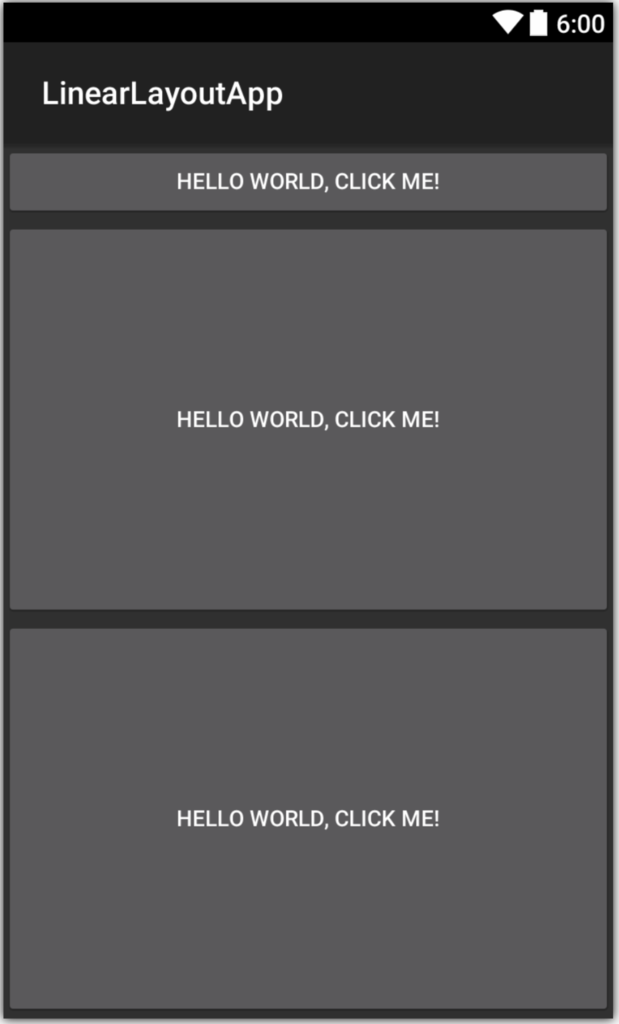
例えば、2つ目と3つ目を、残りの余白を均等に分け合いたいといった場合には、android:layout_heightを0dpに指定して、android:layout_weightに同じ値を指定することで実現できます。
<?xml version="1.0" encoding="utf-8"?><LinearLayout xmlns:android="http://schemas.android.com/apk/res/android"android:orientation="vertical"android:layout_width="match_parent"android:layout_height="match_parent"><Buttonandroid:id="@+id/MyButton"android:layout_width="match_parent"android:layout_height="wrap_content"android:text="@string/Hello" /><Buttonandroid:id="@+id/MyButton2"android:layout_width="match_parent"android:layout_height="0dp"android:text="@string/Hello"android:layout_weight="1" /><Buttonandroid:id="@+id/MyButton3"android:layout_width="match_parent"android:layout_height="0od"android:text="@string/Hello"android:layout_weight="1"/></LinearLayout>
表示は以下のようになります。
