過去記事
- Azure MobileApps + Xamarin.Forms開発の始め方(.NETバックエンド + Prism.Forms) - かずきのBlog@hatena
- Azure MobileApps + Xamarin.Forms開発の始め方(.NETバックエンド + Prism.Forms)「DBの変更」 - かずきのBlog@hatena
- Azure MobileApps + Xamarin.Forms開発の始め方(.NETバックエンド + Prism.Forms)「ローカルデバッグ」 - かずきのBlog@hatena
- Azure MobileApps + Xamarin.Forms開発の始め方(.NETバックエンド + Prism.Forms)「オフラインデータ同期」 - かずきのBlog@hatena
プッシュ通知
そろそろ、プッシュ通知してみたいと思います。 先日、このためにGoogleの開発者登録しました。流石にMac持ってないのでAppleの開発者登録はしてないのでiOS側はプッシュ通知試せてないです。すいません。
ということでXamarin.FormsのAndroidのプッシュ通知を試してみたいと思います。
通知ハブの作成
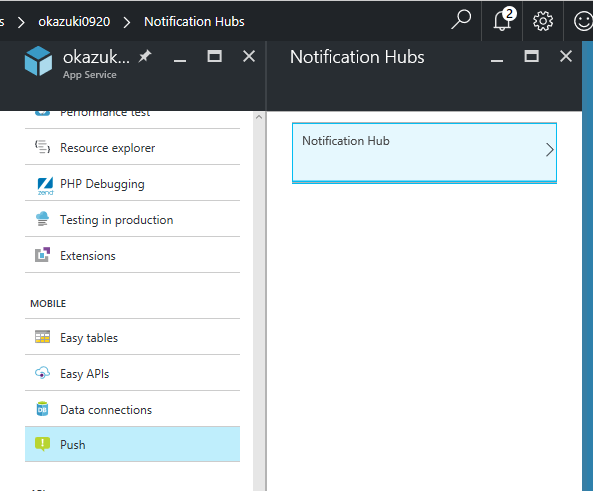
通知を使うには通知ハブを作成しないといけません。Azure上に作成したMobile AppsのPushを選んで作ります。
名前とネームスペースを入力して作成します。
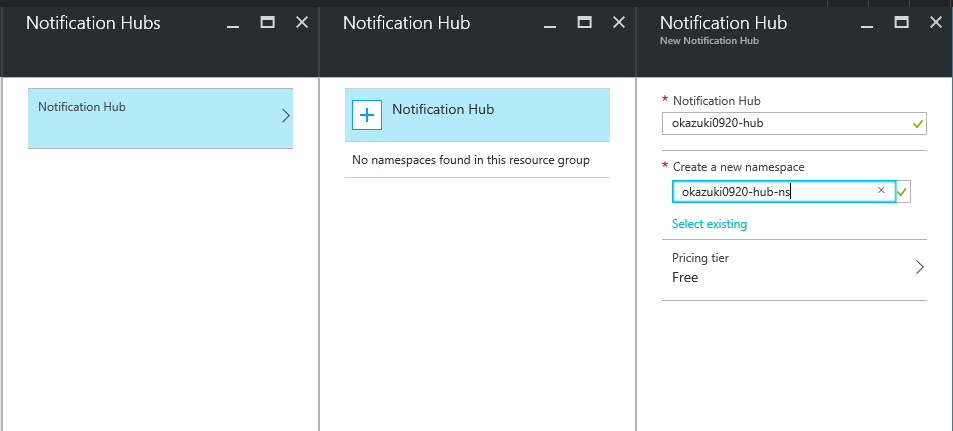
Web.configのAppSettingsにあるMS_NotificationHubNameに作成したNotificationHubの名前を入れておきます。
<add key="MS_NotificationHubName"value="okazuki0920-hub" />
ライブラリのインストール
サーバーサイドのプロジェクトにNuGetから以下のライブラリをインストールします。
- Microsoft.Azure.NotificationHubs
プッシュ通知処理の追加
データが追加されたらプッシュ通知をしてみましょう。InsertAsyncお呼び出しの後にコードを追加します。
// POST tables/TodoItempublic async Task<IHttpActionResult> PostTodoItem(TodoItem item)
{
    item.UserId = (this.User as ClaimsPrincipal)?.FindFirst(ClaimTypes.NameIdentifier)?.Value;
    TodoItem current = await InsertAsync(item);

    await PushAsync(item);

    return CreatedAtRoute("Tables", new { id = current.Id }, current);
}

private async Task PushAsync(TodoItem item)
{
    var settings = this.Configuration.GetMobileAppSettingsProvider().GetMobileAppSettings();
    var hubName = settings.NotificationHubName;
    var connectionString = settings.Connections[MobileAppSettingsKeys.NotificationHubConnectionString].ConnectionString;
    var hub = NotificationHubClient.CreateClientFromConnectionString(connectionString, hubName);

    var templateParams = new Dictionary<string, string>
    {
        { "messageParam",$"{item.Text}が追加されました" }
    };

    try
    {
        await hub.SendTemplateNotificationAsync(templateParams);
    }
    catch (Exception ex)
    {
        this.Configuration.Services.GetTraceWriter().Error(ex);
    }
}
そして、Azureへ発行しておきます。
Androidプロジェクトの編集
Googleのデベロッパーコンソールというやつに移動します。
そして、プロジェクトを作ります。
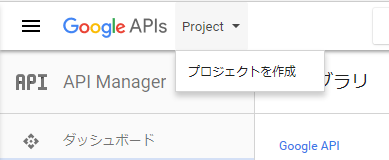
プロジェクト名と、質問事項にこたえて作成します。
そして、ここに行きます。
プロジェクトを作成するボタンを押して、先ほど作成したプロジェクトにFireBaseを追加してください。
設定を選びます。クラウドメッセージングを選びます。

送信者IDとサーバーキーが表示されるので控えておきます。
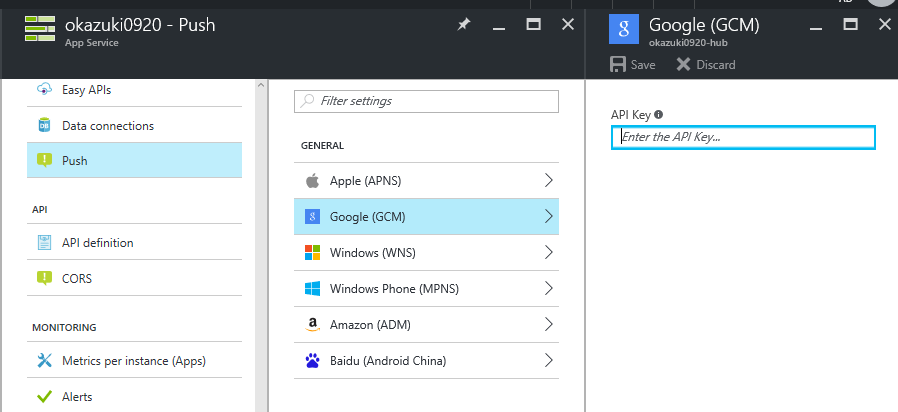
Azureのポータルで作成したMobile AppsからPushを選択してGMSを選ぶとAPIキーの入力を求められるので入力を行います。
そして、DroidプロジェクトのComponentsからGet More ComponentでGoogle Cloud Messaging Clientをインストールします。 (Xamarinのアカウントでのログインを求められたけど、これって新規で使ってる人とかどうするんだろう…)
コードを書こう
設定が終わったのでコードを書いていきます。 まず、送信者IDの定数を定義しておきましょう。
namespace PrismMobileApp.Droid
{
    publicstaticclass Consts
    {
        publicstaticstring[] SenderIds { get; } = new[] { "送信者ID" };
    }
}
そして、MainActivityのLoadApplicationの呼び出しの後に以下のコードを追加します。
try
{
    GcmClient.CheckDevice(this);
    GcmClient.CheckManifest(this);
    GcmClient.Register(this, Consts.SenderIds);
}
catch (Java.Net.MalformedURLException)
{
    Log.Debug(nameof(MainActivity), "Error");
}
catch (Exception ex)
{
    Log.Debug(nameof(MainActivity), ex.ToString());
}
GcmServiceというクラスを作成して、usingとnamespaceの間に以下のコードを追加します。
[assembly: Permission(Name = "@PACKAGE_NAME@.permission.C2D_MESSAGE")]
[assembly: UsesPermission(Name = "@PACKAGE_NAME@.permission.C2D_MESSAGE")]
[assembly: UsesPermission(Name = "com.google.android.c2dm.permission.RECEIVE")]
[assembly: UsesPermission(Name = "android.permission.INTERNET")]
[assembly: UsesPermission(Name = "android.permission.WAKE_LOCK")]
//GET_ACCOUNTS is only needed for android versions 4.0.3 and below
[assembly: UsesPermission(Name = "android.permission.GET_ACCOUNTS")]
次に、PushHandlerBoroadcastReceiverというクラスを定義します。
[BroadcastReceiver(Permission = Gcm.Client.Constants.PERMISSION_GCM_INTENTS)]
[IntentFilter(newstring[] { Gcm.Client.Constants.INTENT_FROM_GCM_MESSAGE }, Categories = newstring[] { "@PACKAGE_NAME@" })]
[IntentFilter(newstring[] { Gcm.Client.Constants.INTENT_FROM_GCM_REGISTRATION_CALLBACK }, Categories = newstring[] { "@PACKAGE_NAME@" })]
[IntentFilter(newstring[] { Gcm.Client.Constants.INTENT_FROM_GCM_LIBRARY_RETRY }, Categories = newstring[] { "jp.okazuki.pushsample" })]
publicclass PushHandlerBroadcastReceiver : GcmBroadcastReceiverBase<GcmService>
{
}
そして、GcmServiceBaseクラスを継承したGcmServiceクラスを作成します。
[Service]
publicclass GcmService : GcmServiceBase
{
    public GcmService() : base(Consts.SenderIds)
    {
    }

    protectedoverridevoid OnMessage(Context context, Intent intent)
    {
        thrownew NotImplementedException();
    }

    protectedoverridevoid OnError(Context context, string errorId)
    {
        thrownew NotImplementedException();
    }

    protectedoverridevoid OnRegistered(Context context, string registrationId)
    {
        thrownew NotImplementedException();
    }

    protectedoverridevoid OnUnRegistered(Context context, string registrationId)
    {
        thrownew NotImplementedException();
    }
}
このOnRegisteredで、渡されたregistrationIdを使って登録処理をしないといけないのですが、認証が有効になってると、ここで登録処理を行ってもアクセス権がないと怒られます。認証が終わった後にプッシュ通知に登録を行わないといけません。今回は、認証処理を行うIAuthenticatorに認証後に何かやるという処理を登録できる仕組みを追加しました。
using System;
using System.Threading.Tasks;

namespace PrismMobileApp.Models
{
    publicinterface IAuthenticator
    {
        Task<bool> AuthenticateAsync();

        void RegisterPostProcess(Func<Task> action);
    }
}
こんな感じにインターフェースを変えて
using Android.Util;
using Microsoft.WindowsAzure.MobileServices;
using PrismMobileApp.Models;
using System;
using System.Collections.Generic;
using System.Linq;
using System.Threading.Tasks;
using Xamarin.Forms;

namespace PrismMobileApp.Droid.Models
{
    publicclass Authenticator : IAuthenticator
    {
        private MobileServiceClient Client { get; }

        private List<Func<Task>> PostProcesses { get; } = new List<Func<Task>>();

        public Authenticator(MobileServiceClient client)
        {
            this.Client = client;
        }

        public async Task<bool> AuthenticateAsync()
        {
            try
            {
                var user = await this.Client.LoginAsync(Forms.Context, MobileServiceAuthenticationProvider.Twitter);
                if (user != null)
                {
                    await Task.WhenAll(
                        this.PostProcesses.Select(x => x()));
                }

                return user != null;
            }
            catch (Exception ex)
            {
                Log.Debug(nameof(Authenticator), ex.ToString());
                returnfalse;
            }
        }

        publicvoid RegisterPostProcess(Func<Task> action)
        {
            this.PostProcesses.Add(action);
        }
    }
}
こんな感じに認証に成功したらPostProcessesを全部実行するという感じにしました。
下準備ができたので各オーバーライドメソッドを実装します。
[Service]
publicclass GcmService : GcmServiceBase
{
    public GcmService() : base(Consts.SenderIds)
    {
    }

    protectedoverridevoid OnMessage(Context context, Intent intent)
    {
        var message = intent.Extras.GetString("message");
        if (!string.IsNullOrEmpty(message))
        {
            this.CreateNotification("New todo item!", $"Todo item: {message}");
            return;
        }
    }

    privatevoid CreateNotification(string title, string description)
    {
        var notificationManager = this.GetSystemService(Context.NotificationService) as NotificationManager;
        var uiIntent = new Intent(this, typeof(MainActivity));

        var builder = new NotificationCompat.Builder(this);
        var notification = builder.SetContentIntent(PendingIntent.GetActivity(this, 0, uiIntent, 0))
            .SetSmallIcon(Android.Resource.Drawable.SymActionEmail)
            .SetTicker(title)
            .SetContentTitle(title)
            .SetContentText(description)
            .SetSound(RingtoneManager.GetDefaultUri(RingtoneType.Notification))
            .SetAutoCancel(true)
            .Build();

        notificationManager.Notify(1, notification);
    }

    protectedoverridevoid OnError(Context context, string errorId)
    {
    }

    protectedoverridevoid OnRegistered(Context context, string registrationId)
    {
        ((App)App.Current).Container.Resolve<IAuthenticator>().RegisterPostProcess(() =>
        {
            ((Activity)Forms.Context).RunOnUiThread(async () =>
            {
                try
                {
                    var client = ((App)App.Current).Container.Resolve<MobileServiceClient>();
                    var push = client.GetPush();

                    conststring templateBodyGCM = @"{ ""data"": { ""message"":""$(messageParam)"" }}";
                    var template = new JObject();
                    template["genericMessage"] = new JObject
                    {
                        { "body", templateBodyGCM },
                    };

                    await push.RegisterAsync(registrationId, template);
                }
                catch (Exception ex)
                {
                    Log.Error(nameof(GcmService), ex.ToString());
                }
            });
            return Task.CompletedTask;
        });
    }

    protectedoverridevoid OnUnRegistered(Context context, string registrationId)
    {
    }
}
OnRegisteredメソッドで先ほどの認証処理の後処理にプッシュの登録処理を追加しています。
動作確認
ローカルデバッグ用に構成してた、App.xaml.csの中身をクラウドように書き換えます。
protectedoverridevoid RegisterTypes()
{
    this.Container.RegisterTypeForNavigation<MainPage>();
    // MobileServiceClientをシングルトンで登録this.Container.RegisterType<MobileServiceClient>(
        new ContainerControlledLifetimeManager(),
        new InjectionConstructor(
            new Uri("https://okazuki0920.azurewebsites.net"),
            new HttpMessageHandler[] { }));
    //this.Container.RegisterType<MobileServiceClient>(//    new ContainerControlledLifetimeManager(),//    new InjectionConstructor(//        new Uri("http://169.254.80.80:1782/"),//        new HttpMessageHandler[] { }),//    new InjectionProperty(nameof(MobileServiceClient.AlternateLoginHost), new Uri("https://okazuki0920.azurewebsites.net")));this.Container.RegisterType<TodoApp>(new ContainerControlledLifetimeManager());
    this.Container.RegisterType<IDataSynchronizer, DataSynchronizer>(new ContainerControlledLifetimeManager());
    this.Container.RegisterType<ITodoItemRepository, TodoItemRepository>(new ContainerControlledLifetimeManager());
}
VSのAndroidエミュレータだとプッシュ通知できない?っぽいので実機デバッグします。
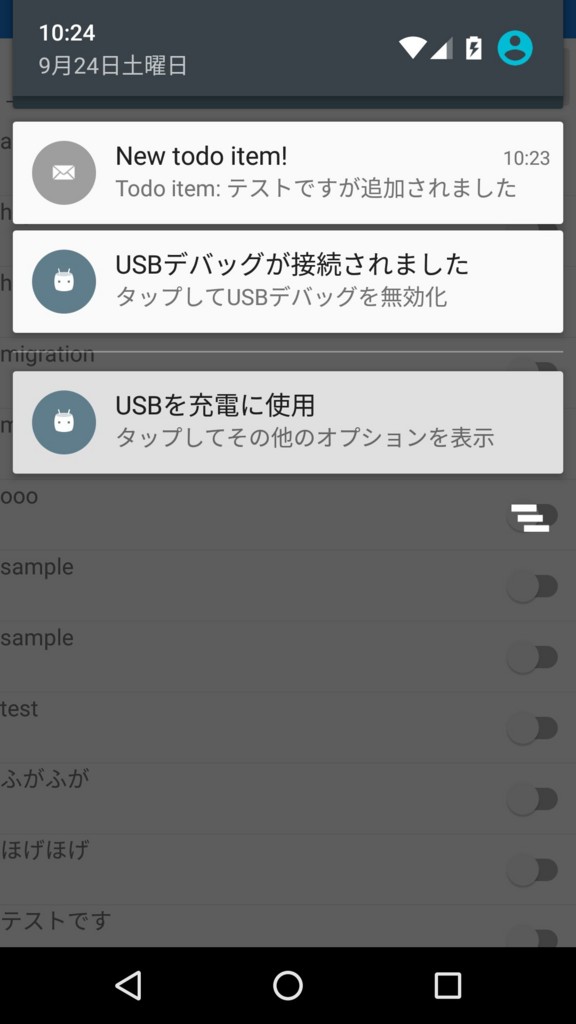
何か適当にデータを追加してPullToRefreshかけるとプッシュ通知が飛んできます。
まとめ
認証とセットでプッシュ通知をやるときは、プッシュ通知の登録タイミングを気を付けよう。