システムエラーというダイアログと、詳細なエラーログは、ここに出したよっていうダイアログが出て既存のソースはいじれるけど、新規追加ができないという悲しい状態になりました。
なんか一時フォルダ的なのを消してやろうと思って以下のフォルダを消したらなおりました。 勘が仕事した。
ユーザーフォルダ\AppData\Local\Microsoft\VisualStudio\12.0\ComponentModelCache
システムエラーというダイアログと、詳細なエラーログは、ここに出したよっていうダイアログが出て既存のソースはいじれるけど、新規追加ができないという悲しい状態になりました。
なんか一時フォルダ的なのを消してやろうと思って以下のフォルダを消したらなおりました。 勘が仕事した。
ユーザーフォルダ\AppData\Local\Microsoft\VisualStudio\12.0\ComponentModelCache
Pocketのクライアントを作ろうとJSONを読み込んでたんですよ。JSON.NETで。 んで、配列で結果返すというやつがあったので正直に配列で受け取ろうとしたら…
{
  values:
  {
    "1": {"name": "taro"},
    "2": {"name": "jiro"},
    "3": {"name": "saburo"}
  }
}
こんなJSON返してきやがった。Arrayじゃない!Objectです。ということで、以下のようにデータを受け取るようにしました。
using Newtonsoft.Json;
using System;
using System.Collections.Generic;

namespace ConsoleApplication1
{
    class Program
    {
        staticvoid Main(string[] args)
        {
            var json = @"{  values:   {""1"": {""name"": ""taro""},""2"": {""name"": ""jiro""},""3"": {""name"": ""saburo""}  }}";
            var item = JsonConvert.DeserializeObject<Item>(json);
            foreach (var v in item.Values)
            {
                Console.WriteLine("{0}: {1}", v.Key, v.Value.Name);
            }
        }
    }

    class Item
    {
        // 何がくるかわからなならDictionaryしか…
        [JsonProperty("values")]
        public Dictionary<string, Person> Values { get; set; }
    }
    class Person
    {
        [JsonProperty("name")]
        publicstring Name { get; set; }
    }
}
リストじゃないと思いつつ、これで動いたので進めようと思ったら、データが0件のときに以下のようなJSONが返ってきました。
{
  values:[]
}
あ…うん知ってる。それ配列…。
これをさっきのプログラムに食わせると…
ハンドルされていない例外: Newtonsoft.Json.JsonSerializationException: Cannot des
erialize the current JSON array (e.g. [1,2,3]) into type 'System.Collections.Gen
eric.Dictionary`2[System.String,ConsoleApplication1.Person]' because the type re
quires a JSON object (e.g. {"name":"value"}) to deserialize correctly.
To fix this error either change the JSON to a JSON object (e.g. {"name":"value"}
) or change the deserialized type to an array or a type that implements a collec
tion interface (e.g. ICollection, IList) like List<T> that can be deserialized f
rom a JSON array. JsonArrayAttribute can also be added to the type to force it t
o deserialize from a JSON array.
はい。おっしゃる通りです。
なので、いったんdynamicで受けてTypeプロパティで型を見てからつどシリアライズしてでシリアライズする(超非効率)
using Newtonsoft.Json;
using Newtonsoft.Json.Linq;
using System;
using System.Collections.Generic;

namespace ConsoleApplication1
{
    class Program
    {
        staticvoid Main(string[] args)
        {
//            var json = @"//{//  values: //  {//    ""1"": {""name"": ""taro""},//    ""2"": {""name"": ""jiro""},//    ""3"": {""name"": ""saburo""}//  }//}//";
            var json = @"{  values:[]}";
            var item = JsonConvert.DeserializeObject<Item>(json);
            foreach (var v in item.GetValues())
            {
                Console.WriteLine("{0}: {1}", v.Key, v.Value.Name);
            }
        }
    }

    class Item
    {
        // いったんdynamicで受けておいて
        [JsonProperty("values")]
        public dynamic Values { get; set; }

        public Dictionary<string, Person> GetValues()
        {
            // 中身の型を見て再度必要な型になおすif (this.Values.Type == JTokenType.Object)
            {
                var json = JsonConvert.SerializeObject(this.Values);
                return JsonConvert.DeserializeObject<Dictionary<string, Person>>(json);
            }

            // オブジェクトじゃなかったら空だよねreturnnew Dictionary<string, Person>();
        }
    }
    class Person
    {
        [JsonProperty("name")]
        publicstring Name { get; set; }
    }
}
とりあえず、これで逃げてるけど、もっといい方法ないのかなぁ。実際にはGetValuesにあたるメソッドは、実際には二度目からはキャッシュした値を返すようにしてます。
花粉がつらい今日この頃です。
まずは基本です。Universal Windows appでは、SharedのプロジェクトにおいたコードはWindowsストアアプリとWindows Phone アプリで共有されます。
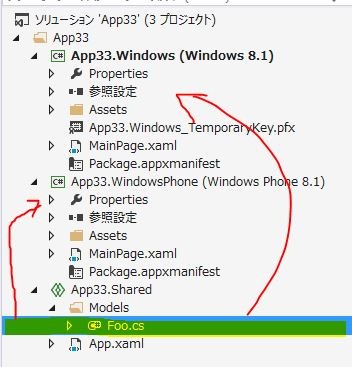
このときXAMLもC#も共有されます
でも、プラットフォーム固有の処理や見た目を定義したいことがありますよね。ページはそのまま個別に作ればいいですが、リソースてきなXAMLは両方のプロジェクトに同じ名前で作成してApp.xamlで読み込みましょう。
こんな風にPlatformDictionary.xamlを両方のプロジェクトに作って…
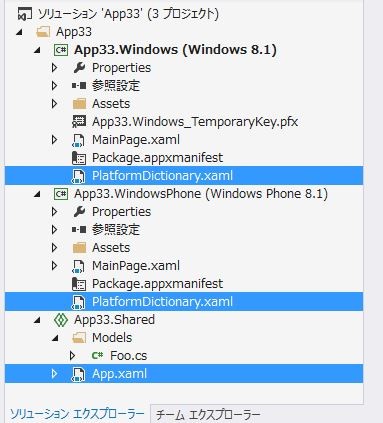
App.xamlで読み込む。これでWindows ストア アプリのときはストアのプロジェクトのやつを読み込んで、電話のときは電話のプロジェクトのやつを読み込みます。
<Applicationx:Class="App33.App"xmlns="http://schemas.microsoft.com/winfx/2006/xaml/presentation"xmlns:x="http://schemas.microsoft.com/winfx/2006/xaml"xmlns:local="using:App33"><Application.Resources><ResourceDictionary><ResourceDictionary.MergedDictionaries><ResourceDictionary Source="PlatformDictionary.xaml" /></ResourceDictionary.MergedDictionaries></ResourceDictionary></Application.Resources></Application>
コントロールのスタイルとか、DataTemplateに効果を発揮しますね。
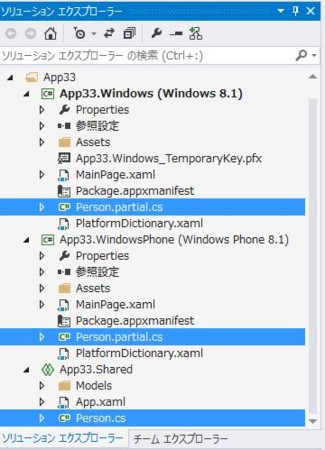
ビルドしたアセンブリが共有されるのではなく、コードが共有されてビルド時によきにはからってくれるという仕組みなので、パーシャルクラスが使えます。以下のようなクラス配置で。
using System;
using System.Collections.Generic;
using System.Text;

namespace App33
{
    publicpartialclass Person
    {
        publicstring Name { get; set; }
    }
}
using System;
using System.Collections.Generic;
using System.Diagnostics;
using System.Linq;
using System.Text;
using System.Threading.Tasks;

namespace App33
{
    publicpartialclass Person
    {
        publicvoid Greet()
        {
            Debug.WriteLine("Hello Windows phone!!");
        }
    }
}
using System;
using System.Collections.Generic;
using System.Diagnostics;
using System.Linq;
using System.Text;
using System.Threading.Tasks;

namespace App33
{
    publicpartialclass Person
    {
        publicvoid Greet()
        {
            Debug.WriteLine("Hello Windows store app!!");
        }
    }
}
こんな風にメソッド全体が違う場合はパーシャルクラスを使うことができます。まぁでもこの後紹介する#ifディレクティブのほうがIDE支援は強いので、そっちが使うのがいいかも?
WINDOWS_APP, WINDOWS_PHONE_APPという定数があるので、それで#if ~ #endifでくくることでプラットフォーム固有の処理を書けます。
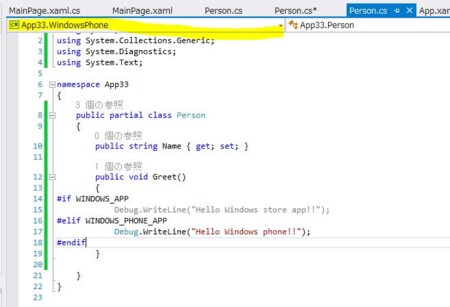
partialの例を#ifディレクティブになおすとこんな感じのコードになります。
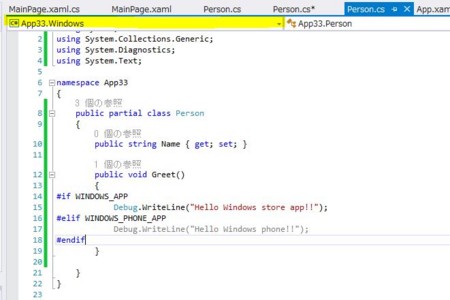
黄色いマーカーで示してるところでプロジェクトを切り替えると、そっちのプロジェクトでは無効なコードがグレーアウトされます。
使い方は通常でよくてNuGetから仕入れることが出来ないくらい。ただ、HttpClientのPCL版の参照の追加と、以下のつぶやきにあるように、Microsoft.Bcl.AsyncのDLLも追加しておこう。 英語情報しかないかなぁと思ったら、まさかのあの人のつぶやきで解決しました。
AsyncOAuth をデスクトップで使おうとしたら Microsoft.Threading.Tasks が見つからないという FileNotFoundException が
2013-02-2704:15:11via web
AsyncOAuth で FileNotFoundException、Microsoft.Bcl.Async というそれっぽい NuGet パッケージ入れたら解決?
2013-02-2704:25:22via web
MVPの初音さんが作った東北さくらトリップというアプリがあります。
このアプリ名前の通り東北の桜の名所+アルファの情報を表示してくれるアプリです。

このアプリの説明を簡単にすると、桜の見どころからSNSの情報、ほかの近所の観光地や宿泊情報など、東北へ行く際の旅行を完全にサポート!!してくれるアプリです。

トップ画面で待機してると桜がひらひら舞い落ちてきたり見てるだけでも楽しいアプリになってます。
この実装が気になって担当してたみつばたんにお願いして作成風景とってもらった動画がこちら。
さくらの実装もさることながら、色々なSNSと連携したりと詰まってる技術要素の数には頭が下がります。
というこで、初音さんに確認したところGWくらいが東北は桜が見ごろということなので、Windowsタブレット片手に行く予定の方は、このアプリを入れてみるといいのではないかと思いました。
10日ほど前の2014年4月19日にPrism 5 for .NET4.5がリリースされてました。
Prismは、MSの中の人たちが作ってるOSSのWPF用(SL用やストアアプリ用などもある)のフレームワークで、複合型アプリケーション(モジュールを組み合わせて1つのアプリケーションに仕立て上げるもの)のサポートと、MVVMパターンのサポート機能が含まれています。
サンプルプログラムなどを見るならMSのサイトからDLしてもいいですが、さくっと始めるだけならNuGetで入手するのが楽です。
Install-Package Prism
もちろんGUIからもOKです。ダウンロードする際に、結構細分化された状態でパッケージが入ってくるのがわかります。
昔とかわりません。ムズイです。
結構シンプルに実装してます。そのぶんめんどいです。大体以下のクラスです。
DataAnnotationでのエラーチェックをサポートしたViewModel作って遊んでみた。
using Microsoft.Practices.Prism.Mvvm;
using Microsoft.Practices.Prism.ViewModel;
using System;
using System.Collections;
using System.Collections.Generic;
using System.ComponentModel;
using System.ComponentModel.DataAnnotations;
using System.Linq;
using System.Runtime.CompilerServices;

namespace WpfApplication7.ViewModels
{
    /// <summary>/// PrismのBindableBaseを拡張してデータの検証を追加/// </summary>publicclass ViewModelBase : BindableBase, INotifyDataErrorInfo
    {
        // INotifyDataErrorInfo実装時に楽できるクラスprivatereadonly ErrorsContainer<string> Errors;

        publicevent EventHandler<DataErrorsChangedEventArgs> ErrorsChanged;

        public ViewModelBase()
        {
            // ErrorsChangedを発行するメソッドをコンストラクタに渡してインスタンス化すると// SetErrorsなどのときに、いい感じにイベント出してくれるthis.Errors = new ErrorsContainer<string>(this.OnErrorsChanged);
        }

        // INotifyDataErrorInfoの実装。基本委譲するだけ。public IEnumerable GetErrors(string propertyName)
        {
            returnthis.Errors.GetErrors(propertyName);
        }

        publicbool HasErrors
        {
            get { returnthis.Errors.HasErrors; }
        }

        protectedvirtualvoid OnErrorsChanged([CallerMemberName]string propertyName = null)
        {
            var h = this.ErrorsChanged;
            if (h != null)
            {
                h(this, new DataErrorsChangedEventArgs(propertyName));
            }
        }

        /// <summary>/// 値の設定と値の検証を行う/// </summary>protectedoverridebool SetProperty<T>(ref T storage, T value, [CallerMemberName]string propertyName = null)
        {
            var changed = base.SetProperty<T>(ref storage, value, propertyName);
            if (changed)
            {
                // DataAnnotationsでプロパティの検証
                var context = new ValidationContext(this)
                {
                    MemberName = propertyName
                };
                List<ValidationResult> validationErrors = new List<ValidationResult>();
                if (!Validator.TryValidateProperty(value, context, validationErrors))
                {
                    // エラーがあったらエラーを設定this.Errors.SetErrors(
                        propertyName,
                        validationErrors.Select(error => error.ErrorMessage).ToArray());
                }
                else
                {
                    // なければクリアthis.Errors.ClearErrors(propertyName);
                }
            }
            return changed;
        }

        publicbool ValidateObject()
        {
            // オブジェクト全体の検証を行う
            var context = new ValidationContext(this);
            List<ValidationResult> validationErrors = new List<ValidationResult>();
            if (Validator.TryValidateObject(this, context, validationErrors))
            {
                returntrue;
            }

            var errors = validationErrors
                .Where(error => error.MemberNames.Any())
                .GroupBy(error => error.MemberNames.First());
            foreach (var error in errors)
            {
                this.Errors.SetErrors(
                    error.Key,
                    error.Select(e => e.ErrorMessage).ToArray());
            }

            returnfalse;
        }
    }
}
そして、これを継承したViewModel
using Microsoft.Practices.Prism.Commands;
using Microsoft.Practices.Prism.Interactivity.InteractionRequest;
using System.ComponentModel.DataAnnotations;

namespace WpfApplication7.ViewModels
{
    publicclass MainWindowViewModel : ViewModelBase
    {

        privatestring input;

        /// <summary>/// 必須入力の項目/// </summary>
        [Required(ErrorMessage = "必須!")]
        publicstring Input
        {
            get { returnthis.input; }
            // 値が設定されたタイミングでコマンドの実行可否の確認set { this.SetProperty(refthis.input, value); this.AlertCommand.RaiseCanExecuteChanged(); }
        }

        private InteractionRequest<Notification> alertRequest = new InteractionRequest<Notification>();

        /// <summary>/// Viewへ通知を行うためのInteractionRequest/// </summary>public InteractionRequest<Notification> AlertRequest
        {
            get { returnthis.alertRequest; }
            set { this.SetProperty(refthis.alertRequest, value); }
        }

        private DelegateCommand alertCommand;

        /// <summary>/// 適当にコマンド/// </summary>public DelegateCommand AlertCommand
        {
            get
            {
                returnthis.alertCommand ??
                    (this.alertCommand = new DelegateCommand(this.AlertExecute, this.CanAlertExecute));
            }
        }

        publicvoid AlertExecute()
        {
            // エラーがなければif (!this.ValidateObject())
            {
                return;
            }

            // Viewに投げるthis.AlertRequest.Raise(new Notification
            {
                Title = "お知らせ",
                Content = this.HasErrors ? "エラー" : "オッケー"
            });
        }

        publicbool CanAlertExecute()
        {
            return !this.HasErrors;
        }

    }
}
んでViewのコードビハインドです。
using Microsoft.Practices.Prism.Mvvm;
using System.Windows;

namespace WpfApplication7.Views
{
    /// <summary>/// IViewを実装してViewModelLocatorProviderでViewModelを自動で設定/// </summary>publicpartialclass MainWindow : Window, IView
    {
        public MainWindow()
        {
            InitializeComponent();
            ViewModelLocationProvider.AutoWireViewModelChanged(this);
        }
    }
}
ViewからViewModelを設定する方法はXAMLでViewModelLocatorを使う方法があるけど、それだとXAMLエディタがエラーをはくので個人的にはコードビハインドでViewModelLocationProviderを使うほうが好み。
そしてXAML。
<Windowxmlns="http://schemas.microsoft.com/winfx/2006/xaml/presentation"xmlns:x="http://schemas.microsoft.com/winfx/2006/xaml"xmlns:mvvm="clr-namespace:Microsoft.Practices.Prism.Mvvm;assembly=Microsoft.Practices.Prism.Mvvm.Desktop"xmlns:d="http://schemas.microsoft.com/expression/blend/2008"xmlns:mc="http://schemas.openxmlformats.org/markup-compatibility/2006"xmlns:ViewModels="clr-namespace:WpfApplication7.ViewModels"xmlns:i="http://schemas.microsoft.com/expression/2010/interactivity"xmlns:Custom="http://www.codeplex.com/prism"xmlns:DefaultPopupWindows="clr-namespace:Microsoft.Practices.Prism.Interactivity.DefaultPopupWindows;assembly=Microsoft.Practices.Prism.Interactivity"mc:Ignorable="d"x:Class="WpfApplication7.Views.MainWindow"Title="MainView"Height="300"Width="300"d:DataContext="{d:DesignInstance {x:Type ViewModels:MainWindowViewModel}, IsDesignTimeCreatable=True}"><i:Interaction.Triggers><!-- AlertRequestからの要求を受けるTrigger --><Custom:InteractionRequestTrigger SourceObject="{Binding AlertRequest}"><!-- 地味にPrism 5からWindow表示アクションがある --><Custom:PopupWindowAction /></Custom:InteractionRequestTrigger></i:Interaction.Triggers><Grid><!-- VMの入力項目にバインド --><TextBox x:Name="textBox"HorizontalAlignment="Left"Height="23"Margin="10,10,0,0"TextWrapping="Wrap"Text="{Binding Input, Mode=TwoWay, UpdateSourceTrigger=PropertyChanged}"VerticalAlignment="Top"Width="120"/><!-- TextBoxのエラーの内容を表示する --><TextBlock HorizontalAlignment="Left"Margin="135,18,0,0"TextWrapping="Wrap"Text="{Binding (Validation.Errors)[0].ErrorContent, ElementName=textBox, Mode=OneWay}"VerticalAlignment="Top"/><!-- コマンドと接続するためのボタン --><Button Content="Button"HorizontalAlignment="Left"Margin="10,38,0,0"VerticalAlignment="Top"Width="75"Command="{Binding AlertCommand, Mode=OneWay}"/></Grid></Window>
実行するとこんな感じ。

何もせずボタンお押すとブロックするよ。これはCommandでValidateObjectを呼んでるおかげ。
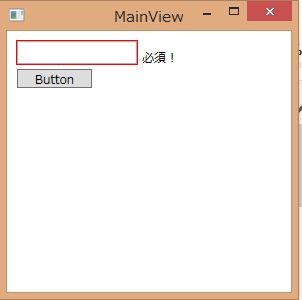
何か入力するとボタンが押せるようになる。押したらデフォルトのウィンドウが出てくる。

軽いMVVMフレームワークとして、PrismのMVVM部分だけ参照して使うのはありかなと思いました。(NuGetでもパッケージが細かくわかれてるので) 複合アプリ作りたい人はフルパッケージでどうぞ!
コードレシピに書いてみました。
Leap Motionの組み込みジェスチャーではなくて、自分でLeapからデータを拾ってきてジェスチャーとして認識する方法が、細かいチューニングができていい! ということでフリックを認識するサンプルをコードレシピにあげました。元ネタは初音さんのコード。
コードレシピにあげたコードはこちら。
表題の通りです。
表があるということは裏もある予定です。とりあえず、試し読みで目次は確認できるので興味があるかたは試してみてください。表紙はちょっとぐちゃっとないりますね…orz
Reactive ExtensionsをベースとしたMVVMパターンのアプリケーションの作成をサポートするためのライブラリです。特徴としては、Reactive Extensionsをベースとしているため、全てをIObservable
現時点の最新版(0.4.5-beta3)で以下のプラットフォームをサポートしてます。
ReactivePropertyは、名前の通りReactiveProperty<T>クラスをViewModelクラスのプロパティとして定義します。そのかわりMVVMフレームワークと異なり、ViewModelの基本型を強制することはありません。
ReactivePropertyクラスは、以下の機能を持つクラスです。
プロパティ自体がIObservableで、プロパティのエラーもIObservableとして表現されているのが特徴です。
ReactivePropertyクラスの特徴がわかったので、次は作り方です。int型の値を持つReactivePropertyの作り方。
new ReactiveProperty<int>();
シンプルにnewで作れます。こういうシンプルさ大事だと思います。では、初期値100の場合は?
new ReactiveProperty<int>(100);
コンストラクタで指定できます。そして、特徴的なのがIObservable<T>からReactivePropertyへの変換が出来る点です。
Subject<int> s = new Subject<int>();
ReactiveProperty<int> p = s.ToReactiveProperty(); // IO<T> -> RxProp<T>へ変換
基本的に、この3つのインスタンス化の方法を使ってReactivePropertyをつくります。
ReactivePropertyを使用したシンプルなViewModelクラスの定義は、以下のようになります。
publicclass MainViewModel
{
    public ReactiveProperty<string> Input { get; private set; }

    public ReactiveProperty<string> Output { get; private set; }

    public MainViewModel()
    {
        // 通常のインスタンス化this.Input = new ReactiveProperty<string>();

        // ReactiveProperty<T>はIObservable<T>なので、LINQで変換してToReactivePropertyで// ReactiveProperty化。this.Output = this.Input
            .Select(s => s != null ? s.ToUpper() : null)
            .ToReactiveProperty();
    }
}
これをDataContextに設定して画面にバインドするとこうなります。
<Windowxmlns="http://schemas.microsoft.com/winfx/2006/xaml/presentation"xmlns:x="http://schemas.microsoft.com/winfx/2006/xaml"xmlns:local="clr-namespace:WpfApplication9"x:Class="WpfApplication9.MainWindow"Title="MainWindow"Height="350"Width="525"><Window.DataContext><local:MainViewModel/></Window.DataContext><StackPanel><TextBox Text="{Binding Input.Value, Mode=TwoWay, UpdateSourceTrigger=PropertyChanged}" /><TextBlock Text="{Binding Output.Value}" /></StackPanel></Window>

Inputプロパティの値が変換されてOutputに流れていることがわかると思います。この例では単純に入力→変換→出力をVとVM内で完結させていますが、MVVMすべての層で一連の流れとして記述するのがReactivePropertyの特徴になります。
世の中、全てがIO<T>だったらいいのですが、一般的なPOCOなどはそうじゃありません。そういうもののためにINotifyPropertyChangedのPropertyChangedイベントをIO
以下のようなカウンタークラスがあるとします。
publicclass Counter : INotifyPropertyChanged
{

    publicevent PropertyChangedEventHandler PropertyChanged;

    privateint count;

    publicint Count
    {
        get { returnthis.count; }
        privateset
        {
            this.count = value;
            var h = this.PropertyChanged;
            if (h != null)
            {
                h(this, new PropertyChangedEventArgs("Count"));
            }
        }
    }

    publicvoid Increment()
    {
        this.Count++;
    }

    publicvoid Decriment()
    {
        this.Count--;
    }
}
このクラスのCountプロパティの連続的な変化をIO
publicclass MainViewModel
{
    private Counter counter = new Counter();

    public ReactiveProperty<int> Count { get; private set; }

    public MainViewModel()
    {
        this.Count = this.counter
            // IO<T>に変換するプロパティを指定
            .ObserveProperty(c => c.Count)
            // IO<T>になったのでReactivePropertyに変換可能
            .ToReactiveProperty();

    }
}
このように、POCOのModelとの接続も行えます。
ReactivePropertyが提供するICommandの実装は、ReactiveCommandといいます。ReactivePropertyでは、ICommandのCanExecuteChangedイベントをIObservable<bool>とみなして、IObservable<bool>からReactiveCommandを生成する機能を提供しています。
ReactiveCommandのExecuteメソッドは、IObservable<T>として動作します。
var s = new Subject<bool>(); // 何かのIO<bool>
ReactiveCommand command = s.ToReactiveCommand(); // コマンドに変換
command.Subscrive(_ =>
{
  // コマンドのExecute時の処理
});
例えば、先ほどのCounterクラスが10になるまでインクリメントできて、0になるまでデクリメントできる2つのコマンドを持ったViewModelクラスは以下のようになります。
publicclass MainViewModel
{
    private Counter counter = new Counter();

    public ReactiveProperty<int> Count { get; private set; }

    public ReactiveCommand IncrementCommand { get; private set; }

    public ReactiveCommand DecrementCommand { get; private set; }

    public MainViewModel()
    {
        this.Count = this.counter
            // IO<T>に変換するプロパティを指定
            .ObserveProperty(c => c.Count)
            // IO<T>になったのでReactivePropertyに変換可能
            .ToReactiveProperty();

        // Countの値が10以下の場合インクリメント出来るthis.IncrementCommand = this.Count
            // IO<bool>へ変換
            .Select(i => i < 10)
            // コマンドへ変換
            .ToReactiveCommand();
        // Executeが呼ばれたらインクリメントthis.IncrementCommand
            .Subscribe(_ => this.counter.Increment());

        // Countの値が0より大きい場合デクリメントできるthis.DecrementCommand = this.Count
            // IO<bool>へ変換
            .Select(i => i > 0)
            // コマンドへ変換
            .ToReactiveCommand();
        // Executeが呼ばれたらデクリメントthis.DecrementCommand
            .Subscribe(_ => this.counter.Decriment());

    }
}
このViewModelを以下のようなViewと接続します。
<Windowxmlns="http://schemas.microsoft.com/winfx/2006/xaml/presentation"xmlns:x="http://schemas.microsoft.com/winfx/2006/xaml"xmlns:local="clr-namespace:WpfApplication9"x:Class="WpfApplication9.MainWindow"Title="MainWindow"Height="350"Width="525"><Window.DataContext><local:MainViewModel/></Window.DataContext><StackPanel><TextBlock Text="{Binding Count.Value}" /><Button Content="Incr"Command="{Binding IncrementCommand, Mode=OneWay}"/><Button Content="Decr"Command="{Binding DecrementCommand, Mode=OneWay}"/></StackPanel></Window>
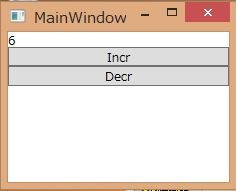
Countの値の変化に応じて自動的に実行可否が変わることが確認できます。


ReactivePropertyには、入力値の検証機能も組み込まれています。一番簡単な検証は、アトリビュートで検証ルールを指定することです。検証ルールをReactiveProperty>T<のプロパティに設定して、インスタンスを作成するタイミングでSetValidateAttributeで自分自身が、なんのプロパティであるか指定する必要があります。
publicclass MainViewModel
{
    // System.ComponentModel.DataAnnotationsの属性で検証ルールを指定
    [Required(ErrorMessage = "必須です")]
    public ReactiveProperty<string> Input { get; private set; }

    public MainViewModel()
    {
        this.Input = new ReactiveProperty<string>()
            // 検証ルールをReactivePropertyに設定する
            .SetValidateAttribute(() => this.Input);
    }
}
以下のようにViewと接続すると、値の検証が働いていることがわかります。
<Windowxmlns="http://schemas.microsoft.com/winfx/2006/xaml/presentation"xmlns:x="http://schemas.microsoft.com/winfx/2006/xaml"xmlns:local="clr-namespace:WpfApplication9"x:Class="WpfApplication9.MainWindow"Title="MainWindow"Height="350"Width="525"><Window.DataContext><local:MainViewModel/></Window.DataContext><StackPanel><TextBox Text="{Binding Input.Value, UpdateSourceTrigger=PropertyChanged}" /></StackPanel></Window>


エラーメッセージを出すには、以下のようにObserveErrorChangedから目的のエラーメッセージだけを取り出すクエリを書けばOKです。
publicclass MainViewModel
{
    // System.ComponentModel.DataAnnotationsの属性で検証ルールを指定
    [Required(ErrorMessage = "必須です")]
    public ReactiveProperty<string> Input { get; private set; }

    public ReactiveProperty<string> InputErrorMessage { get; private set; }

    public MainViewModel()
    {
        this.Input = new ReactiveProperty<string>()
            // 検証ルールをReactivePropertyに設定する
            .SetValidateAttribute(() => this.Input);
        // エラーメッセージを出力するプロパティを作成するthis.InputErrorMessage = this.Input
            // エラーが発行されるIO<IE>を変換する
            .ObserveErrorChanged
            // エラーがない場合nullになるので空のIEにする
            .Select(e => e ?? Enumerable.Empty<object>())
            // 最初のエラーメッセージを取得する
            .Select(e => e.OfType<string>().FirstOrDefault())
            // ReactiveProperty化
            .ToReactiveProperty();
    }
}
このInputErrorMessageをXAMLでTextBlockにバインドすればエラーメッセージの表示が出来ます。
初期状態ではエラーメッセージは表示されません(仕様)

値を変更して、エラーの条件に合致するようになるとエラーが表示されます。

また、SetValidateNotifyErrorメソッドを使うことでカスタム検証ロジックを含めることができます。こちらはnullを返すことでエラーなし。それ以外の値を返すことで、エラーがあるという結果になります。 このメソッドで返した値はObserveErrorChangedに流れていきます。
ReadOnlyReactiveCollection<T>を提供しています。これは読み取り専用のコレクションで、IObservable<CollectionChanged<T>>か、シンプルにIObservable<T>から生成する方法があります。前者は登録・更新・削除・リセットに対応していて、後者は、登録とリセットに対応しています。
ToReadOnlyReactoveCollectionは、値が発行されるたびにコレクションに値を追加します。オプションとして、何かOnNextが発生するとコレクションをリセットするIObservable<Unit>が渡せます。
例として、入力値のログをコレクションとして保持しているが、resetという入力がされるとクリアされるものを作ります。
publicclass MainViewModel
{
    public ReactiveProperty<string> Input { get; private set; }

    public ReadOnlyReactiveCollection<string> InputLog { get; private set; }

    public MainViewModel()
    {
        this.Input = new ReactiveProperty<string>();

        this.InputLog = this.Input
            // Inputの値が発行されるたびに追加されるコレクションを作成
            .ToReadOnlyReactiveCollection(
                // リセットのきっかけはInputがresetになったときthis.Input
                    .Where(s => s == "reset")
                    .Select(_ => Unit.Default));
    }
}
以下のような画面と紐づけて実行します。
<Windowxmlns="http://schemas.microsoft.com/winfx/2006/xaml/presentation"xmlns:x="http://schemas.microsoft.com/winfx/2006/xaml"xmlns:local="clr-namespace:WpfApplication9"x:Class="WpfApplication9.MainWindow"Title="MainWindow"Height="350"Width="525"><Window.DataContext><local:MainViewModel/></Window.DataContext><Grid><Grid.RowDefinitions><RowDefinition Height="Auto" /><RowDefinition /></Grid.RowDefinitions><TextBox Text="{Binding Input.Value, UpdateSourceTrigger=PropertyChanged}" /><ListBox Grid.Row="1"ItemsSource="{Binding InputLog}" /></Grid></Window>
入力値のログをとっているが

入力値がresetになるとクリアされる

先ほど紹介した方法では、追加かリセットしかできないですが、これから紹介する方法では登録・更新・削除を制御することができます。
追加・更新・削除・リセットを制御するにはReactivePropertyのCollectionChanged>T<型のIObservableからToReadOnlyReactiveCollectionメソッドで作成します。
CollectionChanged<T>型には、staticメソッドでAdd, Remove, Replaceが定義されていて、static readonlyなフィールドでResetという値が定義されています。これらの値を流すIObservableを作成することで、柔軟にコレクションの変更が出来るようになります。例えば、ボタンが押された時間を表す文字列を記録するアプリを考えます。以下のように4つのコマンドと選択項目を表すプロパティ、そして、記録を残すコレクションをプロパティに持ち、これらを組み合わせて登録更新削除などを行います。
publicclass MainViewModel
{
    public ReactiveProperty<string> SelectedItem { get; private set; }
    public ReactiveCommand AddCommand { get; private set; }
    public ReactiveCommand ResetCommand { get; private set; }
    public ReactiveCommand UpdateCommand { get; private set; }
    public ReactiveCommand DeleteCommand { get; private set; }

    public ReadOnlyReactiveCollection<string> TimestampLog { get; private set; }

    public MainViewModel()
    {
        this.SelectedItem = new ReactiveProperty<string>();

        this.AddCommand = new ReactiveCommand();
        this.ResetCommand = new ReactiveCommand();
        this.UpdateCommand = this.SelectedItem.Select(v => v != null).ToReactiveCommand();
        this.DeleteCommand = this.SelectedItem.Select(v => v != null).ToReactiveCommand();

        this.TimestampLog = Observable.Merge(
            this.AddCommand
                .Select(_ => CollectionChanged<string>.Add(0, DateTime.Now.ToString())),
            this.ResetCommand.Select(_ => CollectionChanged<string>.Reset),
            this.UpdateCommand
                .Select(_ => this.SelectedItem.Value)
                .Select(v => CollectionChanged<string>.Replace(this.TimestampLog.IndexOf(v), DateTime.Now.ToString())),
            this.DeleteCommand
                .Select(_ => this.SelectedItem.Value)
                .Select(v => CollectionChanged<string>.Remove(this.TimestampLog.IndexOf(v))))
            .ToReadOnlyReactiveCollection();
    }
}
MergeメソッドでAddCommand、ResetCommand、UpdateCommand、DeleteCommandを1本のIObservable<CollectionChanged<T>>にまとめてからコレクションに変換しています。このような合成もReactivePropertyがIObservableである故の強みです。
ReactivePropertyは、シンプルにプロパティとコマンドとコレクションと、いくつかのReactive Extensionsを拡張するユーテリティメソッドから構成されています。そのためMVVMのフル機能はカバーしていません(例としてメッセンジャーとか)。 これらの機能が必要な場合は、お好みのMVVMライブラリを使うことが出来ます。プロパティ定義とコマンドをRxPropertyにして、メッセンジャーを既存ライブラリのものにすればOKです。メッセンジャーをIObservableにする拡張メソッドを用意したり、逆の変換を行うメソッドを用意すると、よりシームレスに使えるようになるかもしれません。
今まで.NET 4.5からだったんですよね地味に。
.NET 4専用のプロジェクトをおこして、そちらにポーティング可能なものだけ移動させて作りました。まだ正式版じゃなくてプレリリースの状態です。なので、NuGetで入れるには以下のようにしてリリース前のパッケージをインストールするようにしてください。
Install-Package ReactiveProperty -Pre
該当バージョンのページ
最近書いてるReactivePropertyですが、Xamarinにも対応しています。なので、簡単にカウントアップするサンプル(ひな形で生成されるやつ)を作ってみようと思います。
使用しているXamarinのバージョンは5.0(build784)です。XamarinのVisual Studioプラグインを利用してVisual Studio上で開発しています。
新規作成から「Android Ice Cream Sandwich Application」を選びます。プロジェクト名は、CounterAppにしました。
NuGetパッケージの管理からReactivePropertyで検索して「ReactiveProperty Portable」をインストールします。最新のXamarinに現時点で対応しているのは、0.4.5-beta3になるので、リリース前のパッケージを含めるを選択してください。
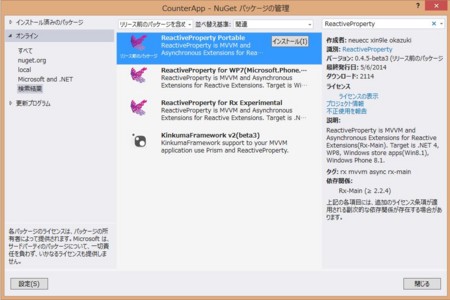
Reactive ExtensionsとReactivePropertyがインストールされます。
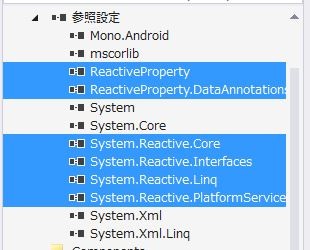
次にModelとなるCounterクラスを作成します。これはINotifyPropertyChangedを実装した普通のC#のクラスです。現在のカウント値を表すプロパティと、カウントアップするメソッドを持っています。
using System.ComponentModel;
using System.Runtime.CompilerServices;

namespace CounterApp
{
    publicclass Counter : INotifyPropertyChanged
    {
        publicevent PropertyChangedEventHandler PropertyChanged;
        privatebool SetProperty<T>(ref T field, T value, [CallerMemberName]string propertyName = null)
        {
            if (Equals(field, value))
            {
                returnfalse;
            }

            field = value;
            var h = this.PropertyChanged;
            if (h != null)
            {
                h(this, new PropertyChangedEventArgs(propertyName));
            }

            returntrue;
        }

        privateint count;

        publicint Count
        {
            get { returnthis.count; }
            privateset { this.SetProperty(refthis.count, value); }
        }

        publicvoid Incr()
        {
            this.Count++;
        }
    }
}
次に、Activityに紐づけるViewModelクラスを作成します。名前はMainViewModelにしました。先ほど作成したCounterクラスを内部にもってActivityに公開するプロパティや操作などをReactivePropertyやReactiveCommandで定義しています。
using Codeplex.Reactive;
using Codeplex.Reactive.Extensions;
using System;
using System.Reactive.Linq;

namespace CounterApp
{
    publicclass MainViewModel
    {
        privatereadonly Counter Model = new Counter();

        // Activityに公開するカウント値public ReactiveProperty<string> CountMessage { get; private set; }

        // インクリメントを行うためのコマンドpublic ReactiveCommand IncrCommand { get; private set; }

        public MainViewModel()
        {
            // model -> rxpropへのOneWayバインディングthis.CountMessage = this.Model
                .ObserveProperty(c => c.Count)
                .Select(i => string.Format("{0} click!", i))
                .ToReactiveProperty();

            // コマンドが実行されたらModelのIncrメソッドを実行するthis.IncrCommand = new ReactiveCommand();
            this.IncrCommand.Subscribe(_ => this.Model.Incr());
        }
    }
}
MainActivityのコードをひな形から修正します。
// バインディング用メソッドが定義されてる名前空間using Codeplex.Reactive.Binding;

using System;

using Android.App;
using Android.Content;
using Android.Runtime;
using Android.Views;
using Android.Widget;
using Android.OS;

namespace CounterApp
{
    [Activity(Label = "CounterApp", MainLauncher = true, Icon = "@drawable/icon")]
    publicclass MainActivity : Activity
    {
        // ViewModelprivatereadonly MainViewModel DataContext = new MainViewModel();

        protectedoverridevoid OnCreate(Bundle bundle)
        {
            base.OnCreate(bundle);

            // Set our view from the "main" layout resource
            SetContentView(Resource.Layout.Main);

            // Get our button from the layout resource,// and attach an event to it
            var button = FindViewById<Button>(Resource.Id.MyButton);

            // CountMessageをbuttonのTextプロパティへバインドthis.DataContext.CountMessage.BindTo(button, b => b.Text);

            // コマンドをイベントハンドラに変換してボタンと紐づける
            button.Click += this.DataContext.IncrCommand.ToEventHandler();
        }
    }
}
ReactivePropertyを通常のプロパティにバインドするためのBindToという拡張メソッドが、Codeplex.Reactive.Binding名前空間に用意されているので、それを使ってButtonのTextと紐付けを行います。
コマンドはToEventHandlerという拡張メソッドでイベントハンドラへ変換する拡張メソッドが、同じくCodeplex.Reactive.Binding名前空間に用意されてるので、それを使ってButtonのClickイベントと紐づけます。
MonoForAndroid_API_15のエミュレータを起動してじっくりと配備を行います。ここらへん実機がほしくなりますね…。
実行すると以下のような画面が表示されます。
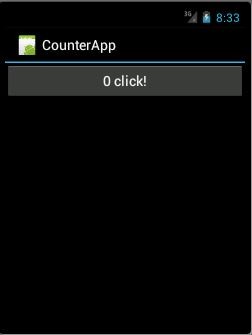
ボタンを押すとカウントアップされていきます。

簡単なサンプルレベルでしか試していませんが、とりあえず動く…!ということでReactivePropertyをよろしくお願いいたします。
betaで出していたものを-Preつけなくても入るようにしました。ついでに、要望のあったReactivePropertyへのデフォルトコンストラクタも追加しています。
Codeplexのページはこちらから。
NuGetのページはこちらから。
ちょっとしたTipsですが…。
Prism for WinRTとReactivePropertyを同時に使う場合以下の点に気を付けるといいです。
ReactivePropertyは、コンストラクタで組み立てるのが一番スムーズなので出来るだけ外部からDIするものはプロパティでインジェクションするのではなくて、コンストラクタでインジェクションしましょう。そうすると、コンストラクタで準備万端状態になるので、ReactivePropertyの組み立てがスムーズに行えます。
どうしてもプロパティでDIしたいときや、ナビゲーションのタイミングで初期化したいものなどがあるときも、以下の方法で、やるとコンストラクタでReactivePropertyの組み立てができます。
こうしておくとObservePropertyを使って監視できるのでコンストラクタでさくっといけるようになります。
public Hoge()
{
  // DI対象のプロパティが全部設定が終わったら初期化する
  var initCompleted = Observable.Merge(
    this.ObserveProperty(o => o.DIProp1).Where(v => v != null),
    this.ObserveProperty(o => o.DIProp2).Where(v => v != null))
    .Skip(1) // もっといいやり方ありそう…
    .Subscribe(_ =>
    {
        // ここで初期化
    });
}
サスペンド時にReactivePropertyの値を保存したいときは、リストアしたくないReactivePropertyにIgnoreDataMember属性を付けたうえで、以下のようなプロパティをViewModelに定義しておくといい感じにしてくれます。
publicclass MainPageViewModel : ViewModel
{
    // リストア対象のReactivePropertypublic ReactiveProperty<string> Input { get; private set; }

    // リストア対象外のReactiveProperty
    [IgnoreDataMember]
    public ReactiveProperty<string> Output { get; private set; }

    // Prism for WinRTのリストアの仕組みに乗せるためのプロパティ
    [RestorableState]
    publicstring PackData
    {
        get { return SerializeHelper.PackReactivePropertyValue(this); }
        set { SerializeHelper.UnpackReactivePropertyValue(this, value); }
    }
}
Prism for WinRTとReactivePropertyの連携書いてみたので、WPFのPrism5での使用方法について書いてみようと思います。
以下のライブラリをNuGetから追加します。
続いて、以下のアセンブリを参照設定から追加します。
ReactivePropertyになじむように、PrismのデフォルトのIInteractionRequestの実相ではなく、自前のTaskベースの実装を行います。といってもコールバックで受けてた続きの処理をTaskにするだけなので、そんなに難しくないです。
using Microsoft.Practices.Prism.Interactivity.InteractionRequest;
using System;
using System.Threading.Tasks;

namespace PrismRxApp.Mvvm
{
    // コールバックではなくTaskで続きの処理を受け取るようにするpublicsealedclass AsyncInteractionRequest<T> : IInteractionRequest
        where T : INotification
    {
        publicevent EventHandler<InteractionRequestedEventArgs> Raised;
        privatevoid OnRaised(InteractionRequestedEventArgs e)
        {
            var h = this.Raised;
            if (h != null)
            {
                h(this, e);
            }
        }

        public Task<T> RaiseAsync(T context)
        {
            var source = new TaskCompletionSource<T>();
            this.OnRaised(new InteractionRequestedEventArgs(context, () => source.SetResult(context)));
            return source.Task;
        }
    }
}
PrismのMessengerであるInteractionRequestは、IInteractionRequestを実装していれば何でもよくて、守るべき約束事はRaisedイベントを適時発行することだけです。なので、こういう風にTaskにくるんでやるのも楽でいいです。ここらへんの抽象化のさじ加減は、いい感じだなと思います。
では、カウンターアプリでも作ってみようと思います。今回のカウンターは0より小さい値にはカウントダウンできない。10より大きい値は危険という感じのカウンターにしようと思います。危険な値でカウントアップする場合は、確認ダイアログを出そうと思います。
ということでカウンタークラスを作成します。ちょっと条件が複雑になってきたのでコード長くなりますね。サンプルにしては。
using Microsoft.Practices.Prism.Mvvm;
using System;

namespace PrismRxApp.Models
{
    // 0以下にならない、10以上になると危険フラグがONになるカウンタクラスpublicclass Counter : BindableBase
    {
        privateint count;

        publicint Count
        {
            get { returnthis.count; }
            privateset { this.SetProperty(refthis.count, value); }
        }

        privatebool isDanger;

        publicbool IsDanger
        {
            get { returnthis.isDanger; }
            privateset { this.SetProperty(refthis.isDanger, value); }
        }

        privatebool canDecrement;

        publicbool CanDecrement
        {
            get { returnthis.canDecrement; }
            set { this.SetProperty(refthis.canDecrement, value); }
        }


        publicvoid Increment()
        {
            this.Count++;
            this.UpdateState();
        }

        publicvoid Decrement()
        {
            if (!this.CanDecrement)
            {
                thrownew InvalidOperationException();
            }

            this.Count--;
            this.UpdateState();
        }

        privatevoid UpdateState()
        {
            this.IsDanger = this.Count >= 10;
            this.CanDecrement = this.Count > 0;
        }
    }
}
次に、ViewModelの作成です。こいつは、Incrementコマンド実行の処理がIsDangerがtrueのときはInteractionRequestを通じてViewに確認要求を出して、IsDangerがfalseのときは素通りして、CounterクラスのIncrementを呼び出すという点以外は特筆すべき点はないと思います。
using Codeplex.Reactive;
using Codeplex.Reactive.Extensions;
using Microsoft.Practices.Prism.Interactivity.InteractionRequest;
using PrismRxApp.Models;
using PrismRxApp.Mvvm;
using System;
using System.Reactive.Linq;
using System.Reactive.Threading.Tasks;

namespace PrismRxApp.ViewModels
{
    publicclass MainWindowViewModel
    {
        privatereadonly Counter Model = new Counter();

        // 画面に出力するメッセージpublic ReactiveProperty<string> Message { get; private set; }

        // インクリメントに確認が必要な時にVに確認要求を投げるInteractionRequestpublic AsyncInteractionRequest<Confirmation> IncrementConfirmationRequest { get; private set; }

        // カウンターをインクリメントするpublic ReactiveCommand IncrementCommand { get; private set; }

        // カウンターをデクリメントするpublic ReactiveCommand DecrementCommand { get; private set; }

        public MainWindowViewModel()
        {
            // メッセージはカウンターの値を適当にフォーマッティングしたものthis.Message = this.Model
                .ObserveProperty(o => o.Count)
                .Select(i => string.Format("Counter value: {0}", i))
                .ToReactiveProperty();

            this.IncrementConfirmationRequest = new AsyncInteractionRequest<Confirmation>();

            this.IncrementCommand = new ReactiveCommand();
            this.IncrementCommand
                .SelectMany(
                    _ => Observable.If(
                        // インクリメントするのが危険なら
                        () => this.Model.IsDanger,
                        // 確認した結果のIO<bool>を返す
                        Observable.Defer(() =>
                            this.IncrementConfirmationRequest
                                .RaiseAsync(new Confirmation { Title = "confirmation", Content = "Increment?" })
                                .ToObservable()
                                .Select(c => c.Confirmed)
                        ),
                        // 普段は、trueを流す
                        Observable.Return(true)
                    )
                )
                // 結果がtrueの場合だけインクリメントする
                .Where(b => b)
                .Subscribe(_ =>
                {
                    this.Model.Increment();
                });

            // デクリメント可能なときだけデクリメントするthis.DecrementCommand = this.Model.ObserveProperty(o => o.CanDecrement).ToReactiveCommand();
            this.DecrementCommand.Subscribe(_ => this.Model.Decrement());

        }
    }
}
Viewは、Prismの命名規約にしたがって自動でViewModelをDataContextに紐づけるためにIViewを実装して、ViewModelLocationProviderを使ってDataContextの設定を行うようにしています。
using Microsoft.Practices.Prism.Mvvm;
using System.Windows;

namespace PrismRxApp.Views
{
    /// <summary>/// MainWindow.xaml の相互作用ロジック/// </summary>publicpartialclass MainWindow : Window, IView
    {
        public MainWindow()
        {
            InitializeComponent();
            ViewModelLocationProvider.AutoWireViewModelChanged(this);
        }
    }
}
あとは、ちゃちゃっとXAML。ボタン2個とメッセージ表示用のテキストボックス。あとは、VMからの要求にこたえて確認ダイアログを出すBehaviorを仕込んでおきます。
<Windowxmlns="http://schemas.microsoft.com/winfx/2006/xaml/presentation"xmlns:x="http://schemas.microsoft.com/winfx/2006/xaml"xmlns:d="http://schemas.microsoft.com/expression/blend/2008"xmlns:mc="http://schemas.openxmlformats.org/markup-compatibility/2006"xmlns:ViewModels="clr-namespace:PrismRxApp.ViewModels"xmlns:i="http://schemas.microsoft.com/expression/2010/interactivity"xmlns:Custom="http://www.codeplex.com/prism"mc:Ignorable="d"x:Class="PrismRxApp.Views.MainWindow"Title="MainWindow"Height="300"Width="300"d:DataContext="{d:DesignInstance {x:Type ViewModels:MainWindowViewModel}, IsDesignTimeCreatable=True}"><i:Interaction.Triggers><Custom:InteractionRequestTrigger SourceObject="{Binding IncrementConfirmationRequest, Mode=OneWay}"><Custom:PopupWindowAction IsModal="True"CenterOverAssociatedObject="True" /></Custom:InteractionRequestTrigger></i:Interaction.Triggers><Grid><Grid.ColumnDefinitions><ColumnDefinition Width="145*"/><ColumnDefinition Width="147*"/></Grid.ColumnDefinitions><Grid.RowDefinitions><RowDefinition Height="Auto"/><RowDefinition Height="Auto"/><RowDefinition/></Grid.RowDefinitions><Button Content="Increment"Grid.Row="1"Margin="5"Command="{Binding IncrementCommand, Mode=OneWay}"/><Button Content="Decrement"Grid.Column="1"Grid.Row="1"Margin="5"Command="{Binding DecrementCommand, Mode=OneWay}"/><TextBlock Grid.ColumnSpan="2"TextWrapping="Wrap"Text="{Binding Message.Value}"Margin="5"/></Grid></Window>
Prism 5から、PopupWindowActionというActionが追加されて、こいつがNotificationとConfirmationに対するデフォルトのWindowを表示する機能を持ってるので積極的に使っていきます。状況に応じてカスタムのWindowを出す機能もあります(使ったことないけど)
実行してみます。カウンタ値が最初0なのでインクリメントだけできる画面が出てきます。
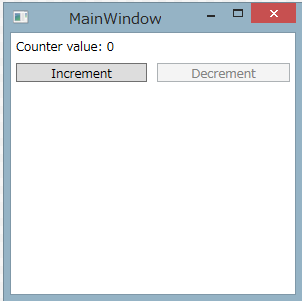
インクリメントボタンを押していくとデクリメントもできるようになります。
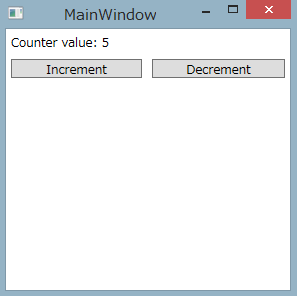
10以上でIncrementをすると確認ダイアログが出てきます。
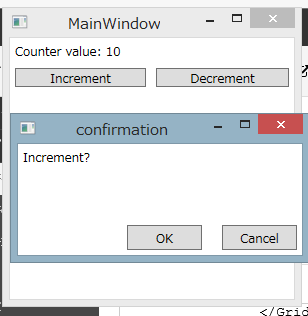
OKを押すとカウントアップされて、Cancelを押すとカウントアップされません。
一応プロジェクトは以下からダウンロードできます。
Visual Studio Onlineにつないでたせいでオフライン環境でVisual Studioが拗ねてしまってデモがスムーズにいかなかったorz
発表資料は以下になります。
DLのURL探してしまったのでメモ。 これでユニバーサルアプリ正式ですね!
先日作ったPrism + ReactivePropertyのカウンターアプリをMvvm Light Toolkit使って作ってみました。
コードレシピにアップしてます。
あれカスタマイズできないんですよね、なかなか。 ということでコードレシピにコードをアップしました。
毎回NuGetからAngularJSと型定義入れたりするのがめんどくさくなったので、プロジェクトテンプレート化しました。zipのまま、TemplatesのProjectTemplatesフォルダにつっこめば使えると思います。