Quantcast
Channel: かずきのBlog@hatena
Viewing all 1388 articles
Browse latest View live

PrismのViewModelでイベントの購読解除などの後始末をするタイミング

$
0
0

PrismのViewModelには画面遷移してきたタイミングで呼ばれるOnNavigatedToと画面から離れるときやサスペンド時に呼ばれるOnNavigatingFromメソッドがあります。ページが有効な間はイベントを購読したいというケースでは、OnNavigatedToでイベントの購読を行い、OnNavigatingFromで購読解除すると一見よさそうに見えます。

デバッガをアタッチしてる状態では、それでいいのですが、デバッガをアタッチしてない状態では画面を最小化したり電話でバックグラウンドに回した時に、実はOnNavigatingFromがsuspending引数がtrueになって呼び出されます。サスペンドからの復帰時にはOnNavigatedToは呼ばれないという厄介な状態になります。(完全にアプリが終了されたら起動シーケンスからやり直しなので呼ばれますが)

なので、OnNavigatingFromで無条件に購読解除すると、サスペンドからの復帰時にイベントの処理が動かないという状況になったりします。これを回避するには以下のように、suspendingがfalseの時だけイベントの購読解除をするといったような処理が必要になります。

publicoverridevoid OnNavigatedTo(NavigatedToEventArgs e, Dictionary<string, object> viewModelState)
{
    base.OnNavigatedTo(e, viewModelState);

    // ここでイベント購読
}

publicoverridevoid OnNavigatingFrom(NavigatingFromEventArgs e, Dictionary<string, object> viewModelState, bool suspending)
{
    base.OnNavigatingFrom(e, viewModelState, suspending);

    if (!suspending)
    {
        // ここでイベント購読解除
    }
}

ちょっとはまった。


UWPでWin2Dで描いた画像を保存しよう

$
0
0

こんな感じでいけました。

CanvasがCanvasControlの変数になります。

var picker = new FileSavePicker();
picker.FileTypeChoices.Add("png", new List<string> { ".png" });
var file = await picker.PickSaveFileAsync();
if (file == null) { return; }

var size = this.Canvas.RenderSize;
var renderTargetBitmap = new RenderTargetBitmap();
await renderTargetBitmap.RenderAsync(this.Canvas, (int)size.Width, (int)size.Height);

var displayInformation = DisplayInformation.GetForCurrentView();

using (var s = await file.OpenAsync(FileAccessMode.ReadWrite))
{
    var encoder = await BitmapEncoder.CreateAsync(BitmapEncoder.PngEncoderId, s);
    encoder.SetPixelData(
        BitmapPixelFormat.Bgra8,
        BitmapAlphaMode.Ignore,
        (uint)renderTargetBitmap.PixelWidth,
        (uint)renderTargetBitmap.PixelHeight,
        displayInformation.LogicalDpi,
        displayInformation.LogicalDpi,
        (await renderTargetBitmap.GetPixelsAsync()).ToArray());
    await encoder.FlushAsync();
}

参考

stackoverflow.com

UWPでWin2Dを使ってオフスクリーンに描画する

$
0
0

画面に表示しない状態で描画したいときもあると思うのでやってみました。

手順としては、CanvasDevice.GetSharedDevice()でCanvasDeviceを取得して、それをもとにCanvasRenderTargetを作成します。CanvasRenderTargetができたらCreateDrawingSessionでCanvasDrawingSessionが作れるので、DrawXXXXを呼んでいきます。

選択した画像にオフスクリーンで文字を描きこんでファイルに保存するコードは以下のようになります。(画面にボタンを置いてクリックイベントでがりっとやってるコードです。)

using Microsoft.Graphics.Canvas;
using System;
using System.Collections.Generic;
using System.Threading.Tasks;
using Windows.Graphics.Display;
using Windows.Graphics.Imaging;
using Windows.Storage;
using Windows.Storage.Pickers;
using Windows.UI;
using Windows.UI.Xaml;
using Windows.UI.Xaml.Controls;

namespace App39
{
    publicsealedpartialclass MainPage : Page
    {
        public MainPage()
        {
            this.InitializeComponent();
        }

        private async void ProcessButton_Click(object sender, RoutedEventArgs e)
        {
            var sourceFile = await this.PickOpenAsync();
            if (sourceFile == null) { return; }

            var device = CanvasDevice.GetSharedDevice();
            var image = default(CanvasBitmap);
            using (var s = await sourceFile.OpenReadAsync())
            {
                image = await CanvasBitmap.LoadAsync(device, s);
            }

            var offscreen = new CanvasRenderTarget(
                device, (float)image.Bounds.Width, (float)image.Bounds.Height, 96);

            using (var ds = offscreen.CreateDrawingSession())
            {
                ds.DrawImage(image, 0, 0);
                ds.DrawText("Hello world", 10, 10, Colors.Blue);
            }

            var displayInformation = DisplayInformation.GetForCurrentView();
            var destFile = await PickSaveAsync();
            using (var s = await destFile.OpenAsync(FileAccessMode.ReadWrite))
            {
                var encoder = await BitmapEncoder.CreateAsync(BitmapEncoder.PngEncoderId, s);
                encoder.SetPixelData(
                    BitmapPixelFormat.Bgra8,
                    BitmapAlphaMode.Ignore,
                    (uint)offscreen.Size.Width,
                    (uint)offscreen.Size.Height,
                    displayInformation.LogicalDpi,
                    displayInformation.LogicalDpi,
                    offscreen.GetPixelBytes());
                await encoder.FlushAsync();
            }
        }

        private async Task<StorageFile> PickOpenAsync()
        {
            var picker = new FileOpenPicker();
            picker.FileTypeFilter.Add(".png");
            picker.FileTypeFilter.Add(".jpg");
            picker.FileTypeFilter.Add(".jpeg");

            return await picker.PickSingleFileAsync();
        }

        private async Task<StorageFile> PickSaveAsync()
        {
            var picker = new FileSavePicker();
            picker.FileTypeChoices.Add("png", new List<string> { ".png" });
            return await picker.PickSaveFileAsync();
        }
    }
}

UWPでユーザー名を取得する

$
0
0

Win8系の頃はUserInformationっていうクラスで取れてたんですがWin10では非推奨になったんですね。知りませんでした。

ということでWindows.System.Userクラスを使ってユーザー名を取ります。

手順としては、User.FindAllAsyncでユーザーを取得して、GetPropertyAsyncにKnownUserPropertiesを指定して各種情報を取るという手順です。

あと、重要なことですがPackage.appxmanifestの機能で「ユーザーアカウント情報」にチェックを入れないと動きません。重要なことですがPackage.appxmanifestの機能で「ユーザーアカウント情報」にチェックを入れないと動きません。大事なことなので2回。エラーも出ずにするっと動きます。

例えばユーザー名を取りたかったら以下のような感じです。

// ローカルユーザーでローカルで認証されてる人だけ
var user = (await User.FindAllAsync(UserType.LocalUser, UserAuthenticationStatus.LocallyAuthenticated)).FirstOrDefault();
if (user == null) { return; }

var displayName = await user.GetPropertyAsync(KnownUserProperties.AccountName) asstring;
if (string.IsNullOrWhiteSpace(displayName))
{
    displayName = await user.GetPropertyAsync(KnownUserProperties.DisplayName) asstring;
}
if (string.IsNullOrWhiteSpace(displayName))
{
    displayName = $"{await user.GetPropertyAsync(KnownUserProperties.FirstName)} {await user.GetPropertyAsync(KnownUserProperties.LastName)}";
}

// 表示してみる
var dialog = new MessageDialog(displayName);
await dialog.ShowAsync();

実行すると、ユーザー情報にアクセスしていいかというのを求められるので、それで許可した場合ユーザー情報を取ることが出来ます。

因みに、私のマシンではFindAllAsyncが複数返ってくる条件がわかりませんでした。どういうときに複数返ってくるんだろう…。Server OSで複数ユーザーが同時にログインしてるときなのだろうか。

Win10で同時にサインインしてるだけだと、複数ユーザーは返ってきませんでした。

UWPで印刷

$
0
0

基本的にWindows 8系の頃と変わってません。

OnNavigatedToで印刷系各種準備を行います。一見無意味に見えるPrintDocumentSourceの取得も意味があるので写経しましょう。

private PrintDocument printDocument;
private IPrintDocumentSource printDocumentSource;

public MainPage()
{
    this.InitializeComponent();
}

protectedoverridevoid OnNavigatedTo(NavigationEventArgs e)
{
    base.OnNavigatedTo(e);

    this.printDocument = new PrintDocument();
    this.printDocumentSource = this.printDocument.DocumentSource;
    this.printDocument.GetPreviewPage += this.PrintDocument_GetPreviewPage;
    this.printDocument.Paginate += this.PrintDocument_Paginate;
    this.printDocument.AddPages += this.printDocument_AddPages;

    PrintManager.GetForCurrentView().PrintTaskRequested += this.MainPage_PrintTaskRequested;
}

GetPreviewPageがプレビューページの表示処理で、Paginateが、ページの中身を作る処理とページ数を確定するところで、AddPagesが印刷する表示を持ったUIElementを実際に印刷処理に渡すところです。そして、PrintTaskRequestedイベントハンドラを登録して印刷の準備完了です。

各種イベントハンドラの中身は以下のような感じになります。画面にImageという名前のImageコントロールを置いていて、それを印刷するコードになっています。

privatevoid printDocument_AddPages(object sender, AddPagesEventArgs e)
{
    // 印刷(複数ページあるときはAddPageを複数回呼ぶ)this.printDocument.AddPage(this.Image);
    this.printDocument.AddPagesComplete();
}

privatevoid PrintDocument_Paginate(object sender, PaginateEventArgs e)
{
    // ここで印刷コンテンツを作ってページ数を設定するthis.printDocument.SetPreviewPageCount(1, PreviewPageCountType.Intermediate);
}

privatevoid PrintDocument_GetPreviewPage(object sender, GetPreviewPageEventArgs e)
{
    // プレビューを表示するthis.printDocument.SetPreviewPage(e.PageNumber, this.Image);
}

privatevoid MainPage_PrintTaskRequested(PrintManager sender, PrintTaskRequestedEventArgs args)
{
    // プリントのタスクを登録する
    args.Request.CreatePrintTask("Sample", req =>
    {
        req.SetSource(this.printDocumentSource);
    });
}

最後にボタンのクリックとかで印刷のUIを呼び出しましょう。

private async void Button_Click(object sender, RoutedEventArgs e)
{
    await PrintManager.ShowPrintUIAsync();
}

これで印刷プレビューが表示されて実際に印刷がされます。

複数ページあるようなアプリでは、別画面に行くときとかにプリンタとの接続を切っておきます。

protectedoverridevoid OnNavigatedFrom(NavigationEventArgs e)
{
    base.OnNavigatedFrom(e);

    PrintManager.GetForCurrentView().PrintTaskRequested -= this.MainPage_PrintTaskRequested;
}

ネットワークの接続状態を確認する

$
0
0

UWPでインターネットの接続状態を確認するには、NetworkInformationクラスを使います。

NetworkInformationクラスのGetInternetConnectionProfileでインターネット接続へのConnectionprofileクラスが取得できます。これに対して、GetNetworkConnectivityLevelを呼び出すとネットワークの接続状態が取れます。NetworkInformationクラスの状態が変わったときに発生するイベントのNetworkStatusChangedイベントを組み合わせると、ネットワークの状態をリアルタイムに表示することが出来ます。

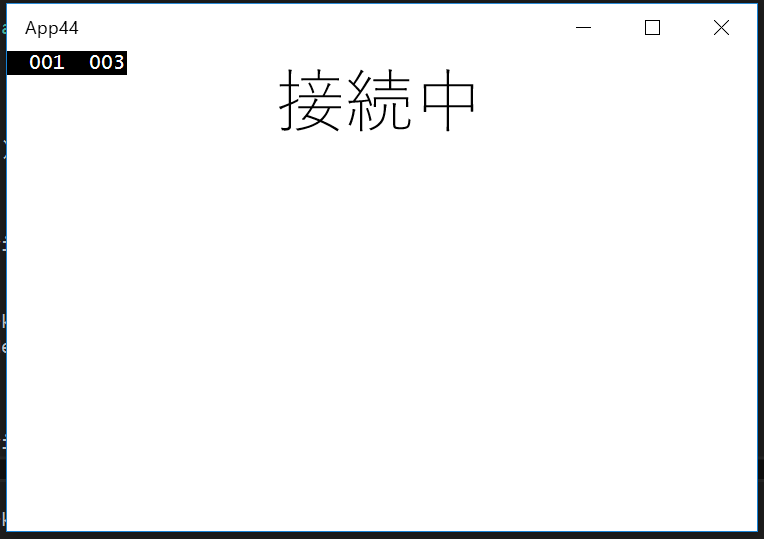
画面にTextBlockをTextBlockという名前でおいて以下のコードをコードビハインドに書くとネットワークの状況に応じて接続状況が画面に表示されるようになります。

using System;
using Windows.Networking.Connectivity;
using Windows.UI.Xaml.Controls;
using Windows.UI.Xaml.Navigation;

namespace App44
{
    publicsealedpartialclass MainPage : Page
    {
        public MainPage()
        {
            this.InitializeComponent();
        }

        protectedoverridevoid OnNavigatedTo(NavigationEventArgs e)
        {
            base.OnNavigatedTo(e);
            NetworkInformation.NetworkStatusChanged += this.NetworkInformation_NetworkStatusChanged;
            this.NetworkInformation_NetworkStatusChanged(null);
        }

        protectedoverridevoid OnNavigatedFrom(NavigationEventArgs e)
        {
            base.OnNavigatedFrom(e);
            NetworkInformation.NetworkStatusChanged -= this.NetworkInformation_NetworkStatusChanged;
        }

        private async void NetworkInformation_NetworkStatusChanged(object sender)
        {
            var ni = NetworkInformation.GetInternetConnectionProfile();
            if (ni != null)
            {
                var text = default(string);
                if (ni.GetNetworkConnectivityLevel() == NetworkConnectivityLevel.InternetAccess)
                {
                    text = "接続中";
                }
                else
                {
                    text = "接続中ではありません。";
                }

                if (this.Dispatcher.HasThreadAccess)
                {
                    this.TextBlock.Text = text;
                }
                else
                {
                    await this.Dispatcher.RunAsync(Windows.UI.Core.CoreDispatcherPriority.Normal, () =>
                    {
                        this.TextBlock.Text = text;
                    });
                }
            }
        }
    }
}

f:id:okazuki:20160305172103p:plain

UWPで予定を追加したりしたい

$
0
0

UWPでは簡単に予定を追加したり削除したりできます。

AppointmentManagerクラスに各種メソッドがあります。

  • ShowAddAppointmentAsync : 予定を追加
  • ShowRemoveAppointmentAsync : 予定を削除
  • ShowAppointmentDetailAsync : 予定の詳細
  • ShowEditNewAppointmentAsync : 編集とか
  • ShowReplaceAppointmentAsync : 置き換え

簡単に使ってみます。画面にボタンを2つ置いて以下のようなコードをコードビハインドに書いてみます。(ボタンクリックのイベントハンドラ作ってからね)

using System;
using Windows.ApplicationModel.Appointments;
using Windows.Foundation;
using Windows.UI.Popups;
using Windows.UI.Xaml;
using Windows.UI.Xaml.Controls;

namespace App45
{
    publicsealedpartialclass MainPage : Page
    {
        public MainPage()
        {
            this.InitializeComponent();
        }

        privatestring appointmentId;

        private async void Button_Click(object sender, RoutedEventArgs e)
        {
            var appointment = new Appointment
            {
                AllDay = true,
                Subject = "Test",
                Details = "予定の詳細"
            };

            this.appointmentId = await AppointmentManager.ShowAddAppointmentAsync(appointment, Rect.Empty);
            var dialog = new MessageDialog(this.appointmentId);
            await dialog.ShowAsync();
        }

        private async void Button_Click_1(object sender, RoutedEventArgs e)
        {
            if (string.IsNullOrWhiteSpace(this.appointmentId)) { return; }

            if (await AppointmentManager.ShowRemoveAppointmentAsync(this.appointmentId, Rect.Empty))
            {
                var dialog = new MessageDialog("削除しました");
                await dialog.ShowAsync();
            }
        }
    }
}

これで、カレンダーアプリが立ち上がって予定の追加をしたり、削除したりといったことが出来るようになります。ShowXXXXAppointmentAsyncを呼ぶと以下のようなカレンダーアプリが立ち上がって予定の操作が出来ます。(決して強制的に予定を追加したり削除したりできるわけではなくて、UIを介して操作が行われるという点が注意です)

UWPでマイクから録音したい

$
0
0

MediaCaptureクラスを使ってやることが出来ます。

まず、MediaCaptureクラスの初期化処理が必要になります。OnNavigatedToあたりに書くといいでしょう。

private MediaCapture MediaCapture { get; set; }
protectedoverride async void OnNavigatedTo(NavigationEventArgs e)
{
    base.OnNavigatedTo(e);

    this.MediaCapture = new MediaCapture();
    var settings = new MediaCaptureInitializationSettings
    {
        StreamingCaptureMode = StreamingCaptureMode.Audio
    };

    await this.MediaCapture.InitializeAsync(settings);
}

次に録音処理です。Streamに吐き出したり直接ファイルに吐き出したりできます。ここではいったんメモリに吐き出すようにしました。手順としては、StartRecordToStreamAsyncメソッドを呼び出すだけです。引数で、何形式で録音するのかということと、出力先を指定します。

private InMemoryRandomAccessStream Stream { get; set; }


// 録音this.Stream = new InMemoryRandomAccessStream();
await this.MediaCapture.StartRecordToStreamAsync(
    MediaEncodingProfile.CreateMp3(AudioEncodingQuality.Medium),
    this.Stream);

録音を停止するにはStopRecordAsyncを呼び出すだけです。後は、ファイルに保存するなりできます。ここではFileSavePickerで選択したファイルに保存するようにしています。

await this.MediaCapture.StopRecordAsync();

var picker = new FileSavePicker();
picker.FileTypeChoices.Add("mp3", new List<string> { ".mp3" });
var file = await picker.PickSaveFileAsync();
if (file != null)
{
    using (var os = await file.OpenStreamForWriteAsync())
    {
        this.Stream.Seek(0);
        await this.Stream.AsStreamForRead().CopyToAsync(os);
        await os.FlushAsync();
    }
}
this.Stream.Dispose();
this.Stream = null;

最後に大事なことなのですがPackage.appxmanifestの機能のところで「マイク」にチェックを入れてマイクへのアクセスを行えるようにします。

コード全体

コード全体です。画面にボタンを1つおいて、それのクリックイベントハンドラに処理を書いています。

<Page x:Class="App46.MainPage"xmlns="http://schemas.microsoft.com/winfx/2006/xaml/presentation"xmlns:x="http://schemas.microsoft.com/winfx/2006/xaml"xmlns:local="using:App46"xmlns:d="http://schemas.microsoft.com/expression/blend/2008"xmlns:mc="http://schemas.openxmlformats.org/markup-compatibility/2006"mc:Ignorable="d"><Grid Background="{ThemeResource ApplicationPageBackgroundThemeBrush}"><Button Content="録音/停止"Click="Button_Click" /></Grid></Page>
using System;
using System.Collections.Generic;
using System.IO;
using Windows.Media.Capture;
using Windows.Media.MediaProperties;
using Windows.Storage.Pickers;
using Windows.Storage.Streams;
using Windows.UI.Xaml;
using Windows.UI.Xaml.Controls;
using Windows.UI.Xaml.Navigation;

namespace App46
{
    publicsealedpartialclass MainPage : Page
    {
        private InMemoryRandomAccessStream Stream { get; set; }
        private MediaCapture MediaCapture { get; set; }
        public MainPage()
        {
            this.InitializeComponent();
        }

        protectedoverride async void OnNavigatedTo(NavigationEventArgs e)
        {
            base.OnNavigatedTo(e);

            this.MediaCapture = new MediaCapture();
            var settings = new MediaCaptureInitializationSettings
            {
                StreamingCaptureMode = StreamingCaptureMode.Audio
            };

            await this.MediaCapture.InitializeAsync(settings);
        }

        private async void Button_Click(object sender, RoutedEventArgs e)
        {
            if (this.Stream == null)
            {
                this.Stream = new InMemoryRandomAccessStream();
                await this.MediaCapture.StartRecordToStreamAsync(
                    MediaEncodingProfile.CreateMp3(AudioEncodingQuality.Medium),
                    this.Stream);
            }
            else
            {
                await this.MediaCapture.StopRecordAsync();

                var picker = new FileSavePicker();
                picker.FileTypeChoices.Add("mp3", new List<string> { ".mp3" });
                var file = await picker.PickSaveFileAsync();
                if (file != null)
                {
                    using (var os = await file.OpenStreamForWriteAsync())
                    {
                        this.Stream.Seek(0);
                        await this.Stream.AsStreamForRead().CopyToAsync(os);
                        await os.FlushAsync();
                    }
                }
                this.Stream.Dispose();
                this.Stream = null;
            }
        }
    }
}

WPF4.5入門のKindle版をアップデートしました

$
0
0

www.amazon.co.jp

図がずれたり、図中の日本語が文字化けしていたのを、全て画像化したので文字化け等が無くなりました。

因みに、上記のKindleで売ってるものは、SlideShareからPDF形式のものはダウンロード出来ます。通常はそちらを読んで頂いて買ってもいいかな?とか、どうしてもKindleで読みたいというかたはぽちって頂ければと思います。

www.slideshare.net

UWPでSQLiteを使う 準備編

$
0
0

UWPでのデータベースといったらSQLiteといった感じです。小規模なら、クラスのインスタンスをそのままJSON.NETでさくっとシリアライズ・デシリアライズでいいですが、データ量がちょっと多くなってくると、いつ終了してもいいように備えないといけないUWPでは、いちいち全部保存というのも頂けない感じになってきます。

ということでDBを使いましょう。

プロジェクトの作成

UWPのプロジェクトを作成しておきまず。

DBアクセス用ライブラリ

SQLiteをいい感じに使えるようにしてくれるライブラリです。正式リリースされてないEntity Framework Core 1.0か、SQLite.NETのPCL版を使うのがいいと思います。ここでは将来性を買って、Entity Framework Core 1.0のRC1を使っていってみようと思います。

NuGetでプレリリースを含めるを選択して以下のパッケージをインストールします。

  • EntityFramework.SQLite
  • EntityFramework.Commands

RC版の制限事項に依存する設定

.NET Nativeと相性が悪いところが今の段階ではあるみたいで、それを解決するためにおまじないを追加しないといけません。PropertiesのDefault.rd.xmlに対して、以下の1行を追加します。

<Type Name="System.Collections.ArrayList"Dynamic="Required All" />

追加する場所はAdd your application specific runtime directives here.というのが書いてあるしたになります。追加したファイルは以下のようになります。

<!--    This file contains Runtime Directives used by .NET Native. The defaults here are suitable for most    developers. However, you can modify these parameters to modify the behavior of the .NET Native    optimizer.    Runtime Directives are documented at http://go.microsoft.com/fwlink/?LinkID=391919    To fully enable reflection for App1.MyClass and all of its public/private members<Type Name="App1.MyClass" Dynamic="Required All"/>    To enable dynamic creation of the specific instantiation of AppClass<T> over System.Int32<TypeInstantiation Name="App1.AppClass" Arguments="System.Int32" Activate="Required Public" />    Using the Namespace directive to apply reflection policy to all the types in a particular namespace<Namespace Name="DataClasses.ViewModels" Seralize="All" />--><Directives xmlns="http://schemas.microsoft.com/netfx/2013/01/metadata"><Application><!--      An Assembly element with Name="*Application*" applies to all assemblies in      the application package. The asterisks are not wildcards.    --><Assembly Name="*Application*"Dynamic="Required All"/><!-- Add your application specific runtime directives here. --><Type Name="System.Collections.ArrayList"Dynamic="Required All" /></Application></Directives>

動作確認

以下のようなクラスを定義します。

using Microsoft.Data.Entity;

namespace App47
{
    publicclass SampleContext : DbContext
    {
        public DbSet<Person> People { get; set; }

        protectedoverridevoid OnConfiguring(DbContextOptionsBuilder optionsBuilder)
        {
            optionsBuilder.UseSqlite("sample.db");
        }

        protectedoverridevoid OnModelCreating(ModelBuilder modelBuilder)
        {
            // PersonのNameを必須入力に
            modelBuilder.Entity<Person>()
                .Property(x => x.Name)
                .IsRequired();
        }
    }

    publicclass Person
    {
        publicint Id { get; set; }
        publicstring Name { get; set; }
    }
}

DBの作成

パッケージマネージャーコンソールで以下のコマンドを実行します。

PM> Add-Migration Sample
To undo this action, use Remove-Migration.

画面

画面を作ります。

<Page x:Class="App47.MainPage"xmlns="http://schemas.microsoft.com/winfx/2006/xaml/presentation"xmlns:x="http://schemas.microsoft.com/winfx/2006/xaml"xmlns:local="using:App47"xmlns:d="http://schemas.microsoft.com/expression/blend/2008"xmlns:mc="http://schemas.openxmlformats.org/markup-compatibility/2006"mc:Ignorable="d"><Grid Background="{ThemeResource ApplicationPageBackgroundThemeBrush}"><ListView x:Name="ListView"><ListView.ItemTemplate><DataTemplate x:DataType="local:Person"><TextBlock Text="{x:Bind Name}" /></DataTemplate></ListView.ItemTemplate></ListView></Grid></Page>

コードビハインドで、適当にデータを作って読み込む処理を書きます。

using Microsoft.Data.Entity;
using System.Linq;
using System.Runtime.InteropServices.WindowsRuntime;
using Windows.UI.Xaml.Controls;
using Windows.UI.Xaml.Navigation;

namespace App47
{
    publicsealedpartialclass MainPage : Page
    {

        public MainPage()
        {
            this.InitializeComponent();

            using (var ctx = new SampleContext())
            {
                // どこかでやらないといけないっぽい通常はApp.xaml.csかな
                ctx.Database.Migrate();

                // データ追加
                var people = Enumerable.Range(1, 100).Select(x => new Person { Name = $"tanaka {x}" }).ToArray();
                ctx.People.AddRange(people);
                ctx.SaveChanges();
            }
        }

        protectedoverridevoid OnNavigatedTo(NavigationEventArgs e)
        {
            base.OnNavigatedTo(e);
            // データを取得してListViewへusing (var ctx = new SampleContext())
            {
                this.ListView.ItemsSource = ctx.People.ToArray();
            }
        }
    }
}

実行

実行すると以下のような感じでデータが表示されます。

f:id:okazuki:20160308220554p:plain

まとめ

とりあえずEntity Frameworkを使えば簡単にローカルのSQLiteに繋げることがわかりました。 この調子で使っていこうと思います。
UWPでEntityFramework 2種類のコードファーストでのモデル定義方法

$
0
0

Entity Frameworkには、アノテーションでクラスに属性をつけてDBの定義を行う方法と、ContextクラスのOnModelCreatingメソッドでModelBuilderクラスを使ったFluentAPIの2種類の定義方法があります。 なんとなく、流れを見てる感じだとModelBuilderを使った定義方法が主流になっているように見えるのと、Entity Frameworkが提供している全機能にアクセスできるのはModelBuilderを使った機能のみっぽいです。

なので、ここでもModelBuilderを使った定義方法をちょっと見ていこうと思います。

エンテティの取得

まず、テーブルに関する情報を設定するためにModelBuilderのEntityメソッドを使ってエンテティに関する定義(テーブル単位の定義とみておk)をするクラスを取得します。これに対して色々な設定をしていきます。

// 例えばAddressクラスの定義をしようとする場合
var address = modelBuilder.Entity<Address>();

テーブル名の設定

テーブル名の設定はEntityで取得したクラスに対して、ToTableメソッドを呼び出すことで設定可能です。引数にテーブル名を渡します。2つ引数を渡すバージョンではスキーマ名を指定することもできます。

address.ToTable("Addresses");

列に関する設定

列に対して、最大長を設定したり、必須入力項目に設定することが出来ます。列の設定はPropertyメソッドで列を指定してから、設定を行います。HasMaxLengthで長さを指定して、IsRequiredで必須入力を設定できます。

var address = modelBuilder.Entity<Address>();
address.Property(x => x.City)
    .HasMaxLength(512)
    .IsRequired();

デフォルト値の設定もできますが、SQLiteではサポートされてないみたいでエラーになりました。

modelBuilder.Entity<Person>()
    .ToTable("People")
    .Property(x => x.Name)
    // 人類のデフォルト名は田中だ
    .HasDefaultValue("田中")
    .IsRequired();

UWPでEntity Framework OneToMany

$
0
0

単体のテーブルの定義ではなく、テーブル間のリレーションの定義の仕方です。これもOnModelCreatingで指定します。例えば以下のような感じのクラスがあったとして

publicclass Person
{
    publicint Id { get; set; }
    publicstring Name { get; set; }

    publicint Age { get; set; }

    public List<Address> Addresses { get; set; }
}

publicclass Address
{
    publicint Id { get; set; }

    publicstring Country { get; set; }

    publicstring City { get; set; }

    publicint PersonId { get; set; }

    public Person Person { get; set; }
}

このクラス間の関連を定義するには以下のようになります。Person側でHasManyってやってもいいけど、Address側だけで定義するだけでも動いてます。

protectedoverridevoid OnModelCreating(ModelBuilder modelBuilder)
{
    modelBuilder.Entity<Person>()
        .ToTable("People")
        .Property(x => x.Name)
        .HasMaxLength(512)
        .IsRequired();

    var address = modelBuilder.Entity<Address>();
    address.ToTable("Addresses");
    address.Property(x => x.City)
        .IsRequired();
    // 多対1
    address.HasOne(x => x.Person)
        // 反対側はMany
        .WithMany(x => x.Addresses)
        // 外部キーを指定
        .HasForeignKey(x => x.PersonId)
        // 削除時の動作を指定
        .OnDelete(Microsoft.Data.Entity.Metadata.DeleteBehavior.Restrict);
}

リレーションのあるデータの投入は以下のように、データを素直に突っ込んでContextに渡してSaveChangesでOKです。

using (var ctx = new SampleContext())
{
    ctx.People.Add(new Person
    {
        Name = "Tanaka",
        Addresses = new List<Address>
        {
            new Address { City = "Tokyo" },
            new Address { City = "Saitama" },
        }
    });
    ctx.SaveChanges();
}

データを取り出すときはInclude拡張メソッドを使って明示的に一緒に読み込むことを指定します。

// 以下のusingが必要// using Microsoft.Data.Entity;using (var ctx = new SampleContext())
{
    var p = ctx.People.Include(x => x.Addresses).First();
    Debug.WriteLine(p.Name);
    foreach (var item in p.Addresses)
    {
        Debug.WriteLine(item.City);
    }
}
Debug.WriteLine("---");
using (var ctx = new SampleContext())
{
    var addresses = ctx.Addresses.Include(x => x.Person).ToArray();
    foreach (var a in addresses)
    {
        Debug.WriteLine($"{a.City} {a.Person.Name}");
    }
}

余談

OneToManyがよく使うと思うのでそれだけ紹介してますが、OneToOneもばっちりあります。似たような感じで使えるので迷うことはないと思います。

後、ManyToManyはサポートされてないので関連表みたいなのに対応するクラスを自分で作って、それとOneToManyで繋ぎ合わせることでやらないといけません。要は、Entity Framework 6が裏でやってくれてたことを自分でやれと。将来的にはサポートされるのかな?

UWPでEntity Framework OneToOne

$
0
0

先日OneToManyやったので今日はOneToOneをやってみたいと思います。

こんな感じのクラスを定義します。

publicclass Person
{
    publicint Id { get; set; }
    publicstring Name { get; set; }
    public PersonDetail Detail { get; set; }
}

publicclass PersonDetail
{
    publicint Id { get; set; }
    publicint Age { get; set; }
    publicint PersonId { get; set; }
    public Person Person { get; set; }
}

そしてDbContextを以下のような雰囲気で定義します。HasOne, WithOne, ForeignKeyのパターンです。何故かForeignKeyにはラムダ式を指定するオーバーライドもあるのですがエラーになったので型と列名を指定するオーバーライドを使ってます。

publicclass SampleContext : DbContext
{
    public DbSet<Person> People { get; set; }
    public DbSet<PersonDetail> PersonDetails { get; set; }

    protectedoverridevoid OnConfiguring(DbContextOptionsBuilder optionsBuilder)
    {
        optionsBuilder.UseSqlite("filename=sample.db");
    }

    protectedoverridevoid OnModelCreating(ModelBuilder modelBuilder)
    {
        var people = modelBuilder.Entity<Person>();
        people.ToTable("People");

        var personDetails = modelBuilder.Entity<PersonDetail>();
        personDetails.ToTable("PersonDetails");
        personDetails.HasOne(x => x.Person)
            .WithOne(x => x.Detail)
            .HasForeignKey(typeof(PersonDetail), nameof(PersonDetail.PersonId))
            .OnDelete(Microsoft.Data.Entity.Metadata.DeleteBehavior.Restrict);
    }
}

こんな感じで実行できます。

// データ突っ込むusing (var ctx = new SampleContext())
{
    ctx.People.Add(new Person
    {
        Name = "Tanaka",
        Detail = new PersonDetail
        {
            Age = 30
        }
    });
    ctx.SaveChanges();
}

// データとってくるusing (var ctx = new SampleContext())
{
    var p = ctx.People.Include(x => x.Detail).First();
    Debug.WriteLine($"{p.Name} {p.Detail.Age}");
}

UWPで音声認識

$
0
0

UWPで音声認識をするには、SpeechRecognizerクラスを使います。

使い方は非常に簡単でインスタンスを作って、CompileConstraintsAsyncメソッドを呼び出します。そのあと、音声認識をしたいタイミングでRecognizeAsyncかRecognizeWithUIAsyncを呼び出します。 以下のような感じです。

まず、Buttonを2つ置いただけの画面を用意します。

<Page x:Class="App52.MainPage"xmlns="http://schemas.microsoft.com/winfx/2006/xaml/presentation"xmlns:x="http://schemas.microsoft.com/winfx/2006/xaml"xmlns:local="using:App52"xmlns:d="http://schemas.microsoft.com/expression/blend/2008"xmlns:mc="http://schemas.openxmlformats.org/markup-compatibility/2006"mc:Ignorable="d"><StackPanel Background="{ThemeResource ApplicationPageBackgroundThemeBrush}"><Button Content="WithUI"Click="ButtonWithUI_Click"HorizontalAlignment="Stretch"/><Button Content="NoUI"Click="ButtonNoUI_Click"HorizontalAlignment="Stretch" /></StackPanel></Page>

コードビハインドで、OnNavigatedToで初期化を行い、各ボタンでRecognizeWithUIAsyncとRecognizeAsyncを呼んで音声認識させて結果をダイアログに出しています。

using System;
using Windows.Media.SpeechRecognition;
using Windows.UI.Popups;
using Windows.UI.Xaml;
using Windows.UI.Xaml.Controls;
using Windows.UI.Xaml.Navigation;

namespace App52
{
    publicsealedpartialclass MainPage : Page
    {
        private SpeechRecognizer Recognizer { get; set; }

        public MainPage()
        {
            this.InitializeComponent();
        }

        protectedoverride async void OnNavigatedTo(NavigationEventArgs e)
        {
            base.OnNavigatedTo(e);

            this.Recognizer = new SpeechRecognizer();
            await this.Recognizer.CompileConstraintsAsync();
        }

        private async void ButtonWithUI_Click(object sender, RoutedEventArgs e)
        {
            var result = await this.Recognizer.RecognizeWithUIAsync();
            var dialog = new MessageDialog(result.Text);
            await dialog.ShowAsync();
        }

        private async void ButtonNoUI_Click(object sender, RoutedEventArgs e)
        {
            var result = await this.Recognizer.RecognizeAsync();
            var dialog = new MessageDialog(result.Text);
            await dialog.ShowAsync();
        }
    }
}

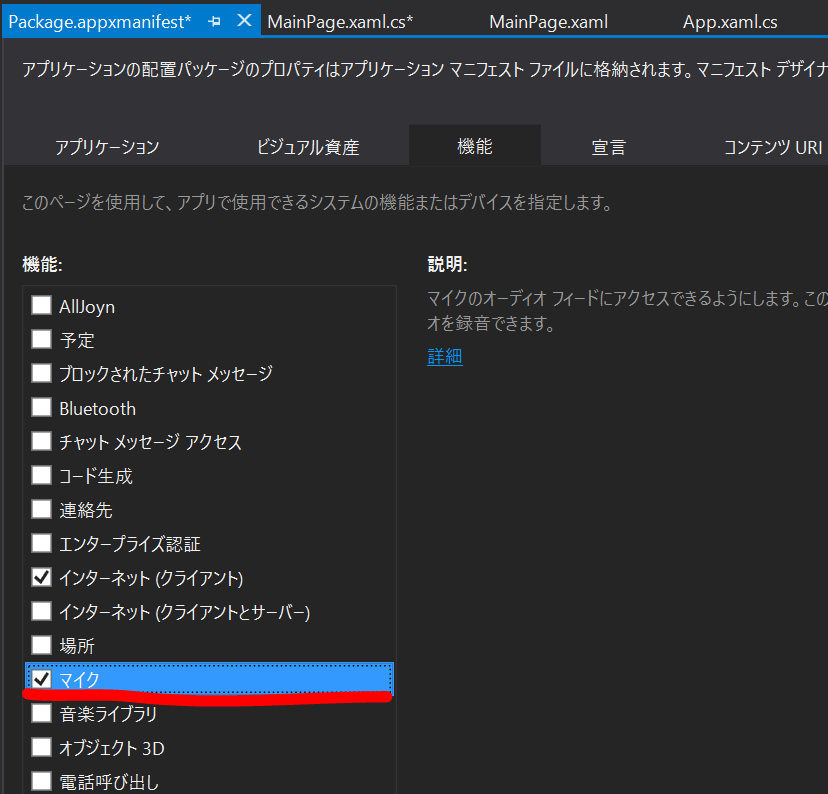
そして、Package.appxmanifestで機能のタブに行ってマイクにチェックを入れておきます。これ大事です。

f:id:okazuki:20160313225518p:plain

実行します。UIの有り無しでちょっと動きは違いますがきちんと認識してくれています。

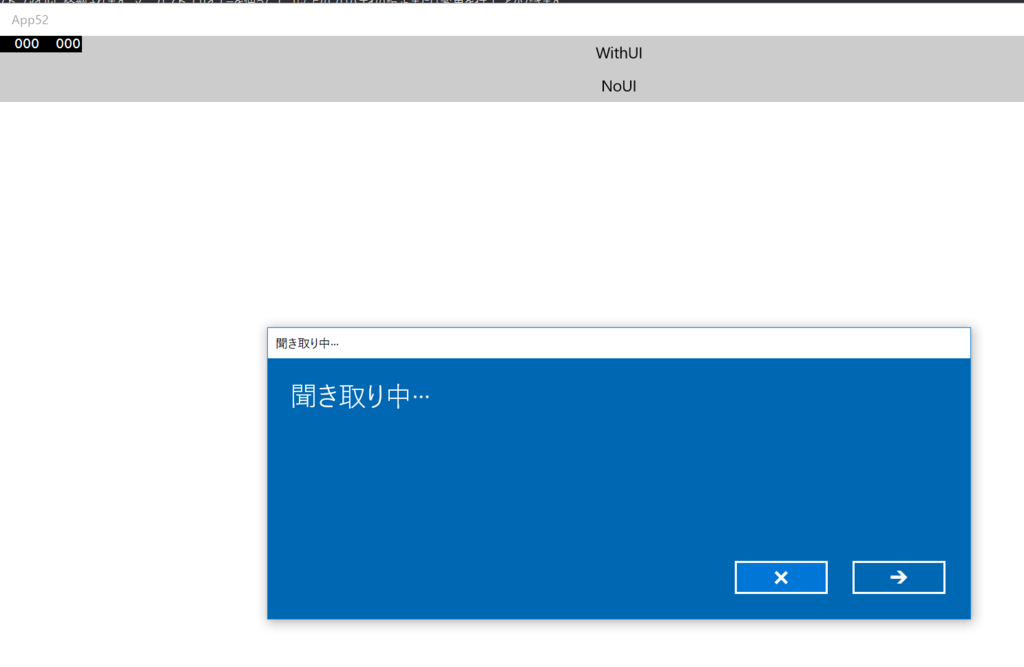
WithUIのほうでは、以下のような画面が表示されます。

f:id:okazuki:20160313225828p:plain

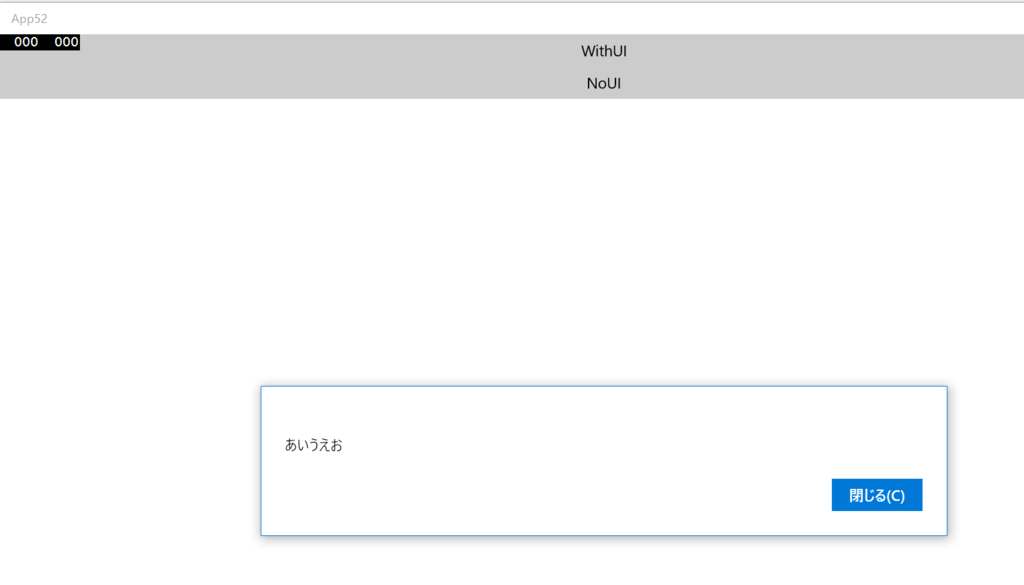
WithUIじゃないほうは、UIは出ませんが裏で認識はされています。

あいうえおと言ったらきちんと認識してくれました。

f:id:okazuki:20160313225949p:plain

UWPで画像ビューワー

$
0
0

UWPでMVVMが~とか考える前に初心者にとってもとっつきやすい(とっついたあとはガンバ!)というのを紹介したいと思います。

ということで、UWPアプリで簡単な画像ビューワーを作ってみましょう!

プロジェクトの作成

プロジェクトの新規作成でVisual C# → Windows → ユニバーサル → 空白のアプリ(ユニバーサルWindows)を作成します。プロジェクト名はImageViewerAppとしておきましょう。

画面の作成

次に画面を作成します。画面上部に画像を開くボタンを置いて、その下にスクロールビューワーの中に画像を表示する領域を作ります。

<Page x:Class="ImageViewerApp.MainPage"xmlns="http://schemas.microsoft.com/winfx/2006/xaml/presentation"xmlns:x="http://schemas.microsoft.com/winfx/2006/xaml"xmlns:local="using:ImageViewerApp"xmlns:d="http://schemas.microsoft.com/expression/blend/2008"xmlns:mc="http://schemas.openxmlformats.org/markup-compatibility/2006"mc:Ignorable="d"><Grid Background="{ThemeResource ApplicationPageBackgroundThemeBrush}"><Grid.RowDefinitions><RowDefinition Height="Auto" /><RowDefinition /></Grid.RowDefinitions><Button Content="Open"HorizontalAlignment="Stretch"Click="ImageOpenButton_Click" /><ScrollViewer Grid.Row="1"HorizontalScrollBarVisibility="Auto"><Image x:Name="Image" /></ScrollViewer></Grid></Page>

コードビハインドの作成

ButtonのClickのImageOpenButton_Clickにカーソルを合わせてF12を押します。するとボタンを押したときの処理のコードが作成されます。ここに画像を開いて読み込む処理を記述します。usingに注意しながら、ImageOpenButton_Clickイベントハンドラの中身を記述していきます。FileOpenPickerやBitmapImageでusingの追加がいりますが、FileOpenPickerと入力したあとにCtrl + .を押すとusingを補間するか聞いてくれます。

using System;
using Windows.Storage.Pickers;
using Windows.UI.Xaml;
using Windows.UI.Xaml.Controls;
using Windows.UI.Xaml.Media.Imaging;

// 空白ページのアイテム テンプレートについては、http://go.microsoft.com/fwlink/?LinkId=402352&clcid=0x409 を参照してくださいnamespace ImageViewerApp
{
    /// <summary>/// それ自体で使用できる空白ページまたはフレーム内に移動できる空白ページ。/// </summary>publicsealedpartialclass MainPage : Page
    {
        public MainPage()
        {
            this.InitializeComponent();
        }

        private async void ImageOpenButton_Click(object sender, RoutedEventArgs e)
        {
            // 画像を開くダイアログをの設定
            var picker = new FileOpenPicker();
            picker.FileTypeFilter.Add(".png");
            picker.FileTypeFilter.Add(".jpg");
            picker.FileTypeFilter.Add(".jpeg");

            // ファイルを1つ選択する
            var file = await picker.PickSingleFileAsync();
            if (file != null)
            {
                // ファイルを選択していたら開く。using (var s = await file.OpenReadAsync())
                {
                    // 画像に読み込んでコントロールにセットする
                    var bitmap = new BitmapImage();
                    bitmap.SetSource(s);
                    this.Image.Source = bitmap;
                }
            }
        }
    }
}

実行して動作確認

うまくいってると実行してボタンを押すと画像を開くダイアログがでます。画像を開くと、以下のような感じでいい感じに画像が表示されます。

f:id:okazuki:20160314214729p:plain

まとめ

ということで、UWPで簡単な画像ビューワーを作ってみました。 超簡単でしょう?

XAMLとC#を使った開発でMVVM!とか気を張らずに、これくらいのゆるい感じでとっかかるのもいいのではないかと思います。コレクションはDataTemplate使わないと死ぬので、どこだけは押さえてあとは緩くいってもいいかなぁと思う今日この頃。

あ、でも個人的にはMVVMちっくに作るほうが平和だと思ってます。


UWPでEntity Framework 追加・更新・削除

$
0
0

コードファーストでのテーブル定義もなんとなくわかったので、追加・更新・削除でもしてみたいと思います。

基本的な流れは、変更操作をした後SaveChangesメソッドを呼び出すという流れになります。SaveChangesを呼び出すとEntity Frameworkが、それまでの変更を元にDBに対して更新作業をしてくれます。こんなDbContextを定義してる前庭で話を進めていきます。

using Microsoft.Data.Entity;

namespace App51
{
    publicclass SampleContext : DbContext
    {
        public DbSet<Person> People { get; set; }

        protectedoverridevoid OnConfiguring(DbContextOptionsBuilder optionsBuilder)
        {
            optionsBuilder.UseSqlite("filename=sample.db");
        }

        protectedoverridevoid OnModelCreating(ModelBuilder modelBuilder)
        {
            modelBuilder.Entity<Person>()
                .ToTable("People")
                .Property(x => x.Name)
                .IsRequired();
        }
    }

    publicclass Person
    {
        publicint Id { get; set; }
        publicstring Name { get; set; }
    }
}

追加

DbSetにAddしてSaveChangesです。

using (var ctx = new SampleContext())
{
    var p = new Person { Name = "Tanaka" };
    var p2 = new Person { Name = "Kimura" };

    ctx.People.Add(p);
    ctx.People.Add(p2);

    ctx.SaveChanges();

    Debug.WriteLine($"{p.Id} {p.Name}");
    Debug.WriteLine($"{p2.Id} {p2.Name}");
}

SaveChanges後には、Idに値がふられていること(DBで自動割り当てにしてるから)が確認できます。

更新

更新は、DbContextから取得したデータに対して変更をしてSaveChangesをします。

using (var ctx = new SampleContext())
{
    var p = ctx.People.First();
    p.Name = "Ohta";

    ctx.SaveChanges();
}

削除

データの削除は、DbSetから取得したエンテティに対してDbSetのRemove(たくさんある場合はRemoveRangeを使うと楽)メソッドに渡してSaveChangesすることで削除されます。

using (var ctx = new SampleContext())
{
    var p = ctx.People.First();
    ctx.People.Remove(p);
    ctx.SaveChanges();
}

UWPでEntity Framework 管理外のオブジェクトを変更監視に追加する

$
0
0

一旦DBからとってきたデータを暫く手元に置いておいて、後で更新したいということってありますよね。Entity Frameworkのデフォルトの挙動だと、DbSetから取得したデータに対する変更は監視して、いい感じにSaveChangesのときにDBに反映してくれます。

ただ、別のDbContextから取得したオブジェクトや手元でnewしたオブジェクトは、そのままではいい感じに変更監視してくれません。 そんな時に使えるのがDbSetのAttachメソッドです。Attachにオブジェクトを渡すと変更監視してくれます。 また、Attachの戻り値のEntityEntryのStateをEntityState.Modifiedにすることで、変更があったとマークすることが出来ます。

コードで書くと以下のような感じです。

var p = default(Person);
using (var ctx = new SampleContext())
{
    p = new Person { Name = "Tanaka" };
    ctx.People.Add(p);
    ctx.SaveChanges();
}

p.Name = "Kimura";

using (var ctx = new SampleContext())
{
    var tracker = ctx.People.Attach(p);
    tracker.State = Microsoft.Data.Entity.EntityState.Modified;
    ctx.SaveChanges();
}

using (var ctx = new SampleContext())
{
    p = ctx.People.First();
    Debug.WriteLine($"{p.Id} {p.Name}");
    ctx.SaveChanges();
}

プログラミング生放送勉強会 第40回@金沢が開催されます

$
0
0

2016年3月26日(土)にプログラミング生放送の第40回が金沢で開催されます。

atnd.org

プロ生は個人的に参加したことがない!ので、なんとも言えませんが主催者の人からお勧めポイントを聞いてみました。

人が固定化されてないっぽいので内輪的な空気もなくて、勉強会興味あるけどどうなんだろう?という人は参加してみるといいかもしれませんね!

特定サイトを閲覧するためのアプリを作る「Life with Windows 10 Mibileを題材に」

$
0
0

こんな呟きもあったので、簡単にですが、こういうアプリを作る方法を書いてみます。

使うもの

  • Prism
  • ReactiveProperty

Prismについては以下のページあたりを見てください。

github.com

使い方についてはここらへんを

github.com

ReactivePropertyについては以下のページあたりを見てください。

github.com

使い方についてはここらへんを

blog.okazuki.jp

出来上がり

こちらにソースは置いてるので自由にクローンしてオリジナルアプリのための土台として使ってください。

github.com

起動すると以下のようにLife with Windows 10 Mobileの最新の何件かの記事がリスト形式で表示されます。

f:id:okazuki:20160317212617p:plain

記事をタップするとEdgeが立ち上がり対象の記事を閲覧できます。

f:id:okazuki:20160317212639p:plain

ちょっとだけ解説

まず、こういうアプリを作るときはRSSを購読するのがお手軽なのでお勧めです。 RSSのURLはLife with Windows 10 MobileではNewsのページにあるのでURLをメモっておきます。

RSSの読み込み

UWPでは、RSSを読み込むためにSyndicationClientというクラスが提供されています。それを使うと以下のようにさくっと読み込むことが出来ます。

var client = new SyndicationClient();
var results = await client.RetrieveFeedAsync(new Uri("http://w10m.jp/rss"));
this.Posts = results
    .Items
    .Select(x => new Post
    {
        Title = x.Title.Text,
        Uri = new Uri(x.Id)
    })
    .ToArray();

Postsプロパティは単純な変更通知プロパティです。ViewModelではReactivePropertyを使って単純にViewへそのまま公開しています。

public MainPageViewModel(LifeWithW10MViewer model)
{
    this.Model = model;
    this.Posts = this.Model
       .ObserveProperty(x => x.Posts)
       .ToReadOnlyReactiveProperty()
       .AddTo(this.Disposable);
}

ブラウザの表示

RSSはListViewに表示してるのですが、それをタップしたときにブラウザを起動する必要があります。 そういう時のためにLauncherクラスがあります。URLを渡すとブラウザを起動してくれる便利なやつです。

public async void ItemClick(object sender, ItemClickEventArgs e)
{
    var target = e.ClickedItem as Post;
    await Launcher.LaunchUriAsync(target.Uri);
}

残作業

オリジナルアプリにするにあたって以下の残作業があると思います。

エラー処理

すいません。してません。RSS読むところを適当にtry catchで囲ってあげましょう。

ブランディング

自分のアプリっぽく色やロゴを決めてブランディングします。(今はデフォルトの見た目なので、そのままストアに出すとアイコンで落とされる)

オリジナル機能の追加

このままだとRSSを表示してるだけなので、もっとこうサイトを見るだけよりも便利!って思うような機能(これ大事だと思います)を追加するといいと思います。

命名

いい名前つけましょう。

ストアに公開!

ストアに公開して皆に使ってもらいましょう!

特定サイトを閲覧するためのアプリを作る「Life with Windows 10 Mibileを題材に その2」

$
0
0

blog.okazuki.jp

真面目にアプリを作る方法を紹介しましたが、もう1つHosted Web appというものもあるので、こちらも紹介します。 これは、公式さんがやるといいかも?

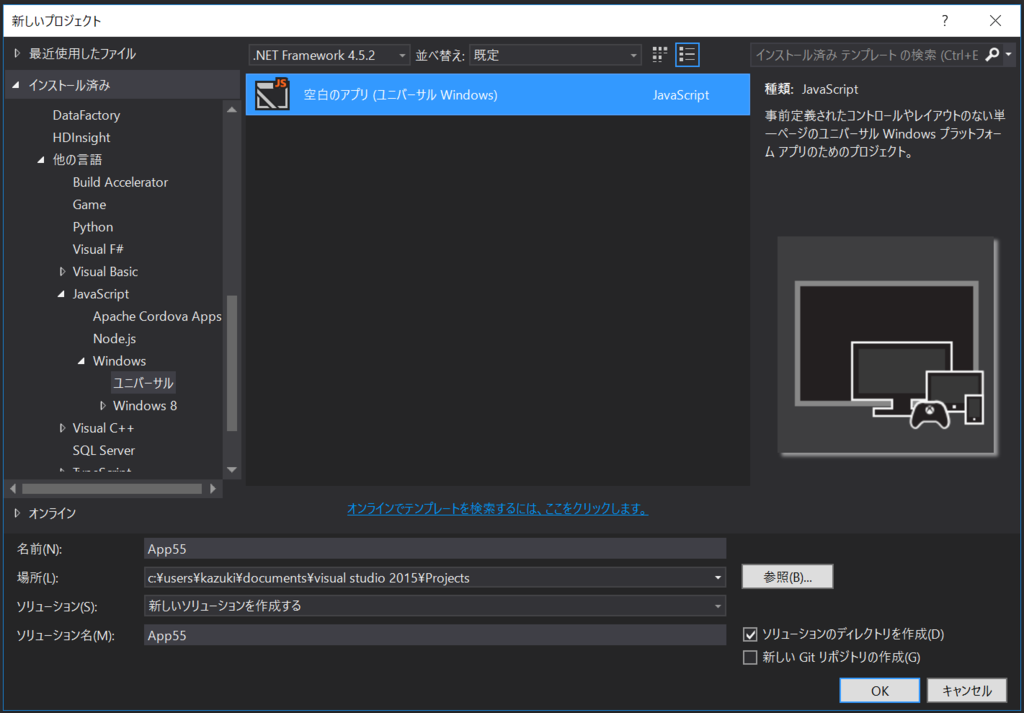
まず、JavaScriptのUWPのアプリを作ります。

f:id:okazuki:20160317213019p:plain

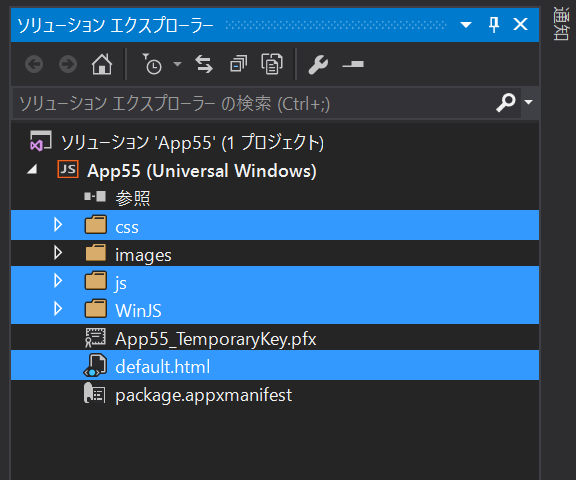
css, js, WinJS, default.htmlはいらないので消します。

f:id:okazuki:20160317213150p:plain

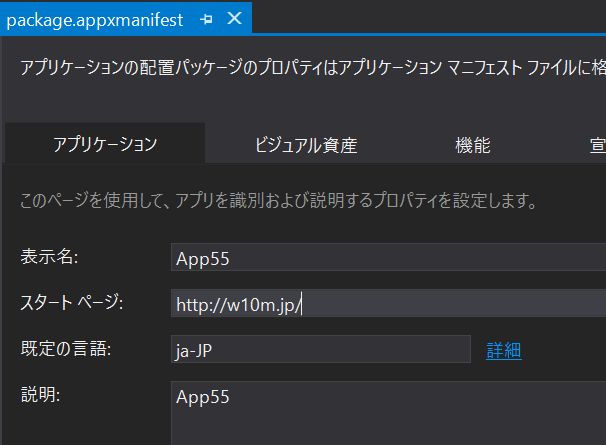
Package.appxmanifestを開いてスタートページにLife with Windows 10 MobileのサイトのURLを貼り付けます。

f:id:okazuki:20160317213323p:plain

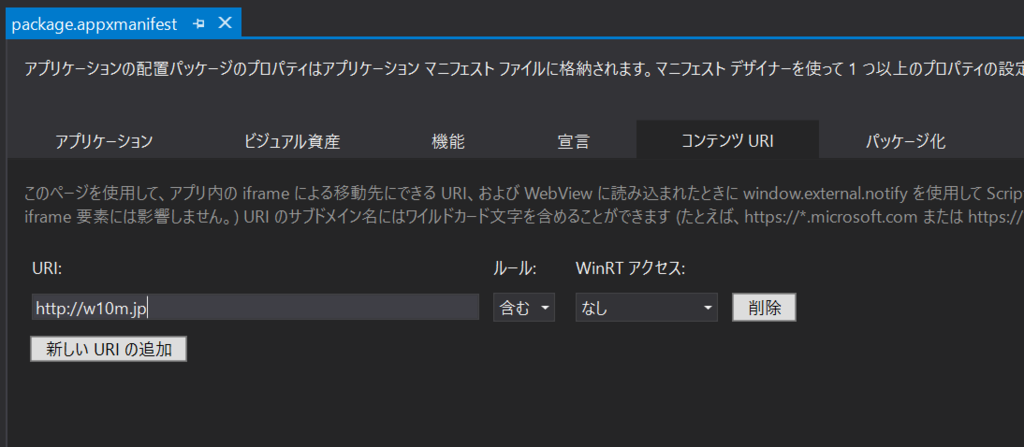
続けてコンテンツURIにアクセスできるURLを指定します。

f:id:okazuki:20160317213644p:plain

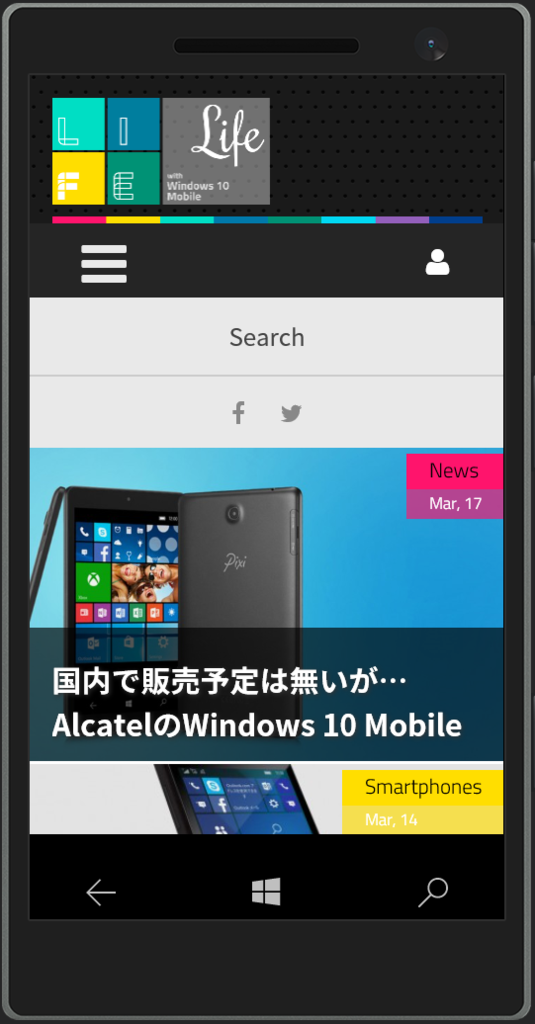
これで完成です。実行すると、こんな感じでWebページがそのままアプリになります。

f:id:okazuki:20160317213836p:plain

Edgeとは独立して動くため、Edgeが閉じられる時にまきこまれて一緒に閉じられるということがありません(特にPCで顕著)

残作業

アイコンをセットしてストアへリリースすれば完成です。

Viewing all 1388 articles
Browse latest View live


<script src="https://jsc.adskeeper.com/r/s/rssing.com.1596347.js" async> </script>