Quantcast
Channel: かずきのBlog@hatena
Viewing all 1388 articles
Browse latest View live

NuAns NEOレビュー

$
0
0

先日de:code 2016の開発者キットに申し込んでNuAns NEOが当たりました。

https://neo.nuans.jp/

NuAns NEOといえば、カバーを自由に選べて2色チョイス出来ることで有名です。 色の組み合わせで個性が出る点とても新しくていいですよね。

私は、上下別ではなく手帳カバータイプのものを選びました。NEO FLIP Case Suede Whiteというやつです。

f:id:okazuki:20160526203827j:plain

開くとこんな感じになります。

f:id:okazuki:20160526205726j:plain

動作

今までMADOSMAを使ってきたのですが、メモリとかが2倍なだけあって、やはりアプリの動作がサクサクしてるように感じます。特にMADOSMAでは重たくて使ってなかったAristeaが快適に動く点が、ポイント高かったです。

タッチ操作もぬるぬると動いて好感度高いです。

f:id:okazuki:20160526210234j:plain

OSのバージョン

OSは、一度アップデートが降ってきてそれを適用したら、10.0.10586.318というのになりました。

f:id:okazuki:20160526210512j:plain

スクリーンショットの取り方

上の画像を取るために調べたのですが、音量の上と電源ボタンの同時押しでスクリーンショットが撮れます。あまり撮る機会はないですが、さくっと取れていい感じでした。

gori.me

Continuum

NuAns NEOが開発キットとして選ばれた理由としてContinuum対応というのがあると思ってます!(勝手に)手元にWindows 10 Insider Previewの接続アプリというワイヤレスディスプレイになるアプリを使ってディスプレイ化して繋いでみました。

f:id:okazuki:20160526211408j:plain

Twitterアプリを起動してみました。

f:id:okazuki:20160526212508j:plain

画面の拡大率

好みの問題ですが、NuAns NEOはでデフォルトでディスプレイの拡大率が200%に設定されています。個人的には150%にして広く使いたいのでそこだけ設定を変えています。

f:id:okazuki:20160526211702j:plain

まとめ

初期のころに買って、タッチ改善のためのファームをアップデートした人は、アップデートが当たらなくなったりしていて地雷端末なのかと少し心配しましたが、今のところ安定して使えています(といっても1日ちょっとですが)。 中にはNuAns NEOの箱が閉まらないということを書いてる人もいましたが、私の場合は変な音がしたけど、無事閉まったので一安心です。

shinji-japan.hatenadiary.jp

Continuumも出来て(HD解像度だけど)見た目もオシャレでいい感じのWindows 10 Mobile端末になってると思います。電池もちがいい点も高評価ですね!

以上、簡単にですがレビューでした。


UWPのApplicationData.Currentのデータをバージョン管理する

$
0
0

アプリの設定とかはApplicationData.Currentの下のLocalSettingsとかRoamingSettingsとかを使うのが一般的ですよね。ここの設定がアプリのバージョンアップによって非互換が発生してしまった!?というときに使える小技を紹介します。

ApplicationData.Current.SetVersionAsyncというメソッドを使います。 このメソッドには、アプリケーションのバージョン番号と、バージョン番号変える時の操作を指定できます。 こんな感じで使います。

await ApplicationData.Current.SetVersionAsync(0, r =>
{
    var d = r.GetDeferral();
    Debug.WriteLine($"CurrentVersion: {r.CurrentVersion}, DesiredVersion: {r.DesiredVersion}");
    // バージョンが違ってたら必要に応じて変換ロジックを走らせる
    d.Complete();
});

アプリのバージョンが上がって仕様が変わったタイミングでSetVersionAsyncの第一引数をインクリメントする感じで使います。 バージョン番号が変わってなくても、第二引数で指定したコールバックは呼ばれるので注意ですね。

NEO User Group Meeting vol.2に行ってきました

$
0
0

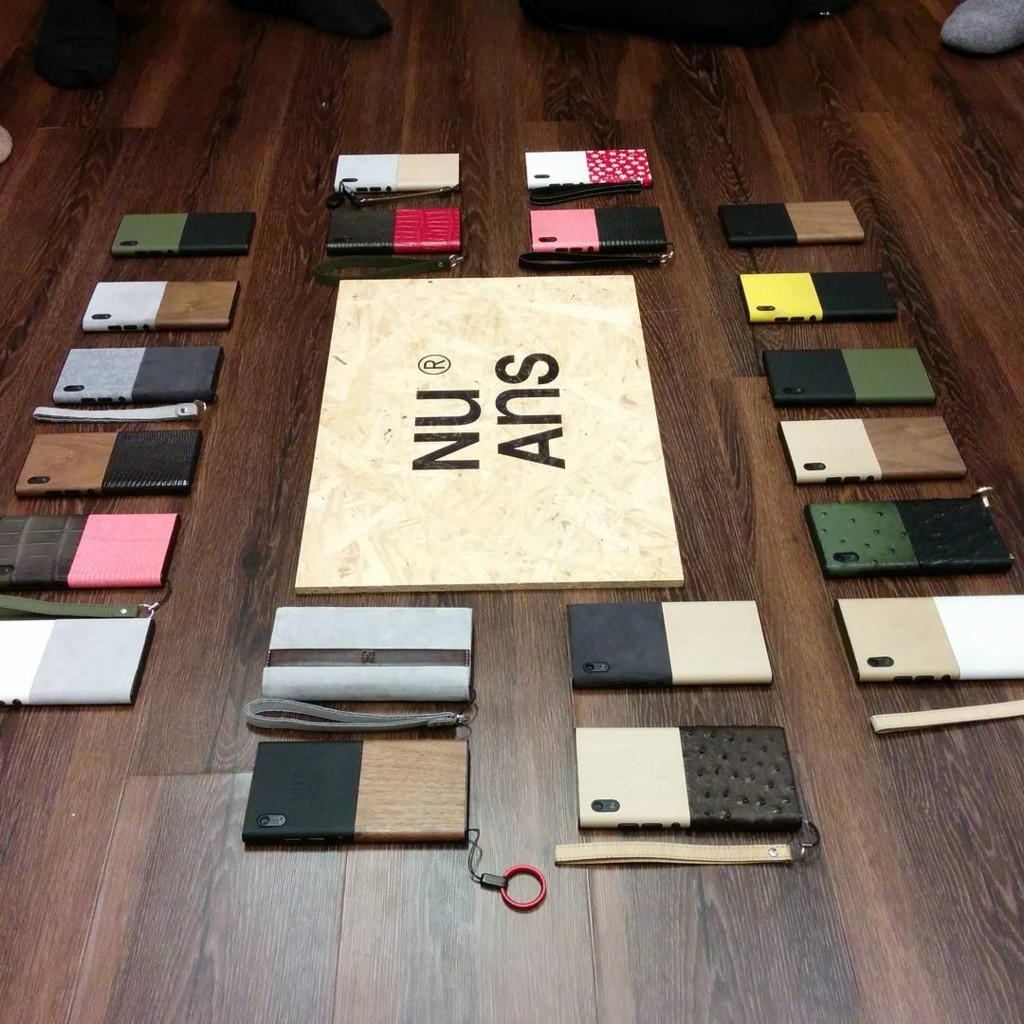
NuAns NEOを持ってる人が集まるイベントに行ってきました。

eventon.jp

先日de:codeの開発者キットでNuAns NEOが当たってNuAns NEO使いになったので行ってきました。

この集まりがあるのを知ったきっかけは@od_10zことおでさんなんですが、おでさんは残念ながら病気で行けなかった感じですね!

f:id:okazuki:20160605110843j:plain

写真の通り20台のNuAns NEOが集まることになった、この会ですが、フリップタイプのカバーを選んでるのが私だけだったというのが印象的でした。

肝心の会の中身ですが、ここでしか聞けない情報のほかに、デザインへの拘りや、長く使ってもらえることを考えて作られてるという、とても中の人たちの頑張りが伝わってきました。 次買い替える時も、NuAns NEOの次世代機かMADOSMAの、その時の最新の機のどちらからか選ぼうかなと思う感じになりました。

全体的に楽しい会だったのでよかったですね!

ReactiveProperty v2.7.3をリリースしました

$
0
0

ソファーで爆睡してて目覚めたらこんなメッセージが

WPF限定なのをどうにかしたいと思いつつも、まぁ現実問題プラットフォーム固有処理ですよね…と思いとりあえず.NET4, 4.5, 4.6に組み込まさせていただきました。

以下のNuGetからダウンロード出来ます。

www.nuget.org

UWPで電話にデプロイするときに0x89731810のエラーが出て配備できない

$
0
0

Windows 10 MobileをPCにさした状態で、デバイスマネージャーからWindows 10 Mobile Deviceを削除して(なぜか2個できてたので2個とも削除した)もう一度さしなおすとうまくデプロイできるようになりました。

以下のMSDNフォーラムの内容が参考になりました。

配置エラー

ASP.NETのWeb.configでIPアドレス指定でアクセス拒否とかをしたい

$
0
0

configuration/system.webServer/securityの下にipSecurityで追加するらしい。 詳細は以下の@ITの記事がとてもわかりやすい。

www.atmarkit.co.jp

ReactiveProperty v2.7.3.1をリリースしました

$
0
0

www.nuget.org

このようなリクエストを受け取ったのでプルリクを投げて頂いて取り込みました。

github.com

pdbを含むようにしただけでReactiveProperty本体には特に更新は入っていません。

ReactiveProperty v2.7.4をリリースしました

$
0
0

www.nuget.org

@neueccさんが、またプルリクをくれました。UniRxからポーティングされたクラスが1つ追加されました。 MessageBrokerというRxっぽく使えるMessenger的なクラスになります。

基本的に以下のような使い方になります。

// 購読
MessageBroker.Default.Subscribe<SampleClass>(x => Console.WriteLine(x));
// ToObservableでRxのメソッド使い放題
MessageBroker.Default.ToObservable<SampleClass>()
    .ObserveOn(Dispatcher)
    .Subscribe(x => Console.WriteLine(x));

// 発行
MessageBroker.Default.Publish(new SampleClass());

非同期版も用意されています。

AsyncMessageBroker.Default.Subscribe<SampleClass>(async x => 
{
    Console.WriteLine(x);
    return Task.Delay(TimeSpan.FromSeconds(2));
});

var d = AsyncMessageBroker.Default.Subscribe<SampleClass>(async x => 
{
    Console.WriteLine(x);
    return Task.Delay(TimeSpan.FromSeconds(4));
});

// 全てのSubscribeが終了するまで待ちます
await AsyncMessageBroker.Default.PublishAsync(new SampleClass());

// 購読解除
d.Dispose();
await AsyncMessageBroker.Default.PublishAsync(new SampleClass());

一応、上記のようなDefaultでデフォルトインスタンスを使いまわすことがほとんどだと思いますが自分でインスタンス管理したい場合は特に制約は設けてないので好きにnewするなりDIコンテナに登録しちゃってください。


Microsoft MVP for Windows Developmentを今年も受賞できました

$
0
0

Microsoft MVP for Windows Development!今年も無事受賞出来ました。また1年よろしくお願いします。

ReactivePropertyのメンテとUWP関連の情報発信などに力を入れたいと思います!(といいつつ直近2回の登壇予定はWPFだったりする)

かずきのUWP入門というPDFをSlideShareに公開しました

$
0
0

最近Blog書かないで何してたかというとワードでせっせと書いてました。あんまり日本語のUWPの本がないんで書きましょう!ということで。まずはSlideShareに公開しました。ダウンロードを許可してるので、是非ダウンロードして読んでください。

www.slideshare.net

因みに、近々Kindleにも出す予定なので、Kindleで買ってもいいよって人は、そちらもよろしくお願いします!

ReactiveProperty v2.8をリリースしました

$
0
0

リリースしました。

www.nuget.org

id:neueccさんのプルリクのおかげで、今まで一手間必要だったコンソールアプリやLINQPadでのReactivePropertyの利用が簡単になりました。(今までデフォルトだと例外はいてたのが、例外はかなくなった)

あと、Blogにリクエストが来てたReadOnlyReactiveCollectionから要素が削除されるときにDisposeが呼ばれる挙動をカスタマイズできるようにしました。disposeElement引数が追加されてます(デフォルトtrueで今までの挙動と同じ)

かずきのUWP入門をKindleでも販売をはじめました

$
0
0

基本SlideShareに置いてあるのでそちらをどうぞ。SlideShareにログインすると資料のちょい下あたりのボタンにDownloadっていうのがあるので、そこからDLできます。

www.slideshare.net

Kindleでも読みたいとか投げ銭的な感じで買ってもいいよって人はぽちってくれると喜びます。まだ、ちょっと本の紹介がおかしいですがそのうち直します。

www.amazon.co.jp

ReactiveProperty v3.0.0-pre1を放流しました

$
0
0

Reactive Extensions 3.0対応です。

www.nuget.org

要注意バージョンです!

私の環境で、.NET Framework 4.6での動作は確認できました。動作しなかったプラットフォームは以下になります。

  • Xamarin
  • UWP

何故かNuGetで参照追加するだけでコンパイルエラーになります。因みにSystem.Reactiveの参照を追加しただけで、同じことになったのでReactivePropertyの問題ではないと考えています。 この問題が解決するまでは、とりあえずpreで出したいと思います。

だれか追試お願いします!

ReactiveProperty v3.0.0-pre2をリリースしました

$
0
0

.NET Standard 1.1としてビルドできたのでNuGetに放流しました。 ただ、nuspec書くのがだるかったのでnetstandard1.1とかのフォルダは切ってませんので、今までと使う側としては何も変わりありません。

www.nuget.org

UWPに参照追加するとビルドエラーになる件ですが、以下の定義をproject.jsonのdependenciesに追加することで回避が出来ます。これはどうやるのが正解なんだろうか。

"System.Threading.Timer": "4.0.1",
"Microsoft.Win32.Primitives": "4.0.1",
"System.Globalization.Calendars": "4.0.1",
"System.Net.Sockets": "4.1.0"

Xamarin.FormsでListViewのItemTemplate内のボタンにPageにバインドされているVMにあるCommandをバインドする方法

$
0
0

こういうの悩みますよね。例えば以下のようなViewModelがあるとします。こいつのAlertCommandに選択項目を渡したいというケースです。

using System.Collections.ObjectModel;
using System.ComponentModel;
using System.Diagnostics;
using System.Linq;
using Xamarin.Forms;

namespace App52
{
    publicclass MainPageViewModel : INotifyPropertyChanged
    {
        publicevent PropertyChangedEventHandler PropertyChanged;

        public ObservableCollection<string> Items { get; } = new ObservableCollection<string>(Enumerable.Range(1, 100)
            .Select(x => $"Item{x}"));

        public Command AlertCommand { get; }

        public MainPageViewModel()
        {
            this.AlertCommand = new Command<string>(x =>
            {
                Debug.WriteLine($"Execute: {x}");
            });
        }
    }
}

こういう感じのXAMLでいけます。

<?xml version="1.0" encoding="utf-8"?><ContentPage xmlns="http://xamarin.com/schemas/2014/forms"xmlns:x="http://schemas.microsoft.com/winfx/2009/xaml"xmlns:App52="clr-namespace:App52;assembly=App52"x:Class="App52.MainPage"x:Name="Root"><ContentPage.BindingContext><App52:MainPageViewModel /></ContentPage.BindingContext><ListView ItemsSource="{Binding Items}"><ListView.ItemTemplate><DataTemplate><ViewCell><StackLayout Orientation="Horizontal"><Label Text="{Binding}" /><Button Text="Alert"Command="{Binding Source={x:Reference Root}, Path=BindingContext.AlertCommand}"CommandParameter="{Binding}" /></StackLayout></ViewCell></DataTemplate></ListView.ItemTemplate></ListView></ContentPage>

x:Referenceでページ自体をSourceに指定して、そこからVMのCommandをPathで指定しています。あとは、CommandParameterに渡したい要素をBindingしてやるだけ。これで動くようになります。めでたしめでたし。


Metro.cs#2 WPFからみるMVVM で WPFから他プラットフォームへの展開というテーマで話してきました #metrocs

$
0
0

doc.co

資料を公開しておきます。今回からSlideShareじゃなくてdocs.comにしてみました。

Modelをしっかり作ろうぜ!っていうことでちょびっと話してきました。 試行錯誤した結果なので、これが正しいかはわからないですが…。まぁ一例ということで。

WPFでTextBoxに入力エラーがないときだけ押せるボタンをXAMLで実現したい

$
0
0

WPFでint型をバインドしたTextBoxとかって入力エラーがあると赤色枠がついていい感じにしてくれますよね。ただしViewModelからは、そのエラーは検知できない。 でも、ボタンは押せないようにしたい。そんなときは、こんなXAMLで実現できます。

<Window x:Class="WpfApplication12.MainWindow"xmlns="http://schemas.microsoft.com/winfx/2006/xaml/presentation"xmlns:x="http://schemas.microsoft.com/winfx/2006/xaml"xmlns:d="http://schemas.microsoft.com/expression/blend/2008"xmlns:mc="http://schemas.openxmlformats.org/markup-compatibility/2006"xmlns:local="clr-namespace:WpfApplication12"mc:Ignorable="d"Title="MainWindow"Height="350"Width="525"><Window.Resources><local:IsAllFalseConverter x:Key="IsAllFalseConverter" /></Window.Resources><Window.DataContext><local:MainWindowViewModel /></Window.DataContext><StackPanel><TextBox x:Name="TextBoxInput1"Text="{Binding Input1, Mode=TwoWay, UpdateSourceTrigger=PropertyChanged}" /><TextBlock Text="{Binding (Validation.HasError), ElementName=TextBoxInput1}" /><TextBox x:Name="TextBoxInput2"Text="{Binding Input2, Mode=TwoWay, UpdateSourceTrigger=PropertyChanged}" /><TextBlock Text="{Binding (Validation.HasError), ElementName=TextBoxInput2}" /><Button Content="OK"><Button.IsEnabled><MultiBinding Converter="{StaticResource IsAllFalseConverter}"><Binding ElementName="TextBoxInput1"Path="(Validation.HasError)" /><Binding ElementName="TextBoxInput2"Path="(Validation.HasError)" /></MultiBinding></Button.IsEnabled></Button></StackPanel></Window>

IsAllFalseConverterは以下のような感じで。

using System;
using System.Collections.Generic;
using System.Diagnostics;
using System.Globalization;
using System.Linq;
using System.Text;
using System.Threading.Tasks;
using System.Windows.Data;

namespace WpfApplication12
{
    publicclass IsAllFalseConverter : IMultiValueConverter
    {
        publicobject Convert(object[] values, Type targetType, object parameter, CultureInfo culture)
        {
            return values.OfType<bool>().All(x => !x);
        }

        publicobject[] ConvertBack(objectvalue, Type[] targetTypes, object parameter, CultureInfo culture)
        {
            thrownew NotImplementedException();
        }
    }
}

これで、エラーのないときだけ押せるボタンの出来上がり。WPFのXAML強いですねやっぱり。

ここまで書いておいて

ViewModelにstringで受け取るようにしておいて、そこでエラーチェックとかコマンドの実行可否を判断するようにするのがおすすめです。はい。

WPFでTextBoxに入力エラーがないときだけ押せるボタンを実現したい

$
0
0

1つ前でVMでやるのがおすすめですよって書いたけどどうやるの?っていう記事です。

blog.okazuki.jp

今回はReactivePropertyの組み込みのエラーチェック機能を使ってやってみます。まず。intしか受け付けないValidationAttributeを作ります。

using System.ComponentModel.DataAnnotations;

namespace WpfApplication12
{
    publicclass IntAttribute : ValidationAttribute
    {
        public IntAttribute(string errorMessage) : base(errorMessage)
        {
        }

        publicoverridebool IsValid(objectvalue)
        {
            int temp;
            returnint.TryParse(value?.ToString(), out temp);
        }
    }
}

そして、それをセットしたReactivePropertyを定義します。

publicclass MainWindowViewModel : BindableBase
{
    [Int("整数で入力してね")]
    public ReactiveProperty<string> Input1 { get; }
    [Int("整数で入力してね")]
    public ReactiveProperty<string> Input2 { get; }

    public ReactiveCommand ExecuteCommand { get; }

    public MainWindowViewModel()
    {
        this.Input1 = new ReactiveProperty<string>("0")
            .SetValidateAttribute(() => this.Input1);
        this.Input2 = new ReactiveProperty<string>("0")
            .SetValidateAttribute(() => this.Input2);

        this.ExecuteCommand = new[]
            {
                this.Input1.ObserveHasErrors,
                this.Input2.ObserveHasErrors,
            }.CombineLatestValuesAreAllFalse()
            .ToReactiveCommand();
    }

}

ExecuteCommandは、Input1とInput2でエラーが全部Falseだったら実行可能なコマンドに加工しています。CombineLatestValuesAreAllFalse(True版もあるよ)はReactivePropertyのちょっとした便利メソッドですね。

これを以下のような感じでXAMLにバインドすれば出来上がりです。

<Window x:Class="WpfApplication12.MainWindow"xmlns="http://schemas.microsoft.com/winfx/2006/xaml/presentation"xmlns:x="http://schemas.microsoft.com/winfx/2006/xaml"xmlns:d="http://schemas.microsoft.com/expression/blend/2008"xmlns:mc="http://schemas.openxmlformats.org/markup-compatibility/2006"xmlns:local="clr-namespace:WpfApplication12"mc:Ignorable="d"Title="MainWindow"Height="350"Width="525"><Window.DataContext><local:MainWindowViewModel /></Window.DataContext><StackPanel><TextBox x:Name="TextBoxInput1"Text="{Binding Input1.Value, Mode=TwoWay, UpdateSourceTrigger=PropertyChanged}" /><TextBlock Text="{Binding (Validation.HasError), ElementName=TextBoxInput1}" /><TextBox x:Name="TextBoxInput2"Text="{Binding Input2.Value, Mode=TwoWay, UpdateSourceTrigger=PropertyChanged}" /><TextBlock Text="{Binding (Validation.HasError), ElementName=TextBoxInput2}" /><Button Content="OK"Command="{Binding ExecuteCommand}"/></StackPanel></Window>

めでたしめでたし。

Prism.Wpfで子WindowでRegionを使う方法

$
0
0

アップデート

もうちょっと頑張ったサンプルをGitHubに公開しました。

github.com

古い内容

PopupWindowActionで表示するWindow内で画面遷移したい!とかいうことがあると使えないんですよね。ということで解決策として、RegionManagerを新しく作って、それを新規のWindowに割り当てるという方法があります。今回はその方法のサンプルを作ってみました。

github.com

MainWindowとSubWindowがあり、MainWindowでボタンを押すとSubWindowがモーダルで表示されて、SubWindow内で画面遷移を行ったうえで画面を閉じるという流れになっています。

RegionManagerを割り当てつつ画面をモーダル表示するアクション

今回は、PrismのPopupWindowActionを使うのではなく、自前のWindow表示用Actionを作りました。こんな感じでRegionManagerを新しく作ってWindowに割り当てています。

using Prism.Regions;
using System;
using System.Windows;
using System.Windows.Interactivity;

namespace WpfApplication13.Commons
{
    publicclass ShowModalWindowAction : TriggerAction<DependencyObject>
    {
        public Type WindowType
        {
            get { return (Type)GetValue(WindowTypeProperty); }
            set { SetValue(WindowTypeProperty, value); }
        }

        // Using a DependencyProperty as the backing store for WindowType.  This enables animation, styling, binding, etc...publicstaticreadonly DependencyProperty WindowTypeProperty =
            DependencyProperty.Register("WindowType", typeof(Type), typeof(ShowModalWindowAction), new PropertyMetadata(typeof(Window)));

        protectedoverridevoid Invoke(object parameter)
        {
            var currentRegionManager = RegionManager.GetRegionManager(Window.GetWindow(this.AssociatedObject));
            var w = (Window)Activator.CreateInstance(this.WindowType);
            RegionManager.SetRegionManager(w, currentRegionManager.CreateRegionManager());
            w.ShowDialog();
        }
    }
}

このActionを使うことで新たなRegionManagerを割り当てたWindowが表示されます。もうちょっと欲を言うと、PrismのPopupWindowActionと同じようにViewModel等にNotificationを渡してやる機能とかを追加してもいいかもしれません。

使い方

使い方はInteractionRequestTrigger等のTriggerの下に置くだけです。

<UserControl xmlns="http://schemas.microsoft.com/winfx/2006/xaml/presentation"xmlns:x="http://schemas.microsoft.com/winfx/2006/xaml"xmlns:mc="http://schemas.openxmlformats.org/markup-compatibility/2006"xmlns:d="http://schemas.microsoft.com/expression/blend/2008"xmlns:local="clr-namespace:WpfApplication13.Views"xmlns:i="http://schemas.microsoft.com/expression/2010/interactivity"xmlns:Commons="clr-namespace:WpfApplication13.Commons"xmlns:Prism="http://prismlibrary.com/"x:Class="WpfApplication13.Views.ViewA"mc:Ignorable="d"Prism:ViewModelLocator.AutoWireViewModel="True"d:DesignHeight="300"d:DesignWidth="300"><i:Interaction.Triggers><Prism:InteractionRequestTrigger SourceObject="{Binding ShowWindowRequest}"><Commons:ShowModalWindowAction WindowType="{x:Type local:SubWindow}" /></Prism:InteractionRequestTrigger></i:Interaction.Triggers><Grid><Button Content="ShowWindow"Command="{Binding ShowWindowCommand}"/></Grid></UserControl>

指定したタイプのWindowを表示します。

SubWindow

SubWindowは、普通にRegionを切っているだけのWindowです。

<Window x:Class="WpfApplication13.Views.SubWindow"xmlns="http://schemas.microsoft.com/winfx/2006/xaml/presentation"xmlns:x="http://schemas.microsoft.com/winfx/2006/xaml"xmlns:d="http://schemas.microsoft.com/expression/blend/2008"xmlns:mc="http://schemas.openxmlformats.org/markup-compatibility/2006"xmlns:local="clr-namespace:WpfApplication13.Views"xmlns:Prism="http://prismlibrary.com/"mc:Ignorable="d"Title="SubWindow"Height="300"Width="300"><Grid><ContentControl Prism:RegionManager.RegionName="ChildMain" /></Grid></Window>

SubWindow内の初期のViewの表示

これがいまいちだと思ってるのですが、SubWindowのLoadedイベントを購読して、そこで実施しています。もうちょっと改善したいなと思っています。まぁでも、これくらいが手軽で分かりやすいといえばわかりやすいのでバランスが難しいところです。

using Prism.Regions;
using System.Windows;

namespace WpfApplication13.Views
{
    /// <summary>/// SubWindow.xaml の相互作用ロジック/// </summary>publicpartialclass SubWindow : Window
    {
        public SubWindow()
        {
            InitializeComponent();
            this.Loaded += (_, __) =>
            {
                var rm = RegionManager.GetRegionManager(this);
                rm.RequestNavigate("ChildMain", "ChildViewA");
            };
        }
    }
}

SubWindowを閉じる

SubWindowを閉じるのは、Windowを閉じる専用のActionを定義してそれでやるようにしました。以下のような簡単なActionです。

using System.Windows;
using System.Windows.Interactivity;

namespace WpfApplication13.Commons
{
    publicclass WindowCloseAction : TriggerAction<DependencyObject>
    {
        protectedoverridevoid Invoke(object parameter)
        {
            Window.GetWindow(this.AssociatedObject)?.Close();
        }
    }
}

これをInteractionRequestTriggerと組み合わせてChildViewBで使っています。

<UserControl xmlns="http://schemas.microsoft.com/winfx/2006/xaml/presentation"xmlns:x="http://schemas.microsoft.com/winfx/2006/xaml"xmlns:mc="http://schemas.openxmlformats.org/markup-compatibility/2006"xmlns:d="http://schemas.microsoft.com/expression/blend/2008"xmlns:local="clr-namespace:WpfApplication13.Views"xmlns:Prism="http://prismlibrary.com/"xmlns:i="http://schemas.microsoft.com/expression/2010/interactivity"xmlns:Commons="clr-namespace:WpfApplication13.Commons"x:Class="WpfApplication13.Views.ChildViewB"Prism:ViewModelLocator.AutoWireViewModel="True"mc:Ignorable="d"d:DesignHeight="300"d:DesignWidth="300"><i:Interaction.Triggers><Prism:InteractionRequestTrigger SourceObject="{Binding WindowCloseRequest}"><Commons:WindowCloseAction /></Prism:InteractionRequestTrigger></i:Interaction.Triggers><Grid><Button Content="Close"Command="{Binding WindowCloseCommand}"/></Grid></UserControl>

SubWindowのRegionManagerをVMから使う

これは少しトリッキーです。ViewModelに以下のようなIRegionManagerのプロパティを定義しています。

using Prism.Commands;
using Prism.Mvvm;
using Prism.Regions;

namespace WpfApplication13.ViewModels
{
    publicclass ChildViewAViewModel : BindableBase
    {
        public IRegionManager RegionManager { get; set; }

        public DelegateCommand NavigateCommand { get; }

        public ChildViewAViewModel()
        {
            this.NavigateCommand = new DelegateCommand(() =>
            {
                this.RegionManager.RequestNavigate("ChildMain", "ChildViewB");
            });
        }
    }
}

それをViewのXAMLからBindingのOneWayToSourceでインジェクションしています。

<UserControl x:Class="WpfApplication13.Views.ChildViewA"xmlns="http://schemas.microsoft.com/winfx/2006/xaml/presentation"xmlns:x="http://schemas.microsoft.com/winfx/2006/xaml"xmlns:mc="http://schemas.openxmlformats.org/markup-compatibility/2006"xmlns:d="http://schemas.microsoft.com/expression/blend/2008"xmlns:local="clr-namespace:WpfApplication13.Views"xmlns:Prism="http://prismlibrary.com/"Prism:ViewModelLocator.AutoWireViewModel="True"Prism:RegionManager.RegionManager="{Binding RegionManager, Mode=OneWayToSource}"mc:Ignorable="d"d:DesignHeight="300"d:DesignWidth="300"><StackPanel><TextBlock Text="Child" /><Button Content="Nav"Command="{Binding NavigateCommand}" /></StackPanel></UserControl>

これは、気づかないと「???」という感じです。Unityが管理してるのはMainWindowに紐づいてるRegionManagerだと思うので、SubWindowに紐づくやつは、こうやって設定しています。Unityのコンテナをネストするような仕組みを作りこめばDIでいい感じに出来なくはないけど、複雑になってきちゃう。

まとめ

Prismで複数WindowでRegionを使うのは難しいです。シンプルに1画面に収めてポップアップは補助的という感じのアプリを作るのが作りやすいですね。(複雑な子画面も今回のようにやってできないわけではないけど厄介)

WPFでPrismをライトウェイトに使いたい「Hello world」

$
0
0

WPF版Prismは使いこなすと強力です。でも使いこなすの大変です。ハイ。学習コストかけてられないし、学習コストかけたからといって1個のアプリ開発で、そのコストを回収できるかもわかりませんですしね。 ということで、なるべくライトにPrismを使ってみたいと思います。

Prismで使いたい機能

以下の機能を使おうと思います。

  • MVVM基本クラス
    • BindableBaseクラス
    • DelegateCommandクラス
  • ViewModelLocator
  • InteractionRequest
    • PopupWindowAction
  • DIコンテナのUnity

逆に以下の機能は使わない前提です。

  • Bootstrapper
  • Module
  • Region

では行ってみましょう。

プロジェクトの作成

LightweightPrismSampleという名前でプロジェクトを作ったという前提で説明します。NuGetからPrism.Unityをインストールします。

MainWindowは後で作り直すので削除しておきます。

Appクラス

App.xamlからStartupUriを消してStartupメソッドに書き換えます。ここでちょっとUnityの初期化とか書くようにします。

<Application x:Class="LightweightPrismSample.App"xmlns="http://schemas.microsoft.com/winfx/2006/xaml/presentation"xmlns:x="http://schemas.microsoft.com/winfx/2006/xaml"xmlns:local="clr-namespace:LightweightPrismSample"Startup="Application_Startup"><Application.Resources></Application.Resources></Application>

ViewModelLocatorを使うためのおまじないみたいなものです。アプリで管理しているUnityのコンテナからViewModelを生成するようにしています。

using Microsoft.Practices.Unity;
using Prism.Mvvm;
using System.Windows;

namespace LightweightPrismSample
{
    publicpartialclass App : Application
    {
        // アプリで管理するコンテナprivate IUnityContainer Container { get; } = new UnityContainer();

        privatevoid Application_Startup(object sender, StartupEventArgs e)
        {
            ViewModelLocationProvider.SetDefaultViewModelFactory(x => this.Container.Resolve(x));
        }
    }
}

Viewの作成

Views名前空間にMainWindowを作成します。ViewModelLocatorを使うおまじないをAppクラスでしてるので、ViewModelLocatorが使えます。

<Window x:Class="LightweightPrismSample.Views.MainWindow"xmlns="http://schemas.microsoft.com/winfx/2006/xaml/presentation"xmlns:x="http://schemas.microsoft.com/winfx/2006/xaml"xmlns:d="http://schemas.microsoft.com/expression/blend/2008"xmlns:mc="http://schemas.openxmlformats.org/markup-compatibility/2006"xmlns:local="clr-namespace:LightweightPrismSample.Views"xmlns:Prism="http://prismlibrary.com/"Prism:ViewModelLocator.AutoWireViewModel="True"mc:Ignorable="d"Title="MainWindow"Height="300"Width="300"><Grid></Grid></Window>

Appクラス再び

MainWindowを表示させます。せっかくなのでUnityから作りましょう(深い意味はない。DIしたければできるようになるっていうくらい)

using Microsoft.Practices.Unity;
using Prism.Mvvm;
using System.Windows;

namespace LightweightPrismSample
{
    publicpartialclass App : Application
    {
        // アプリで管理するコンテナprivate IUnityContainer Container { get; } = new UnityContainer();

        privatevoid Application_Startup(object sender, StartupEventArgs e)
        {
            ViewModelLocationProvider.SetDefaultViewModelFactory(x => this.Container.Resolve(x));
            this.Container.Resolve<MainWindow>().Show();
        }
    }
}

この時点で、MainWindowが表示されるようになります。

f:id:okazuki:20160716220307p:plain

ViewModelの作成

では、ViewModelを作成していきます。ViewModels名前空間に以下のようなViewModelを作ります。InteractionRequestやDelegateCommandやBindableBaseを使います。

using Prism.Commands;
using Prism.Interactivity.InteractionRequest;
using Prism.Mvvm;

namespace LightweightPrismSample.ViewModels
{
    publicclass MainWindowViewModel : BindableBase
    {
        public DelegateCommand AlertCommand { get; }

        public InteractionRequest<INotification> AlertRequest { get; } = new InteractionRequest<INotification>();

        privatestring input;

        publicstring Input
        {
            get { returnthis.input; }
            set { this.SetProperty(refthis.input, value); }
        }

        public MainWindowViewModel()
        {
            this.AlertCommand = new DelegateCommand(() =>
                this.AlertRequest.Raise(new Notification { Title = "Alert", Content = this.Input }));
        }
    }
}

Viewの調整

ViewModelに合わせてViewも調整します。InteractionRequestに応答するトリガーや、PopupWindowActionなんかを使っています。Behaviorを使うのでSystem.Windows.Interactionアセンブリを参照に追加するのを忘れずに。

<Window xmlns="http://schemas.microsoft.com/winfx/2006/xaml/presentation"xmlns:x="http://schemas.microsoft.com/winfx/2006/xaml"xmlns:d="http://schemas.microsoft.com/expression/blend/2008"xmlns:mc="http://schemas.openxmlformats.org/markup-compatibility/2006"xmlns:local="clr-namespace:LightweightPrismSample.Views"xmlns:Prism="http://prismlibrary.com/"xmlns:i="http://schemas.microsoft.com/expression/2010/interactivity"x:Class="LightweightPrismSample.Views.MainWindow"Prism:ViewModelLocator.AutoWireViewModel="True"mc:Ignorable="d"Title="MainWindow"Height="300"Width="300"><i:Interaction.Triggers><Prism:InteractionRequestTrigger SourceObject="{Binding AlertRequest}"><Prism:PopupWindowAction /></Prism:InteractionRequestTrigger></i:Interaction.Triggers><StackPanel><TextBox Text="{Binding Input, Mode=TwoWay}" /><Button Content="Alert"Command="{Binding AlertCommand}" /></StackPanel></Window>

実行

実行するとWindowが立ち上がり、TextBoxに入力した内容がボタンを押すとポップアップで表示されます。 画面遷移とかしたかったら自力でファイト!という感じで凝ったことしようとするとPrismの機能が恋しくなるかもしれませんが、そうじゃない軽いアプリならこんな構成もありかなという感じです。

f:id:okazuki:20160716221254p:plain

おまけ

今回のプロジェクトはGitHubに公開しています。

github.com

このプロジェクトを育てるには

AppクラスのStartupイベントでUnityのコンテナにModelやら必要なクラスの登録処理を書いたり色々やってよしなにやる感じです。

Viewing all 1388 articles
Browse latest View live


<script src="https://jsc.adskeeper.com/r/s/rssing.com.1596347.js" async> </script>