Quantcast
Channel: かずきのBlog@hatena
Viewing all 1388 articles
Browse latest View live

Xamarin.Formsでボタンの2度押しをReactivePropertyを使って抑止してみよう

$
0
0

お題の通りです。

こんな感じでReactiveCommandを普通に使うと連打すると2重で画面遷移したりします。

using Prism.Mvvm;
using Prism.Navigation;
using Reactive.Bindings;
using System;

namespace PrismUnityApp12.ViewModels
{
    publicclass MainPageViewModel : BindableBase, INavigationAware
    {
        privatestring _title;
        publicstring Title
        {
            get { return _title; }
            set { SetProperty(ref _title, value); }
        }

        public ReactiveCommand NavigateCommand { get; }

        public MainPageViewModel(INavigationService navigationService)
        {
            this.NavigateCommand = new ReactiveCommand();
            this.NavigateCommand.Subscribe(async _ => await navigationService.NavigateAsync("NextPage"));
        }

        publicvoid OnNavigatedFrom(NavigationParameters parameters)
        {

        }

        publicvoid OnNavigatedTo(NavigationParameters parameters)
        {
            if (parameters.ContainsKey("title"))
                Title = (string)parameters["title"] + " and Prism";
        }
    }
}

解決策は簡単で2重起動防止機能が組み込まれてるAsyncReactiveCommandを使うだけでOKです。

using Prism.Mvvm;
using Prism.Navigation;
using Reactive.Bindings;
using System;

namespace PrismUnityApp12.ViewModels
{
    publicclass MainPageViewModel : BindableBase, INavigationAware
    {
        privatestring _title;
        publicstring Title
        {
            get { return _title; }
            set { SetProperty(ref _title, value); }
        }

        public AsyncReactiveCommand NavigateCommand { get; }

        public MainPageViewModel(INavigationService navigationService)
        {
            this.NavigateCommand = new AsyncReactiveCommand();
            this.NavigateCommand.Subscribe(async _ => await navigationService.NavigateAsync("NextPage"));
        }

        publicvoid OnNavigatedFrom(NavigationParameters parameters)
        {

        }

        publicvoid OnNavigatedTo(NavigationParameters parameters)
        {
            if (parameters.ContainsKey("title"))
                Title = (string)parameters["title"] + " and Prism";
        }
    }
}

これでOK。このCommandを紐づけがボタンを連打しても2重で画面遷移したりしなくなりました。名前の通りasyncに対応してるからばっちりですね。


ReactiveProperty 3.4.0をXamarinで使う場合

$
0
0

Reactive Extensions 3.1.xがPCLにうまく入らないので、.NET Standardにプロジェクトを変換してから入れてください。

何かRx安定しないな…。

Visual Studio Moble Center触ってみた

$
0
0

Visual Studio Mobile Centerの申し込みをしたら、先日招待メールもらったので触ってみました。

初期画面

ログインするとこんな感じの画面になります。

f:id:okazuki:20161204101229p:plain

アプリの作成

Add a new appというボタンがあるので押すと、アプリの作成画面になります。

f:id:okazuki:20161204101401p:plain

OSの選択が排他式になってるのでXamarinでAndroid/iOS両対応とかしてるときにはもにょっとした感じになりながらアプリを作ることになりますね。とりあえず、XamarinでAndroidアプリ開発してるということでAdd new appしてしまいましょう。

そうすると、クラッシュレポートとか分析?系の機能を有効化するためにアプリに組み込まないといけないコードが表示されます。ここで表示されてるGUIDがアプリの秘密のキーっぽいので、管理には気を付けた方がよさそうですね。

f:id:okazuki:20161204101953p:plain

実際に組み込んでみよう

Prism Template Packでアプリを作って早速やってみたいと思います。

Mobile Center Analyticsで検索しろって書いてありますが、検索した結果上から3番目にそれっぽいのが出てきました。 Microsoft.Azure.Mobile.Analyticsがそれっぽいです。

次に、Mobile Center Crashesで検索して上から2番目に出てくるMicrosoft.Azure.Mobile.Crashesをインストールします。

AppクラスのOnInitializedメソッドのNavigateAsyncメソッドの呼び出しの上らへんにコードを挿入します。

protectedoverridevoid OnInitialized()
{
    InitializeComponent();
    MobileCenter.Start(typeof(Analytics), typeof(Crashes));
    NavigationService.NavigateAsync("MainPage?title=Hello%20from%20Xamarin.Forms");
}

そして、MainActivityOnCreateメソッドの中でConfigureメソッドを呼び出しましょう。

protectedoverridevoid OnCreate(Bundle bundle)
{
    TabLayoutResource = Resource.Layout.tabs;
    ToolbarResource = Resource.Layout.toolbar;

    base.OnCreate(bundle);
    MobileCenter.Configure("d59f9362-351e-4602-9355-6f56cbf4f412");
    global::Xamarin.Forms.Forms.Init(this, bundle);
    LoadApplication(new App(new AndroidInitializer()));
}

続いてiOSプロジェクトのAppDelegate.csの中のFinishedLaunchingメソッドの中にも同じコードを埋め込みましょう。

publicoverridebool FinishedLaunching(UIApplication app, NSDictionary options)
{
    global::Xamarin.Forms.Forms.Init();
    MobileCenter.Configure("d59f9362-351e-4602-9355-6f56cbf4f412");
    LoadApplication(new App(new iOSInitializer()));

    returnbase.FinishedLaunching(app, options);
}

分析レポートの確認

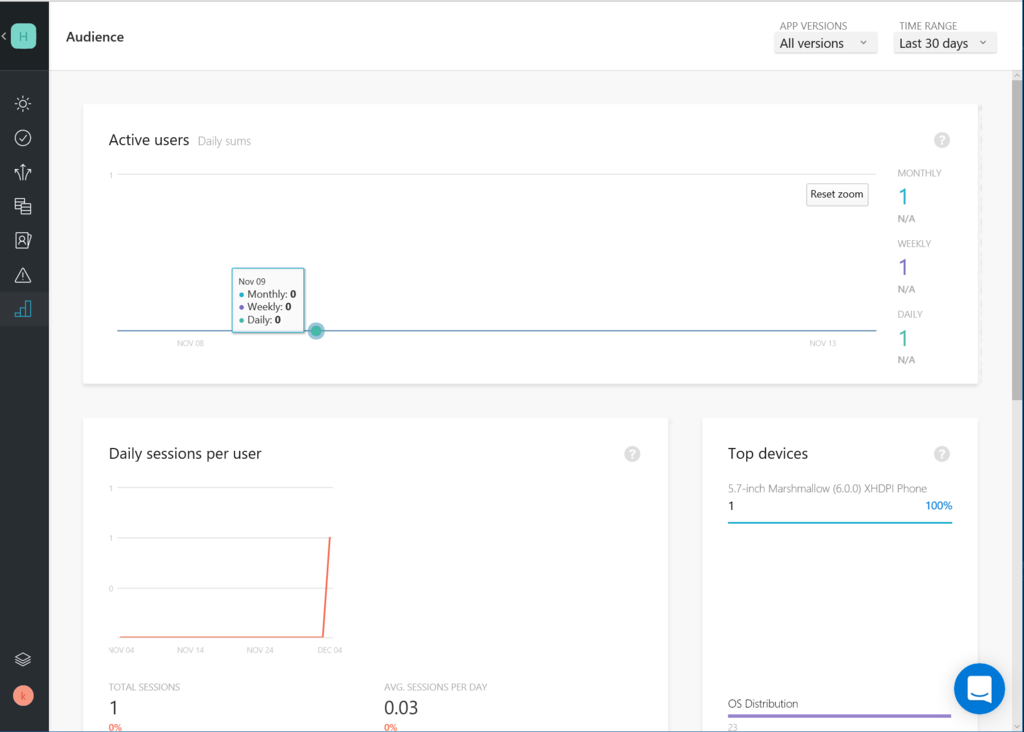
アプリを起動して、Mobile Centerの左側のAnalyticsをみてみましょう。以下のようなレポートが表示されます。 アプリ1つしか起動してないので、Active usersが1になってるのが確認できますね。

f:id:okazuki:20161204103631p:plain

クラッシュレポートの確認

次にクラッシュレポートを確認してみます。 MainPageViewModelに確実にクラッシュするコマンドを用意します。

public DelegateCommand CrashCommand { get; }

public MainPageViewModel()
{
    this.CrashCommand = new DelegateCommand(() => { thrownew InvalidOperationException("error"); });
}

そして、画面にこのコマンドに紐づいたボタンを配置します。

<?xml version="1.0" encoding="utf-8"?><ContentPage xmlns="http://xamarin.com/schemas/2014/forms"xmlns:x="http://schemas.microsoft.com/winfx/2009/xaml"xmlns:prism="clr-namespace:Prism.Mvvm;assembly=Prism.Forms"prism:ViewModelLocator.AutowireViewModel="True"x:Class="HelloWorldApp.Views.MainPage"Title="MainPage"><StackLayout HorizontalOptions="Center"VerticalOptions="Center"><Label Text="{Binding Title}" /><Button Text="Crash"Command="{Binding CrashCommand}" /></StackLayout></ContentPage>

あと、多分これがいるんだと思われるメソッドをOnNavigatedToあたりに仕込んでおきます。(Appクラスでもいいかな)

publicvoid OnNavigatedTo(NavigationParameters parameters)
{
    if (parameters.ContainsKey("title"))
        Title = (string)parameters["title"] + " and Prism";

    Crashes.GenerateTestCrash();
}

GenerateTestCrashでレポートしてくれるんだと思います。

そんなこんなでボタンを押してクラッシュさせて起動させたりっていうのを繰り返してるとそのうちCrashesのところに以下のようにレポートが表示されます。

f:id:okazuki:20161204110122p:plain

f:id:okazuki:20161204110228p:plain

配布

配布もできます。 やってみましょう。

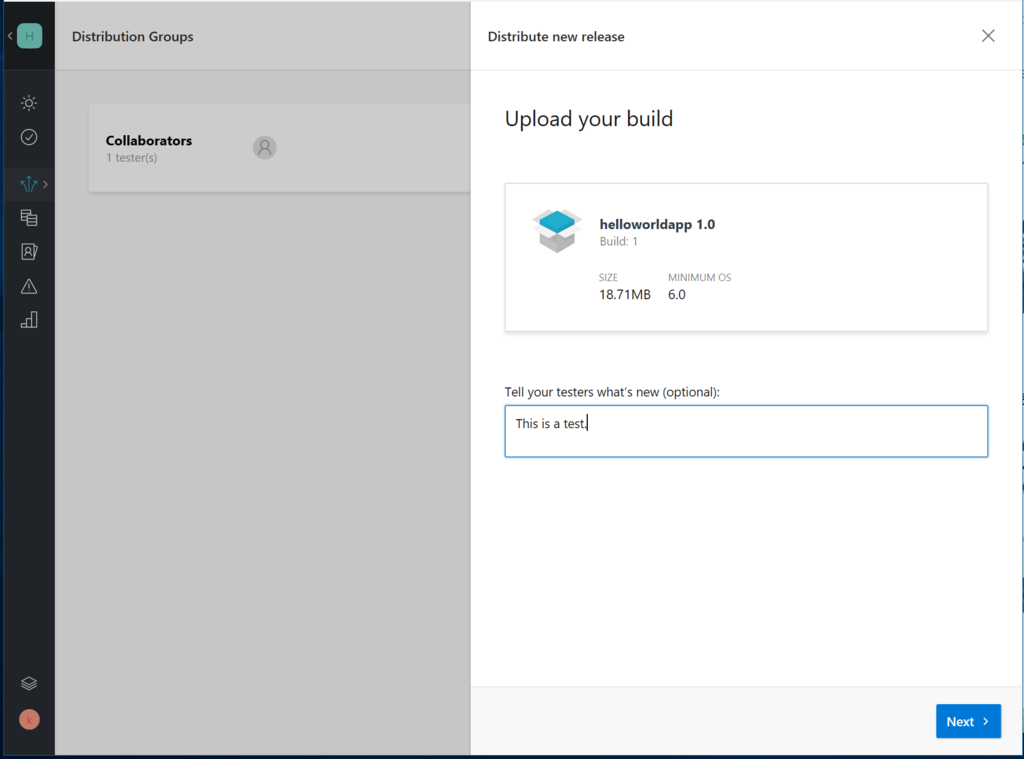
DistributionからDistribute new releaseあたりをぽちっとしましょう。APKファイルを登録して、なんかコメント書いていきます。

f:id:okazuki:20161204111038p:plain

配布先のグループを選んで(このグループにメンバー追加する方法がわからん…)

f:id:okazuki:20161204111356p:plain

最後にDistributeボタンを押しましょう。

f:id:okazuki:20161204111446p:plain

メールが届きます。 メールのInstallボタンを押すとMobile Centerへのサインインを求められます。サインインをすると、インストール画面が出てきます。

f:id:okazuki:20161204112111j:plain

インストールをタップするとダウンロードが走ります。

そしてインストールをしようとすると、パッケージの解析に失敗とか出てインストールまでいけませんでした…アップロードしたapkがよくなかったのかな…。

まとめ

このほかにMobile CenterではXamarin Test CloudやAzure Mobile Appsの機能がインテグレートされています。そちらは、別途機会があれば紹介したいと思います。 最後にインストール成功までいけなくてもやっとした感じになりましたが、触ってみた感じは以上です。

Xamarin.FormsでLabelに下線を引きたい

$
0
0

デフォルトで引けないんですね。知らなかった。

Effectを使おう

ということでカスタムレンダラー案件かなと思ったらEffectでいけるっぽいです。

Android

Androidに以下のようなクラスを追加します。

using Android.Widget;
using Xamarin.Forms;
using Xamarin.Forms.Platform.Android;

[assembly: ResolutionGroupName("Sample")]
[assembly: ExportEffect(typeof(PrismUnityApp13.Droid.UnderlineEffect), "UnderlineEffect")]
namespace PrismUnityApp13.Droid
{
    publicclass UnderlineEffect : PlatformEffect
    {


        protectedoverridevoid OnAttached()
        {
            var textView = this.Control as TextView;
            if (textView == null) { return; }

            textView.PaintFlags = textView.PaintFlags | Android.Graphics.PaintFlags.UnderlineText;
        }

        protectedoverridevoid OnDetached()
        {
        }
    }
}

iOS

iOSは動作確認取れる環境はないのですが、UILabelに対して以下のようにすると下線が引けるっぽい?

using Foundation;
using UIKit;
using Xamarin.Forms;
using Xamarin.Forms.Platform.iOS;

[assembly: ResolutionGroupName("Sample")]
[assembly: ExportEffect(typeof(PrismUnityApp13.iOS.UnderlineEffect), "UnderlineEffect")]
namespace PrismUnityApp13.iOS
{
    publicclass UnderlineEffect : PlatformEffect
    {
        protectedoverridevoid OnAttached()
        {
            var label = this.Control as UILabel;
            if (label == null) { return; }

            var text = label.Text;
            label.AttributedText = new NSAttributedString(
                text,
                underlineStyle: NSUnderlineStyle.Single);
        }

        protectedoverridevoid OnDetached()
        {
        }
    }
}

PCL

そして、PCLでEffectを作ります。

using Xamarin.Forms;

namespace PrismUnityApp13
{
    publicclass UnderlineEffect : RoutingEffect
    {
        public UnderlineEffect() : base("Sample.UnderlineEffect")
        {
        }
    }
}

XAML

そして、XAMLでLabelにEffectを追加します。

<Label Text="{Binding Title}"><Label.Effects><local:UnderlineEffect /></Label.Effects></Label>

実行

Androidしか実行環境持ってないのでiOS試せてないのですが、Androidでは以下のように下線が引かれました。

f:id:okazuki:20161205233948p:plain

まとめ

Effect初めて触ってみたけど簡単お手軽な感じですね。いいかも。

Xamarin.Formsでタブページを使う

$
0
0

TabbedPageを使うといいということみたいです。

TabbedPage内にはタブとして表示したいページを置いて行って、タブのタイトルにはPageのTitleが表示されるという動きをしています。 意外と簡単だった。

Prismを使ってNavigationPage内にTabbedPageをネストして初期表示ページを指定して画面遷移するには以下のような感じのコードでOK.

using Prism.Unity;
using PrismUnityApp14.Views;
using Xamarin.Forms;

namespace PrismUnityApp14
{
    publicpartialclass App : PrismApplication
    {
        public App(IPlatformInitializer initializer = null) : base(initializer) { }

        protectedoverridevoid OnInitialized()
        {
            InitializeComponent();

            NavigationService.NavigateAsync("NavigationPage/MainPage/AboutPage");
        }

        protectedoverridevoid RegisterTypes()
        {
            this.Container.RegisterTypeForNavigation<NavigationPage>();
            this.Container.RegisterTypeForNavigation<MainPage>();
            this.Container.RegisterTypeForNavigation<HomePage>();
            this.Container.RegisterTypeForNavigation<AboutPage>();
        }
    }
}

MainPageがTabbedPageを拡張したページで以下のようなXAMLを書いています。

<?xml version="1.0" encoding="utf-8"?><TabbedPage xmlns="http://xamarin.com/schemas/2014/forms"xmlns:x="http://schemas.microsoft.com/winfx/2009/xaml"xmlns:prism="clr-namespace:Prism.Mvvm;assembly=Prism.Forms"xmlns:Views="clr-namespace:PrismUnityApp14.Views"prism:ViewModelLocator.AutowireViewModel="True"x:Class="PrismUnityApp14.Views.MainPage"Title="SampleApp"><Views:HomePage /><Views:AboutPage /></TabbedPage>

実行すると以下のような感じ。

f:id:okazuki:20161206123916p:plain

いい感じですね。

Prism.Formsで使うときの注意点

タブ切り替えではタブ内ページのViewModelで実装しているINavigationAwareのOnNavigatedFromとOnNavigatedToは動かないので、自分でどうにかしないといけない点が要注意です。

今後のバージョンで改善されるといいな(そんなIssueを見た気がする)

Xamarin.FormsのListViewで行単位で高さを変えるには

$
0
0

何もしないと同じになるっぽい。

違う高さにするには、以下のようにHasUnevenRowsプロパティをTrueに設定すればいい。

<ListView ... HasUnevenRows="True">
    ...
</ListView>

おしまし。

Xamarin.Formsで画面レイアウトを作るためのレイアウトコントロールの必要最低限

$
0
0

Xamarin.Formsで思い通りのレイアウトを組みたい。 そんな時には、レイアウト系のコントロールを押さえておくといいです。

公式ドキュメント

Layouts - Xamarin

Layoutコントロール

Xamarin.Formsでは、複数のコントロールを配置するときには、あらかじめ定義されている子要素をレイアウトする機能をもったコントロールに対して、コントロールを配置、もしくはレイアウトコントロールをネストさせて配置します。以下のコントロールが提供されています。

  • StackLayout
  • AbsoluteLayout
  • RelativeLayout
  • Grid
  • ScrillViewer

ここでは、おさえておくべき必要最低限のレイアウトコントロールとしてStackLayoutGridについて紹介したいと思います。

StackLayout

StackLayoutは、名前の通り子要素を縦方向、横方向に並べて配置するコントロールになります。デフォルトでは縦方向に子要素を並べて配置します。デフォルトの挙動を確認するためのXAMLを以下に示します。

<?xml version="1.0" encoding="utf-8"?><ContentPage xmlns="http://xamarin.com/schemas/2014/forms"xmlns:x="http://schemas.microsoft.com/winfx/2009/xaml"xmlns:prism="clr-namespace:Prism.Mvvm;assembly=Prism.Forms"prism:ViewModelLocator.AutowireViewModel="True"x:Class="PrismUnityApp15.Views.MainPage"Title="MainPage"><StackLayout><BoxView Color="Red" /><BoxView Color="Blue" /><BoxView Color="Green" /><BoxView Color="Aqua" /></StackLayout></ContentPage>

実行すると以下のような表示になります。

f:id:okazuki:20161208222547p:plain

縦と横の表示を切り替えるにはOrientationプロパティを指定します。VerticalがデフォルトでHorizontalを指定することで、横方向に並ぶようになります。XAMLを以下に示します。

<?xml version="1.0" encoding="utf-8"?><ContentPage xmlns="http://xamarin.com/schemas/2014/forms"xmlns:x="http://schemas.microsoft.com/winfx/2009/xaml"xmlns:prism="clr-namespace:Prism.Mvvm;assembly=Prism.Forms"prism:ViewModelLocator.AutowireViewModel="True"x:Class="PrismUnityApp15.Views.MainPage"Title="MainPage"><StackLayout Orientation="Horizontal"><BoxView Color="Red" /><BoxView Color="Blue" /><BoxView Color="Green" /><BoxView Color="Aqua" /></StackLayout></ContentPage>

実行すると以下のような表示になります。

f:id:okazuki:20161208222844p:plain

Spacing

Spacingプロパティを使うことでコントロールを並べるときの余白を指定することもできます。

<?xml version="1.0" encoding="utf-8"?><ContentPage xmlns="http://xamarin.com/schemas/2014/forms"xmlns:x="http://schemas.microsoft.com/winfx/2009/xaml"xmlns:prism="clr-namespace:Prism.Mvvm;assembly=Prism.Forms"prism:ViewModelLocator.AutowireViewModel="True"x:Class="PrismUnityApp15.Views.MainPage"Title="MainPage"><StackLayout Orientation="Horizontal"Spacing="20"><BoxView Color="Red" /><BoxView Color="Blue" /><BoxView Color="Green" /><BoxView Color="Aqua" /></StackLayout></ContentPage>

実行すると以下のようになります。

f:id:okazuki:20161208223029p:plain

コントロール間のスペースが広くなっていることが確認できます。

LayoutOptions

さらにコントロールのHorizontalOptionsプロパティとVerticalOptionsを使うことで子コントロールがStackLayout上で占める割合をある程度自由に設定することができます。

HorizontalOptionsプロパティとVerticalOptionsプロパティには以下の値が設定できます。

  • Start: 開始位置にレイアウトする
  • Center: 中央にレイアウトする
  • End: 終端にレイアウトする
  • Fill: いっぱいに広げる
  • StartAndExpand: 開始位置にレイアウトして余白を埋めつくす
  • CenterAndExpand: 中央にレイアウトして余白を埋め尽くす
  • EndAndExpand: 終了位置にレイアウトして余白を埋め尽くす
  • FillAndExpand: いっぱいに広げて余白を埋め尽くす

まず、Start, Center, End, Fillを見ていきます。

<?xml version="1.0" encoding="utf-8"?><ContentPage xmlns="http://xamarin.com/schemas/2014/forms"xmlns:x="http://schemas.microsoft.com/winfx/2009/xaml"xmlns:prism="clr-namespace:Prism.Mvvm;assembly=Prism.Forms"prism:ViewModelLocator.AutowireViewModel="True"x:Class="PrismUnityApp15.Views.MainPage"Title="MainPage"><StackLayout Orientation="Horizontal"><BoxView Color="Red"VerticalOptions="Start" /><BoxView Color="Blue"VerticalOptions="End" /><BoxView Color="Green"VerticalOptions="Center" /><BoxView Color="Aqua"VerticalOptions="Fill" /><!-- Default --></StackLayout></ContentPage>

実行すると以下のようになります。

f:id:okazuki:20161208223900p:plain

次にAndExpandがついているオプションについての挙動を見てみます。

<?xml version="1.0" encoding="utf-8"?><ContentPage xmlns="http://xamarin.com/schemas/2014/forms"xmlns:x="http://schemas.microsoft.com/winfx/2009/xaml"xmlns:prism="clr-namespace:Prism.Mvvm;assembly=Prism.Forms"prism:ViewModelLocator.AutowireViewModel="True"x:Class="PrismUnityApp15.Views.MainPage"Title="MainPage"><StackLayout><BoxView Color="Red"VerticalOptions="StartAndExpand" /><BoxView Color="Blue" /></StackLayout></ContentPage>

実行すると、赤色が上端に配置されて余白を埋め尽くします。そして、青色が赤色が余白を埋め尽くすため下端に表示されます。実行結果を以下に示します。

f:id:okazuki:20161208224159p:plain

次に、EndAndExpandの挙動を確認します。

<?xml version="1.0" encoding="utf-8"?><ContentPage xmlns="http://xamarin.com/schemas/2014/forms"xmlns:x="http://schemas.microsoft.com/winfx/2009/xaml"xmlns:prism="clr-namespace:Prism.Mvvm;assembly=Prism.Forms"prism:ViewModelLocator.AutowireViewModel="True"x:Class="PrismUnityApp15.Views.MainPage"Title="MainPage"><StackLayout><BoxView Color="Red"VerticalOptions="EndAndExpand" /><BoxView Color="Blue" /></StackLayout></ContentPage>

実行すると、赤色が余白を埋め尽くして下端に表示されます。その下に青色が表示されます。実行結果を以下に示します。

f:id:okazuki:20161208224411p:plain

次に、FillAndExpandの挙動を確認します。

<?xml version="1.0" encoding="utf-8"?><ContentPage xmlns="http://xamarin.com/schemas/2014/forms"xmlns:x="http://schemas.microsoft.com/winfx/2009/xaml"xmlns:prism="clr-namespace:Prism.Mvvm;assembly=Prism.Forms"prism:ViewModelLocator.AutowireViewModel="True"x:Class="PrismUnityApp15.Views.MainPage"Title="MainPage"><StackLayout><BoxView Color="Red"VerticalOptions="FillAndExpand" /><BoxView Color="Blue" /></StackLayout></ContentPage>

実行すると、赤色が余白を埋め尽くす形でいっぱいに表示されて、残りの部分に青色が表示されます。実行結果を以下に示します。

f:id:okazuki:20161208224614p:plain

AndExpandのつくプロパティを複数使用した場合、余白は均等に割り振られます。以下のように2つのコントロールでFillAndExpandStartAndExpandを使用した場合は、上半分に赤色がいっぱいに表示され、下半分の開始位置に青色が配置されます。

<?xml version="1.0" encoding="utf-8"?><ContentPage xmlns="http://xamarin.com/schemas/2014/forms"xmlns:x="http://schemas.microsoft.com/winfx/2009/xaml"xmlns:prism="clr-namespace:Prism.Mvvm;assembly=Prism.Forms"prism:ViewModelLocator.AutowireViewModel="True"x:Class="PrismUnityApp15.Views.MainPage"Title="MainPage"><StackLayout><BoxView Color="Red"VerticalOptions="FillAndExpand" /><BoxView Color="Blue"VerticalOptions="StartAndExpand"/></StackLayout></ContentPage>

実行結果を以下に示します。

f:id:okazuki:20161208224850p:plain

複雑なレイアウト

StackLayoutLayoutOptionsを組み合わせることで複雑なレイアウトが実現可能です。以下に例を示します。イメージとしてはTwitterクライアントのような見た目をイメージしています。

<?xml version="1.0" encoding="utf-8"?><ContentPage xmlns="http://xamarin.com/schemas/2014/forms"xmlns:x="http://schemas.microsoft.com/winfx/2009/xaml"xmlns:prism="clr-namespace:Prism.Mvvm;assembly=Prism.Forms"prism:ViewModelLocator.AutowireViewModel="True"x:Class="PrismUnityApp15.Views.MainPage"Title="MainPage"><StackLayout><!-- つぶやき1 --><StackLayout Orientation="Horizontal"VerticalOptions="Start"><BoxView Color="Red" /><StackLayout HorizontalOptions="FillAndExpand"><StackLayout Orientation="Horizontal"><StackLayout Orientation="Vertical"HorizontalOptions="FillAndExpand"><StackLayout Orientation="Horizontal"><Label Text="@okazuki" /><Label Text="かずき@MBPぽちった"HorizontalOptions="FillAndExpand" /></StackLayout><Label Text="XXXXXXXXXXXXXXXXXXXX" /></StackLayout></StackLayout><StackLayout Orientation="Horizontal"HorizontalOptions="EndAndExpand"><Button Text="Like"HorizontalOptions="End" /><Button Text="RT"HorizontalOptions="End" /><Button Text="Quote"HorizontalOptions="End" /></StackLayout></StackLayout></StackLayout><!-- つぶやき2 --><StackLayout Orientation="Horizontal"VerticalOptions="Start"><BoxView Color="Red" /><StackLayout HorizontalOptions="FillAndExpand"><StackLayout Orientation="Horizontal"><StackLayout Orientation="Vertical"HorizontalOptions="FillAndExpand"><StackLayout Orientation="Horizontal"><Label Text="@okazuki" /><Label Text="かずき@MBPぽちった"HorizontalOptions="FillAndExpand" /></StackLayout><Label Text="YYYYYYYYYYYYYYYYYYYYYYYYYYYYYYYYYYYYYYYYYYYY" /></StackLayout></StackLayout><StackLayout Orientation="Horizontal"HorizontalOptions="EndAndExpand"><Button Text="Like"HorizontalOptions="End" /><Button Text="RT"HorizontalOptions="End" /><Button Text="Quote"HorizontalOptions="End" /></StackLayout></StackLayout></StackLayout></StackLayout></ContentPage>

実行結果を以下に示します。

f:id:okazuki:20161208230620p:plain

このように、StackLayoutLayoutOptionsを組み合わせてネストさせることで、かなりのレイアウトを組むことができます。

Grid

次に、Gridについて説明します。Gridは、名前の通り格子状にレイアウトの中を区切って、そこにコントロールを配置していきます。行の定義はGridRowDefinitionsプロパティに対してRowDefinitionを追加することで定義できます。列の定義はColumnDefinitionsプロパティに対してColumnDefinitionを追加することで定義できます。デフォルトでは均等に幅と高さが割り振られます。

コントロールの配置はGrid.Row添付プロパティで行(0オリジン)を指定してGrid.Columnプロパティで列(0オリジン)を指定します。

3x3の格子状に画面を区切った場合のコード例を以下に示します。

<?xml version="1.0" encoding="utf-8"?><ContentPage xmlns="http://xamarin.com/schemas/2014/forms"xmlns:x="http://schemas.microsoft.com/winfx/2009/xaml"xmlns:prism="clr-namespace:Prism.Mvvm;assembly=Prism.Forms"prism:ViewModelLocator.AutowireViewModel="True"x:Class="PrismUnityApp15.Views.MainPage"Title="MainPage"><Grid><!-- 行の定義 --><Grid.RowDefinitions><RowDefinition /><RowDefinition /><RowDefinition /></Grid.RowDefinitions><!-- 列の定義 --><Grid.ColumnDefinitions><ColumnDefinition /><ColumnDefinition /><ColumnDefinition /></Grid.ColumnDefinitions><BoxView Color="Red" /><!-- デフォルトは0,0に配置される --><BoxView Color="Blue"Grid.Row="0"Grid.Column="1" /><BoxView Color="Aqua"Grid.Row="0"Grid.Column="2" /><BoxView Color="Maroon"Grid.Row="1"Grid.Column="0" /><BoxView Color="Navy"Grid.Row="1"Grid.Column="1" /><BoxView Color="Silver"Grid.Row="1"Grid.Column="2" /><BoxView Color="Purple"Grid.Row="2"Grid.Column="0" /><BoxView Color="Lime"Grid.Row="2"Grid.Column="1" /><BoxView Color="Yellow"Grid.Row="2"Grid.Column="2" /></Grid></ContentPage>

実行結果を以下に示します。

f:id:okazuki:20161208231350p:plain

幅と高さの指定

RowDefinitionにはHeightプロパティで行の高さを指定できます。ColumnDefinitionにはWidthプロパティで列の幅を指定できます。指定方法には、数字を指定して固定幅を指定する方法と、1*, 2*のように*を使用して余白を占める割合を比率で指定する方法とAutoを指定して中身のサイズに合わせる方法があります。

コード例を以下に示します。

<?xml version="1.0" encoding="utf-8"?><ContentPage xmlns="http://xamarin.com/schemas/2014/forms"xmlns:x="http://schemas.microsoft.com/winfx/2009/xaml"xmlns:prism="clr-namespace:Prism.Mvvm;assembly=Prism.Forms"prism:ViewModelLocator.AutowireViewModel="True"x:Class="PrismUnityApp15.Views.MainPage"Title="MainPage"><Grid><!-- 行の定義 --><Grid.RowDefinitions><RowDefinition Height="15" /><!-- 固定 --><RowDefinition Height="1*" /><!-- 余白を1対2に分割 --><RowDefinition Height="2*" /></Grid.RowDefinitions><!-- 列の定義 --><Grid.ColumnDefinitions><ColumnDefinition Width="Auto" /><!-- 中身の幅に応じて設定 --><ColumnDefinition Width="*" /><!-- デフォルト値は*(1*と同じ意味) --><ColumnDefinition /></Grid.ColumnDefinitions><BoxView Color="Red" /><!-- デフォルトは0,0に配置される --><BoxView Color="Blue"Grid.Row="0"Grid.Column="1" /><BoxView Color="Aqua"Grid.Row="0"Grid.Column="2" /><BoxView Color="Maroon"Grid.Row="1"Grid.Column="0" /><BoxView Color="Navy"Grid.Row="1"Grid.Column="1" /><BoxView Color="Silver"Grid.Row="1"Grid.Column="2" /><BoxView Color="Purple"Grid.Row="2"Grid.Column="0" /><BoxView Color="Lime"Grid.Row="2"Grid.Column="1" /><BoxView Color="Yellow"Grid.Row="2"Grid.Column="2" /></Grid></ContentPage>

実行結果を以下に示します。

f:id:okazuki:20161208231859p:plain

複数行・複数列の占有

今までは格子状に区切った中の1つのセルに1つのコントロールを置いてきました。Gridコントロールでは、これに加えて複数のセルにまたがる形でコントロールを配置することができます。Grid.RowSpan添付プロパティと、Grid.ColumnSpan添付プロパティを使用することで行の占有数と列の占有数を指定できます。

コード例を以下に示します。

<?xml version="1.0" encoding="utf-8"?><ContentPage xmlns="http://xamarin.com/schemas/2014/forms"xmlns:x="http://schemas.microsoft.com/winfx/2009/xaml"xmlns:prism="clr-namespace:Prism.Mvvm;assembly=Prism.Forms"prism:ViewModelLocator.AutowireViewModel="True"x:Class="PrismUnityApp15.Views.MainPage"Title="MainPage"><Grid><!-- 行の定義 --><Grid.RowDefinitions><RowDefinition /><RowDefinition /><RowDefinition /></Grid.RowDefinitions><!-- 列の定義 --><Grid.ColumnDefinitions><ColumnDefinition /><ColumnDefinition /><ColumnDefinition /></Grid.ColumnDefinitions><BoxView Color="Red"Grid.RowSpan="2"Grid.ColumnSpan="3"/><BoxView Color="Yellow"Grid.Row="2"Grid.Column="1"Grid.ColumnSpan="2" /></Grid></ContentPage>

実行すると以下のようになります。

f:id:okazuki:20161208232709p:plain

複雑なレイアウト

Gridを使うことで複雑なレイアウトを組むことが簡単にできます。StackLayoutで示した表示と同じような表示をGridでもやってみたいと思います。

<?xml version="1.0" encoding="utf-8"?><ContentPage xmlns="http://xamarin.com/schemas/2014/forms"xmlns:x="http://schemas.microsoft.com/winfx/2009/xaml"xmlns:prism="clr-namespace:Prism.Mvvm;assembly=Prism.Forms"prism:ViewModelLocator.AutowireViewModel="True"x:Class="PrismUnityApp15.Views.MainPage"Title="MainPage"><StackLayout VerticalOptions="Start"><!-- つぶやき1 --><Grid><Grid.RowDefinitions><RowDefinition Height="Auto" /><RowDefinition Height="Auto" /><RowDefinition Height="Auto" /></Grid.RowDefinitions><Grid.ColumnDefinitions><ColumnDefinition Width="Auto" /><ColumnDefinition /><ColumnDefinition Width="Auto"/><ColumnDefinition Width="Auto"/><ColumnDefinition Width="Auto"/></Grid.ColumnDefinitions><BoxView Color="Red"Grid.RowSpan="3" /><StackLayout Orientation="Horizontal"Grid.Column="1"Grid.ColumnSpan="4"><Label Text="@okazuki" /><Label Text="かずき@MBPぽちった" /></StackLayout><Label Text="XXXXXXXXXXXXXXXXXXXXXXXXXXXXXXX"Grid.Row="1"Grid.Column="1"Grid.ColumnSpan="4" /><Button Text="Like"Grid.Row="2"Grid.Column="2" /><Button Text="RT"Grid.Row="2"Grid.Column="3" /><Button Text="Quote"Grid.Row="2"Grid.Column="4" /></Grid><!-- つぶやき2 --><Grid><Grid.RowDefinitions><RowDefinition Height="Auto" /><RowDefinition Height="Auto" /><RowDefinition Height="Auto" /></Grid.RowDefinitions><Grid.ColumnDefinitions><ColumnDefinition Width="Auto" /><ColumnDefinition /><ColumnDefinition Width="Auto"/><ColumnDefinition Width="Auto"/><ColumnDefinition Width="Auto"/></Grid.ColumnDefinitions><BoxView Color="Red"Grid.RowSpan="3" /><StackLayout Orientation="Horizontal"Grid.Column="1"Grid.ColumnSpan="4"><Label Text="@okazuki" /><Label Text="かずき@MBPぽちった" /></StackLayout><Label Text="YYYYYYYYYYYYYYYYYYYYYYYYYYYYYY"Grid.Row="1"Grid.Column="1"Grid.ColumnSpan="4" /><Button Text="Like"Grid.Row="2"Grid.Column="2" /><Button Text="RT"Grid.Row="2"Grid.Column="3" /><Button Text="Quote"Grid.Row="2"Grid.Column="4" /></Grid></StackLayout></ContentPage>

実行結果を以下に示します。

f:id:okazuki:20161208233621p:plain

余白

最後に余白について説明します。余白の設定は、PaddingプロパティとMarginプロパティがあります。Paddingプロパティがコントロールの外側に余白を設けます。Marginプロパティがコントロールの内側に余白を設けます。プロパティの設定方法は、4方向に同一の値を設定する方法と、左右と上下にそれぞれ同じ値を設定する方法と、上下左右に個別の値を設定する方法があります。

10のように単一の値を設定すると上下左右にすべて10の余白が設定されます。10,5のように2つの値を設定すると左右に10、上下に5の余白が設定されます。5,10,15,20のように4つの値を設定すると左、上、右、下の順番で余白が設定されます。

コード例を以下に示します。

<?xml version="1.0" encoding="utf-8"?><ContentPage xmlns="http://xamarin.com/schemas/2014/forms"xmlns:x="http://schemas.microsoft.com/winfx/2009/xaml"xmlns:prism="clr-namespace:Prism.Mvvm;assembly=Prism.Forms"prism:ViewModelLocator.AutowireViewModel="True"x:Class="PrismUnityApp15.Views.MainPage"Title="MainPage"Padding="20"><Grid Margin="10,5"><BoxView Color="Red" /></Grid></ContentPage>

ページのPaddingに20を設定して上下左右に20の余白を持たせています。さらにGridでMarginを指定して左右に10、上下に5の余白を持たせています。

実行結果を以下に示します。

f:id:okazuki:20161208234344p:plain

まとめ

Xamarin.Formsには、いくつかのレイアウトコントロールが定義されていますが、基本的なレイアウトに関していうとStackLayoutGridを組み合わせることで大体実現可能です。まず、とっかかりとしてこの2つのレイアウトコントロールの使い方をマスターして思い通りのページを作れるようになりましょう。

Xamarin.FormsでPrism.Formsを使ってPCLに非対応なライブラリを使う方法

$
0
0

例えばMicrosoft.AzureのStorageのライブラリなんかがXamarin.AndroidとXamarin.iOSには対応してるけどPCLには対応してないといった感じです。

被害者がここに。

対応方法

ということで対応方法ですが、id:chomadoさんがちゃんと対応してました。

つまり、プラットフォーム固有機能を呼ぶときと同じ対応でOKということですね。

Prism.Formsでプラットフォーム固有処理を呼び出す方法はDependencyServiceを使うかIPlatformInitializerを使う方法の2通りがあります。

www.nuits.jp

特に理由がない限りは(例えば既存でDependencyServiceでガッツリ作ってるとか。まぁそれでも移行は楽ちんだからやった方がいいと思うけど)IPlatformInitializerを使うのがいいでしょう。柔軟ですし、早いですし。

ということで対応方法のステップ。

ステップ1

PCLのプロジェクトにインターフェースを切る。

publicinterface IHogeService
{
  Task<Hoge> HogeAsync();
}

ステップ2

NuGetからAndroidとiOSプロジェクトにライブラリを追加する。

ステップ3

AndroidかiOSプロジェクトのどちらかに、PCLに定義したインターフェースの実装を定義する。

publicclass HogeService : IHogeService
{
  public Task<Hoge> HogeAsync()
  {
    // ライブラリを使ったコード
  }
}

ステップ4

もう一方のプロジェクト(Androidにステップ3で実装したならiOS、iOSに実装したならAndroid)にリンクとしてステップ3で作ったファイルを追加。

これでソースコードの共有化を行います。

ステップ5

各プラットフォームのIPlatformInitializerの実装にサービスの登録を行う。Prism Template Packを使ってる場合は自動的にMainActivityAppDelegateに追加されています。

container.RegisterType<IHogeService, HogeService>(new ContainerControledLifetimeManager());

ステップ6

PCLで使いましょう。 ViewModelとかのコンストラクタにサービスを受け取るようにすることで、Androidで実行されたときはAndroid用のクラスが、iOSで実行されたときはiOS用のクラスがインジェクションされます。

まとめ

普通PCLか.NET Standard対応してるだろJKと思ってても、思わぬところで罠があったりするので頭の片隅に入れておきましょう。


Xamarin.FormsのListViewでタップされた項目をスマートにViewModelに渡す方法

$
0
0

EventToCommandBehaviorを使います。コードはこちらを参考に。

github.com

この時、こういうBehaviorを作っておくとListViewの選択がされなくなって捗ります。

using Xamarin.Forms;

namespace PrismUnityApp2
{
    publicclass NotSelectableListViewBehavior : Behavior<ListView>
    {
        protectedoverridevoid OnAttachedTo(ListView bindable)
        {
            base.OnAttachedTo(bindable);

            bindable.ItemSelected += this.Bindable_ItemSelected;
        }

        protectedoverridevoid OnDetachingFrom(ListView bindable)
        {
            base.OnDetachingFrom(bindable);
            bindable.ItemSelected -= this.Bindable_ItemSelected;
        }

        privatevoid Bindable_ItemSelected(object sender, SelectedItemChangedEventArgs e)
        {
            ((ListView)sender).SelectedItem = null;
        }
    }
}

SelectedItemをItemSelectedでnullにしてるのですが、こうすることで選択時に色がつかなくなります。 色がついてると同じアイテムを2回選択したときにイベントが飛ばないので強制的に選択をしないようにしているという感じですね。

あとは、SelectedItemChangedEventArgsから選択項目を抜き出すConverterを作って

using System;
using System.Globalization;
using Xamarin.Forms;

namespace PrismUnityApp2
{
    publicclass SelectedItemChangedEventArgsToSelectedItemConverter : IValueConverter
    {
        publicobject Convert(objectvalue, Type targetType, object parameter, CultureInfo culture)
        {
            var args = (SelectedItemChangedEventArgs)value;
            return args.SelectedItem;
        }

        publicobject ConvertBack(objectvalue, Type targetType, object parameter, CultureInfo culture)
        {
            thrownew NotImplementedException();
        }
    }
}

こんな風にListViewに対して設定すればOKです。

<?xml version="1.0" encoding="utf-8"?><ContentPage xmlns="http://xamarin.com/schemas/2014/forms"xmlns:x="http://schemas.microsoft.com/winfx/2009/xaml"xmlns:prism="clr-namespace:Prism.Mvvm;assembly=Prism.Forms"xmlns:local="clr-namespace:PrismUnityApp2"prism:ViewModelLocator.AutowireViewModel="True"x:Class="PrismUnityApp2.Views.MainPage"Title="MainPage"><ContentPage.Resources><ResourceDictionary><local:SelectedItemChangedEventArgsToSelectedItemConverter x:Key="SelectedItemChangedEventArgsToSelectedItemConverter" /></ResourceDictionary></ContentPage.Resources><Grid><ListView ItemsSource="{Binding People}"><ListView.Behaviors><local:NotSelectableListViewBehavior /><local:EventToCommandBehavior EventName="ItemSelected"Converter="{StaticResource SelectedItemChangedEventArgsToSelectedItemConverter}"Command="{Binding SelectedCommand}"/></ListView.Behaviors></ListView></Grid></ContentPage>

大事なのは、ViewModel側のCommandでnullは受け付けないようにするところです。これをやらないと無駄にコマンドが実行されます。 (初回表示のときや、ItemSelectedイベントでnullをセットしたときとかにイベントが発生するので)

using Prism.Commands;
using Prism.Mvvm;
using Prism.Navigation;
using System;
using System.Collections.Generic;
using System.Diagnostics;
using System.Linq;

namespace PrismUnityApp2.ViewModels
{
    publicclass MainPageViewModel : BindableBase, INavigationAware
    {
        public IEnumerable<Person> People { get; } = Enumerable.Range(1, 100)
            .Select(x => new Person { Name = $"tanaka {x}" })
            .ToArray();

        public DelegateCommand<Person> SelectedCommand { get; }

        public MainPageViewModel()
        {
            this.SelectedCommand = new DelegateCommand<Person>(
                x => Debug.WriteLine($"{x.Name} selected."), 
                x => x != null);
        }

        publicvoid OnNavigatedFrom(NavigationParameters parameters)
        {
        }

        publicvoid OnNavigatedTo(NavigationParameters parameters)
        {
        }
    }

    publicclass Person
    {
        publicstring Name { get; set; }
    }
}

以上、簡単にですが最近得たノウハウ。

Xamarin.FormsのBehaviorをBinding可能にする

$
0
0

デフォルトだとBindingできないんですよ。ということでソリューションは以下のようにします。

github.com

BindingContextが伝搬しないなら伝搬させればいいじゃない?ということで手動でせっせと伝搬させてます。

これくらいデフォルトで面倒見てほしかった…。

Xamarin.FormsでBehaviorのTriggerとActionを作る

$
0
0

Xamarin.Formsのドキュメント上は見つけれなかったけど、ソースコード的にはTriggerとActionがあったりします。

github.com

ただ、この人たちはBindingに対応してないという、ちょっと悲しい感じに仕上がってます。なので、XamarinのBehaviorをベースにBindingに対応したTriggerとActionを作ってみようと思います。

Behaviorの基本クラス

BindingContextを伝搬するBehaviorBase<T>クラスを作ります。

using System;
using Xamarin.Forms;

namespace PrismUnityApp16.Behaviors
{
    publicclass BehaviorBase<T> : Behavior<T>
        where T : BindableObject
    {
        protected T AssociatedObject { get; private set; }

        protectedoverridevoid OnAttachedTo(T bindable)
        {
            base.OnAttachedTo(bindable);
            this.AssociatedObject = bindable;
            this.BindingContext = bindable.BindingContext;

            bindable.BindingContextChanged += this.Bindable_BindingContextChanged;
        }

        privatevoid Bindable_BindingContextChanged(object sender, EventArgs e)
        {
            this.OnBindingContextChanged();
        }

        protectedoverridevoid OnDetachingFrom(T bindable)
        {
            base.OnDetachingFrom(bindable);
            bindable.BindingContextChanged -= this.Bindable_BindingContextChanged;
        }

        protectedoverridevoid OnBindingContextChanged()
        {
            base.OnBindingContextChanged();
            this.BindingContext = this.AssociatedObject.BindingContext;
        }
    }
}

Triggerの基本クラスを作る

次にTriggerの基本クラスを作ります。BehaviorBase<T>を継承してIActionインターフェースを抱え込む感じで作ります。ContentPropertyActionsを指定していい感じにXAMLで書けるようにもしておきましょう。

あと、IActionBindingContextを伝搬させるのも忘れないでやっておきます。

using System.Collections.Generic;
using System.Linq;
using Xamarin.Forms;

namespace PrismUnityApp16.Behaviors
{
    [ContentProperty("Actions")]
    publicclass TriggerBehaviorBase<T> : BehaviorBase<T>
        where T : BindableObject
    {
        public ICollection<IAction> Actions { get; } = new List<IAction>();

        protectedvoid InvokeActions(object parameter)
        {
            foreach (var action inthis.Actions.ToArray())
            {
                action.Execute(parameter);
            }
        }

        protectedoverridevoid OnAttachedTo(T bindable)
        {
            base.OnAttachedTo(bindable);
            foreach (var action inthis.Actions.ToArray())
            {
                action.BindingContext = this.BindingContext;
            }
        }

        protectedoverridevoid OnDetachingFrom(T bindable)
        {
            base.OnDetachingFrom(bindable);
            foreach (var action inthis.Actions.ToArray())
            {
                action.BindingContext = null;
            }
        }

        protectedoverridevoid OnBindingContextChanged()
        {
            base.OnBindingContextChanged();

            foreach (var action inthis.Actions.ToArray())
            {
                action.BindingContext = this.BindingContext;
            }
        }
    }
}

IActoinはこんな感じのシンプルなインターフェースです。

namespace PrismUnityApp16.Behaviors
{
    publicinterface IAction
    {
        object BindingContext { get; set; }

        void Execute(object parameter);
    }
}

使ってみよう

イベントをもとにActionを実行するEventTriggerBehaviorとCommandを実行するInvokeCommandActionを作ってみようと思います。

EventTriggerBehavior

さくっとリフレクションを使ってイベントを拾ってきて登録します。

using System;
using System.Reflection;
using Xamarin.Forms;

namespace PrismUnityApp16.Behaviors
{
    publicclass EventTriggerBehavior : TriggerBehaviorBase<View>
    {
        publicstaticreadonly BindableProperty EventNameProperty = BindableProperty
            .Create(nameof(EventName), typeof(string), typeof(EventTriggerBehavior));

        private Delegate EventHandler { get; set; }

        private EventInfo EventInfo { get; set; }

        publicstring EventName
        {
            get { return (string)this.GetValue(EventNameProperty); }
            set { this.SetValue(EventNameProperty, value); }
        }

        protectedoverridevoid OnAttachedTo(View bindable)
        {
            base.OnAttachedTo(bindable);
            if (string.IsNullOrEmpty(this.EventName))
            {
                return;
            }

            this.EventInfo = this.AssociatedObject.GetType().GetRuntimeEvent(this.EventName);
            if (this.EventInfo == null)
            {
                thrownew InvalidOperationException($"{this.EventName} is not found.");
            }

            var methodInfo = typeof(EventTriggerBehavior).GetTypeInfo().GetDeclaredMethod(nameof(OnEvent));
            this.EventHandler = methodInfo.CreateDelegate(this.EventInfo.EventHandlerType, this);
            this.EventInfo.AddEventHandler(bindable, this.EventHandler);
        }

        privatevoid OnEvent(object sender, object args)
        {
            this.InvokeActions(args);
        }

        protectedoverridevoid OnDetachingFrom(View bindable)
        {
            base.OnDetachingFrom(bindable);
            this.EventInfo.RemoveEventHandler(bindable, this.EventHandler);
        }
    }
}

InvokeCommandAction

BindableObjectから継承してIActionを実装します。Commandを実行する感じに書きましょう。

using System.Windows.Input;
using Xamarin.Forms;

namespace PrismUnityApp16.Behaviors
{
    publicclass InvokeCommandAction : BindableObject, IAction
    {
        publicstaticreadonly BindableProperty CommandProperty = BindableProperty
            .Create(nameof(Command), typeof(ICommand), typeof(EventTriggerBehavior));
        publicstaticreadonly BindableProperty CommandParameterProperty = BindableProperty
            .Create(nameof(CommandParameter), typeof(object), typeof(EventTriggerBehavior));
        publicstaticreadonly BindableProperty ConverterProperty = BindableProperty
            .Create(nameof(Converter), typeof(IValueConverter), typeof(EventTriggerBehavior));

        public ICommand Command
        {
            get { return (ICommand)this.GetValue(CommandProperty); }
            set { this.SetValue(CommandProperty, value); }
        }
        publicobject CommandParameter
        {
            get { returnthis.GetValue(CommandParameterProperty); }
            set { this.SetValue(CommandParameterProperty, value); }
        }
        public IValueConverter Converter
        {
            get { return (IValueConverter)this.GetValue(ConverterProperty); }
            set { this.SetValue(ConverterProperty, value); }
        }


        publicvoid Execute(object parameter)
        {
            var p = this.CommandParameter;

            if (p == null)
            {
                p = this.Converter?.Convert(parameter, typeof(object), null, null);
            }

            if (this.Command?.CanExecute(p) ?? false)
            {
                this.Command.Execute(p);
            }
        }
    }
}

使ってみよう

使い方は簡単。例えばButtonClickedイベントと紐づける場合はこんな感じ。

<?xml version="1.0" encoding="utf-8" ?>
<ContentPage xmlns="http://xamarin.com/schemas/2014/forms"             xmlns:x="http://schemas.microsoft.com/winfx/2009/xaml"             xmlns:prism="clr-namespace:Prism.Mvvm;assembly=Prism.Forms"             xmlns:controls="clr-namespace:PrismUnityApp16.Controls"             xmlns:behaviors="clr-namespace:PrismUnityApp16.Behaviors"             prism:ViewModelLocator.AutowireViewModel="True"             x:Class="PrismUnityApp16.Views.MainPage"
             Title="MainPage">
  <StackLayout HorizontalOptions="Center" VerticalOptions="Center">
    <Button Text="OK">
      <Button.Behaviors>
        <behaviors:EventTriggerBehavior EventName="Clicked">
          <behaviors:InvokeCommandAction Command="{Binding HelloCommand}" />
        </behaviors:EventTriggerBehavior>
      </Button.Behaviors>
    </Button>
  </StackLayout>
</ContentPage>

ViewModel側はこんな感じです。

using Prism.Commands;
using Prism.Mvvm;
using Prism.Navigation;
using System.Diagnostics;

namespace PrismUnityApp16.ViewModels
{
    publicclass MainPageViewModel : BindableBase, INavigationAware
    {
        public DelegateCommand HelloCommand { get; }

        public MainPageViewModel()
        {
            this.HelloCommand = new DelegateCommand(() => Debug.WriteLine("Clicked"));
        }

        publicvoid OnNavigatedFrom(NavigationParameters parameters)
        {

        }

        publicvoid OnNavigatedTo(NavigationParameters parameters)
        {
        }
    }
}

実行してボタンを押すとデバッグウィンドウの出力にClickedと表示されます。

まとめ

デフォで用意しといてくれ。

DIコンテナのUnityのLifetimeManagerを拡張して任意のタイミングでインスタンスの破棄をする

$
0
0

UnityのLifetimeManagerはシングルトンで管理するContainerControlledLifetimeManagerか、デフォルトの毎回newする‘PerResolveLifetimeManager‘か、スレッド単位のPerThreadLifetimeManagerが用意されています。あとマニアックなところだと、ExternallyControlledLifetimeManagerとかいう弱参照で管理されるものもあります。

今回は、LifetimeManagerを拡張して任意のタイミングで破棄できるLifetimeManagerを作ってみようと思います。

破棄を通知するインターフェースの定義

まず、オブジェクトが破棄されたことを通知するインターフェースを定義します。とりあえず今回はイベントの発火でライフサイクルの終了を通知するようにしてみようと思うので、シンプルにCompletedイベントだけを持ったインターフェースを定義しました。

interface ITransactionPolicy
{
    event EventHandler Completed;
}

ITransactionPolicyを使ったLifetimeManagerの定義

後は、ITransactionPolicyCompletedイベントが起きたらインスタンスを破棄するようにするLifetimeManagerの実装を作るだけです。

sealedclass TransactionLifetimeManager : LifetimeManager, IDisposable
{
    privateobjectvalue;

    publicoverrideobject GetValue()
    {
        returnvalue;
    }

    publicoverridevoid RemoveValue()
    {
        this.Dispose();
    }

    publicoverridevoid SetValue(object newValue)
    {
        value = newValue;
        var tx = valueas ITransactionPolicy;
        if (tx != null)
        {
            tx.Completed += this.Tx_Completed;
        }
    }

    publicvoid Dispose()
    {
        this.Dispose(true);
        GC.SuppressFinalize(this);
    }

    privatevoid Dispose(bool disposable)
    {
        if (disposable)
        {
            (valueas IDisposable)?.Dispose();
            this.value = null;
        }
    }


    privatevoid Tx_Completed(object sender, EventArgs e)
    {
        ((ITransactionPolicy)this.value).Completed -= this.Tx_Completed;
        this.RemoveValue();
    }
}

使ってみよう

使い方は簡単です。ITransactionPolicyを実装してTransactionLifetimeManagerで登録するだけ。

// こっちはライフサイクルを制御するclass Person : ITransactionPolicy, IDisposable
{
    private Service Service { get; }
    public Person(Service service)
    {
        this.Service = service;
        Console.WriteLine("Person#Constructor");
    }

    publicevent EventHandler Completed;

    publicvoid Complete()
    {
        this.Completed?.Invoke(this, EventArgs.Empty);
    }

    publicvoid Dispose()
    {
        Console.WriteLine("Person#Dispose");
    }
}

// こっちは普通のクラスclass Service
{
    public Service()
    {
        Console.WriteLine("Service#Constructor");
    }
}

コンテナに登録して使ってみましょう。

var c = new UnityContainer();
// Serviceはシングルトン
c.RegisterType<Service>(new ContainerControlledLifetimeManager());
// Personは任意のタイミングで破棄
c.RegisterType<Person>(new TransactionLifetimeManager());

// とりあえずインスタンス取得
Console.WriteLine("Resolve<Person>()");
var p = c.Resolve<Person>();

// 2回目取得しても同じインスタンスが取れることを確認
Console.WriteLine("Resolve<Person>()");
Console.WriteLine(p == c.Resolve<Person>() ? "同じインスタンス" : "違うインスタンス");

// インスタンスを明示的に破棄
Console.WriteLine("RaiseCompleted");
p.Complete();

// 違うインスタンスが取れることを確認
Console.WriteLine("Resolve<Person>()");
Console.WriteLine(p == c.Resolve<Person>() ? "同じインスタンス" : "違うインスタンス");

// コンテナの破棄時にDisposeが呼ばれることも確認
Console.WriteLine("Container#Dispose");
c.Dispose();

実行すると以下のような出力が得られます。

Resolve<Person>()
Service#Constructor
Person#Constructor
Resolve<Person>()
同じインスタンス
RaiseCompleted
Person#Dispose
Resolve<Person>()
Person#Constructor
違うインスタンス
Container#Dispose
Person#Dispose

ちゃんとServiceはシングルトンでPersonCompletedイベントの発火とともに削除されてることが確認できます。

注意点

スレッドセーフではないのでWebアプリケーションみたいに不特定多数のスレッドからコンテナにアクセスするような環境下では使わないほうが幸せです。クライアントアプリとかでUIスレッド上からしかコンテナにアクセスしないような環境下で使いましょう。

まとめ

Unityはいいぞ。

LifetimeManagerの拡張は、はじめてやったけど結構簡単でした。

追記

3年前にやってた。

code.msdn.microsoft.com

Xamarin.Forms + PrismでSQLiteを使ってみよう

$
0
0

モバイル環境でのデータベースといったらSQLiteがデファクト!ということでXamarin.Forms + Prism.Formsの環境で試してみましょう。

NuGetパッケージの導入

使用するパッケージはSQLite-net-pclです。(似た名前のが多いので注意)

www.nuget.org

プラットフォーム固有処理を作成

残念なことにPCLに閉じて完結という感じではなさそうです。 コネクションの作成時にパスを渡すのですが、このパスがプラットフォーム固有文字列になるので以下のようにSQLiteConnectionを返すインターフェースを定義していい感じにやる必要があります。

using SQLite;

namespace PrismUnityApp17.Services
{
    publicinterface ISQLiteConnectionProvider
    {
        SQLiteConnection GetConnection();
    }
}

Androidの実装

Personalフォルダをとってきて、そこにファイルを作る感じにします。

using PrismUnityApp17.Services;
using SQLite;
using System.IO;

namespace PrismUnityApp17.Droid.Services
{
    publicclass SQLiteConnectionProvider : ISQLiteConnectionProvider
    {
        private SQLiteConnection Connection { get; set; }

        public SQLiteConnection GetConnection()
        {
            if (this.Connection != null) { returnthis.Connection; }

            var path = System.Environment.GetFolderPath(System.Environment.SpecialFolder.Personal);
            path = Path.Combine(path, "database.db3");
            returnthis.Connection = new SQLiteConnection(path);
        }
    }
}

iOSの実装

iOSはLibraryフォルダに作る感じです。(ちょっとAndroidに比べてめんどい)

using PrismUnityApp17.Services;
using SQLite;
using System;
using System.IO;

namespace PrismUnityApp17.iOS.Services
{
    publicclass SQLiteConnectionProvider : ISQLiteConnectionProvider
    {
        private SQLiteConnection Connection { get; set; }

        public SQLiteConnection GetConnection()
        {
            if (this.Connection != null) { returnthis.Connection; }

            var path = Environment.GetFolderPath(Environment.SpecialFolder.Personal);
            path = Path.Combine(path, "..", "Library", "database.db3");
            returnthis.Connection = new SQLiteConnection(path);
        }
    }
}

悩み

SQLiteConnectionIDispoasbleなのでDisposeしないとなのですが、毎回やるのとstaticに持ってて、使いまわすのどっちが正解なのか悩んでます…。とりあえず今回の例ではアプリ内で1つのコネクションにしてます。

PlatformInitializerへの登録

上記で作成したクラスをIPlatformInitializerで登録します。

Android

MainActivityの下に定義されてるので以下のように追加します。

publicclass AndroidInitializer : IPlatformInitializer
{
    publicvoid RegisterTypes(IUnityContainer container)
    {
        container.RegisterType<ISQLiteConnectionProvider, SQLiteConnectionProvider>(new ContainerControlledLifetimeManager());
    }
}

iOS

iOSはAppDelegateの下に定義されているので、そこにも追加します。

publicclass iOSInitializer : IPlatformInitializer
{
    publicvoid RegisterTypes(IUnityContainer container)
    {
        container.RegisterType<ISQLiteConnectionProvider, SQLiteConnectionProvider>(new ContainerControlledLifetimeManager());
    }
}

テーブルの定義

こんな感じでテーブルを表すクラスを定義します。

using SQLite;

namespace PrismUnityApp17.Businesses
{
    publicclass TodoItem
    {
        [PrimaryKey]
        [AutoIncrement]
        publicint Id { get; set; }
        [NotNull]
        publicstring Title { get; set; }
    }
}

そして、テーブルにアクセスするためのクラスを作ります。

using PrismUnityApp17.Businesses;
using SQLite;
using System.Collections.Generic;
using System.Linq;

namespace PrismUnityApp17.Services
{
    publicinterface ITodoItemService
    {
        IEnumerable<TodoItem> GetAll();
        TodoItem GetById(int id);
        void Update(TodoItem todoItem);
        void Insert(TodoItem todoItem);
        void Delete(int id);
    }

    publicclass TodoItemService : ITodoItemService
    {
        private ISQLiteConnectionProvider ConnectionProvider { get; }
        private SQLiteConnection Connection { get; }

        public TodoItemService(ISQLiteConnectionProvider connectionProvider)
        {
            this.ConnectionProvider = connectionProvider;
            this.Connection = this.ConnectionProvider.GetConnection();
            this.Connection.CreateTable<TodoItem>();
        }

        publicvoid Delete(int id)
        {
            this.Connection.Delete<TodoItem>(id);
        }

        public IEnumerable<TodoItem> GetAll()
        {
            returnthis.Connection.Table<TodoItem>().ToList();
        }

        public TodoItem GetById(int id)
        {
            returnthis.Connection.Table<TodoItem>().FirstOrDefault(x => x.Id == id);
        }

        publicvoid Insert(TodoItem todoItem)
        {
            this.Connection.Insert(todoItem);
        }

        publicvoid Update(TodoItem todoItem)
        {
            this.Connection.Update(todoItem);
        }
    }
}

画面とVMを作ろう

あとは、これを使う画面を作るだけです。とりあえず追加と削除を。

using Prism.Commands;
using Prism.Mvvm;
using Prism.Navigation;
using PrismUnityApp17.Businesses;
using PrismUnityApp17.Services;
using System.Collections.Generic;

namespace PrismUnityApp17.ViewModels
{
    publicclass MainPageViewModel : BindableBase, INavigationAware
    {
        private ITodoItemService TodoItemService { get; }

        private IEnumerable<TodoItem> todoItems;

        public IEnumerable<TodoItem> TodoItems
        {
            get { returnthis.todoItems; }
            set { this.SetProperty(refthis.todoItems, value); }
        }

        privatestring inputText;

        publicstring InputText
        {
            get { returnthis.inputText; }
            set { this.SetProperty(refthis.inputText, value); }
        }

        public DelegateCommand AddCommand { get; }

        public DelegateCommand<TodoItem> DeleteCommand { get; }

        public MainPageViewModel(ITodoItemService todoItemService)
        {
            this.TodoItemService = todoItemService;

            this.AddCommand = new DelegateCommand(this.AddTodoItem, () => !string.IsNullOrEmpty(this.InputText))
                .ObservesProperty(() => this.InputText);

            this.DeleteCommand = new DelegateCommand<TodoItem>(this.DeleteTodoItem);
        }

        privatevoid DeleteTodoItem(TodoItem todoItem)
        {
            this.TodoItemService.Delete(todoItem.Id);
            this.TodoItems = this.TodoItemService.GetAll();
        }

        privatevoid AddTodoItem()
        {
            this.TodoItemService.Insert(new TodoItem { Title = this.InputText });
            this.InputText = "";
            this.TodoItems = this.TodoItemService.GetAll();
        }

        publicvoid OnNavigatedFrom(NavigationParameters parameters)
        {

        }

        publicvoid OnNavigatedTo(NavigationParameters parameters)
        {
            this.TodoItems = this.TodoItemService.GetAll();
        }
    }
}

XAMLはこんな感じで。

<?xml version="1.0" encoding="utf-8"?><ContentPage xmlns="http://xamarin.com/schemas/2014/forms"xmlns:x="http://schemas.microsoft.com/winfx/2009/xaml"xmlns:prism="clr-namespace:Prism.Mvvm;assembly=Prism.Forms"prism:ViewModelLocator.AutowireViewModel="True"x:Class="PrismUnityApp17.Views.MainPage"Title="MainPage"x:Name="Page"><ContentPage.Padding><OnPlatform x:TypeArguments="Thickness"iOS="0,20,0,0" /></ContentPage.Padding><ContentPage.ToolbarItems><ToolbarItem Text="Add"Command="{Binding AddCommand}" /></ContentPage.ToolbarItems><StackLayout><Entry Text="{Binding InputText, Mode=TwoWay}" /><ListView ItemsSource="{Binding TodoItems}"VerticalOptions="FillAndExpand"><ListView.ItemTemplate><DataTemplate><ViewCell><ViewCell.ContextActions><MenuItem Text="Delete"Command="{Binding BindingContext.DeleteCommand, Source={x:Reference Page}}"CommandParameter="{Binding}" /></ViewCell.ContextActions><Label Text="{Binding Title}" /></ViewCell></DataTemplate></ListView.ItemTemplate></ListView></StackLayout></ContentPage>

仕上げにApp.xaml

ITodoItemServiceの登録や、ページの登録(NavigationPageの登録など)をやります。

using Microsoft.Practices.Unity;
using Prism.Unity;
using PrismUnityApp17.Services;
using PrismUnityApp17.Views;
using Xamarin.Forms;

namespace PrismUnityApp17
{
    publicpartialclass App : PrismApplication
    {
        public App(IPlatformInitializer initializer = null) : base(initializer) { }

        protectedoverride async void OnInitialized()
        {
            InitializeComponent();

            await this.NavigationService.NavigateAsync("NavigationPage/MainPage");
        }

        protectedoverridevoid RegisterTypes()
        {
            this.Container.RegisterTypeForNavigation<MainPage>();
            this.Container.RegisterTypeForNavigation<NavigationPage>();

            this.Container.RegisterType<ITodoItemService, TodoItemService>(new ContainerControlledLifetimeManager());
        }
    }
}

これで、追加と削除ができるアプリが出来上がり。意外とお手軽ですね。

Async対応

Async対応版に改造してみます。

ISQLiteConnectionProviderを改造

SQLiteAsyncConnectionを返すようにします。

using SQLite;

namespace PrismUnityApp17.Services
{
    publicinterface ISQLiteConnectionProvider
    {
        SQLiteAsyncConnection GetConnection();
    }
}

プラットフォーム固有実装でもSQLiteAsyncConnectionを返すようにします。

Android

using PrismUnityApp17.Services;
using SQLite;
using System.IO;

namespace PrismUnityApp17.Droid.Services
{
    publicclass SQLiteConnectionProvider : ISQLiteConnectionProvider
    {
        private SQLiteAsyncConnection Connection { get; set; }

        public SQLiteAsyncConnection GetConnection()
        {
            if (this.Connection != null) { returnthis.Connection; }

            var path = System.Environment.GetFolderPath(System.Environment.SpecialFolder.Personal);
            path = Path.Combine(path, "database.db3");
            returnthis.Connection = new SQLiteAsyncConnection(path);
        }
    }
}

iOS

using PrismUnityApp17.Services;
using SQLite;
using System;
using System.IO;

namespace PrismUnityApp17.iOS.Services
{
    publicclass SQLiteConnectionProvider : ISQLiteConnectionProvider
    {
        private SQLiteAsyncConnection Connection { get; set; }

        public SQLiteAsyncConnection GetConnection()
        {
            if (this.Connection != null) { returnthis.Connection; }

            var path = Environment.GetFolderPath(Environment.SpecialFolder.Personal);
            path = Path.Combine(path, "..", "Library", "database.db3");
            returnthis.Connection = new SQLiteAsyncConnection(path);
        }
    }
}

TodoItemServiceの非同期化

TodoItemServiceを非同期に書き換えます。

using PrismUnityApp17.Businesses;
using SQLite;
using System.Collections.Generic;
using System.Linq;
using System.Threading.Tasks;

namespace PrismUnityApp17.Services
{
    publicinterface ITodoItemService
    {
        Task<IEnumerable<TodoItem>> GetAllAsync();
        Task<TodoItem> GetByIdAsync(int id);
        Task UpdateAsync(TodoItem todoItem);
        Task InsertAsync(TodoItem todoItem);
        Task DeleteAsync(TodoItem todoItem);
    }

    publicclass TodoItemService : ITodoItemService
    {
        private ISQLiteConnectionProvider ConnectionProvider { get; }
        private SQLiteAsyncConnection Connection { get; }

        public TodoItemService(ISQLiteConnectionProvider connectionProvider)
        {
            this.ConnectionProvider = connectionProvider;
            this.Connection = this.ConnectionProvider.GetConnection();
        }

        public async Task DeleteAsync(TodoItem todoItem)
        {
            await this.Connection.CreateTableAsync<TodoItem>();
            await this.Connection.DeleteAsync(todoItem);
        }

        public async Task<IEnumerable<TodoItem>> GetAllAsync()
        {
            await this.Connection.CreateTableAsync<TodoItem>();
            return await this.Connection.Table<TodoItem>().ToListAsync();
        }

        public async Task<TodoItem> GetByIdAsync(int id)
        {
            await this.Connection.CreateTableAsync<TodoItem>();
            return await this.Connection.Table<TodoItem>().Where(x => x.Id == id).FirstOrDefaultAsync();
        }

        public async Task InsertAsync(TodoItem todoItem)
        {
            await this.Connection.CreateTableAsync<TodoItem>();
            await this.Connection.InsertAsync(todoItem);
        }

        public async Task UpdateAsync(TodoItem todoItem)
        {
            await this.Connection.CreateTableAsync<TodoItem>();
            await this.Connection.UpdateAsync(todoItem);
        }
    }
}

ViewModelの非同期対応

最後にViewModelを非同期対応にします。

using Prism.Commands;
using Prism.Mvvm;
using Prism.Navigation;
using PrismUnityApp17.Businesses;
using PrismUnityApp17.Services;
using System.Collections.Generic;

namespace PrismUnityApp17.ViewModels
{
    publicclass MainPageViewModel : BindableBase, INavigationAware
    {
        private ITodoItemService TodoItemService { get; }

        private IEnumerable<TodoItem> todoItems;

        public IEnumerable<TodoItem> TodoItems
        {
            get { returnthis.todoItems; }
            set { this.SetProperty(refthis.todoItems, value); }
        }

        privatestring inputText;

        publicstring InputText
        {
            get { returnthis.inputText; }
            set { this.SetProperty(refthis.inputText, value); }
        }

        public DelegateCommand AddCommand { get; }

        public DelegateCommand<TodoItem> DeleteCommand { get; }

        public MainPageViewModel(ITodoItemService todoItemService)
        {
            this.TodoItemService = todoItemService;

            this.AddCommand = new DelegateCommand(this.AddTodoItem, () => !string.IsNullOrEmpty(this.InputText))
                .ObservesProperty(() => this.InputText);

            this.DeleteCommand = new DelegateCommand<TodoItem>(this.DeleteTodoItem);
        }

        private async void DeleteTodoItem(TodoItem todoItem)
        {
            await this.TodoItemService.DeleteAsync(todoItem);
            this.TodoItems = await this.TodoItemService.GetAllAsync();
        }

        private async void AddTodoItem()
        {
            await this.TodoItemService.InsertAsync(new TodoItem { Title = this.InputText });
            this.InputText = "";
            this.TodoItems = await this.TodoItemService.GetAllAsync();
        }

        publicvoid OnNavigatedFrom(NavigationParameters parameters)
        {

        }

        public async void OnNavigatedTo(NavigationParameters parameters)
        {
            this.TodoItems = await this.TodoItemService.GetAllAsync();
        }
    }
}

これでばっちり!非同期でも動きますね。

Xamarin.Forms入門のPDF作りました(Prismもあるよ)

$
0
0

SlideShareでログインしてダウンロードできるようにしています。是非ダウンロードしてみてください!200ページちょっとあります。

www.slideshare.net

目次

1    はじめに
1.1 ターゲットプラットフォーム
1.2 Xamarin.Formsとは
2   Hello world
2.1.1   実行して動作確認
3   XAML
3.1 XAMLとC#のコードの対比
3.1.1   XAMLの基本
3.2 XAMLの応用
3.2.1   添付プロパティ
3.2.2   マークアップ拡張
3.2.3   StaticResource
3.2.4   x:Static
3.2.5   TypeConverter
3.2.6   データバインディング
4   Xamarin.Formsのコントロール
4.1 BindableObject
4.1.1   バインダブルプロパティ
4.1.2   添付プロパティ
4.2 レイアウトコントロール
4.2.1   StackLayout
4.2.2   Grid
4.2.3   AbsoluteLayout
4.2.4   RelativeLayout
4.2.5   ScrollView
4.2.6   余白の制御
4.3 一般的なコントロール
4.3.1   Label
4.3.2   ActivityIndicator
4.3.3   BoxView
4.3.4   Button
4.3.5   DatePicker
4.3.6   Editor
4.3.7   Entry
4.3.8   Image
4.3.9   ListView
4.3.10  OpenGLView
4.3.11  Picker
4.3.12  ProgressBar
4.3.13  SearchBar
4.3.14  Slider
4.3.15  Stepper
4.3.16  Switch
4.3.17  TableView
4.3.18  TimePicker
4.3.19  WebView
4.3.20  Map
4.3.21  CarouselView
4.4 ページ
4.4.1   Page
4.4.2   ContentPage
4.4.3   MasterDetailPage
4.4.4   NavigationPage
4.4.5   TabbedPage
4.4.6   CarouselPage
5   スタイル
6   ジェスチャー
6.1 TapGestureRecognizer
6.2 PinchGestureRecognizer
6.3 PanGestureRecognizer
7   アニメーション
7.1 Xamarin.Formsのコントロールの移動や拡大縮小、回転
7.2 シンプルなアニメーション
7.3 イージング
8   ビヘイビア
9   トリガー・アクション
9.1 PropertyTrigger
9.2 DataTrigger
9.3 EventTrigger
9.4 MultiTrigger
10  メッセージングセンター
11  プラットフォーム固有機能
11.1    Deviceクラス
11.1.1  Idiom
11.1.2  OS
11.1.3  OnPlatform
11.1.4  Styles
11.1.5  GetNamedSize
11.1.6  OpenUri
11.1.7  StartTimer
11.1.8  BeginInvokeOnMainThread
11.2    DependencyService
11.3    Effect
11.4    CustomRenderer
11.5    Plugin
11.6    ネイティブのビュー
12  永続化
12.1    ApplicationクラスのProperties
12.2    ローカルファイル
12.3    SQLite
13  Prism
13.1    Prismの機能
13.2    MVVM開発のサポート
13.3    Dependency Injection
13.4    Xamarin.Forms組み込みのCommandよりも高機能のCommand
13.5    Page Dialog Service
13.6    ページナビゲーション
13.7    MessageingCenterよりも高機能なメッセージング機能
13.8    ロギング
14  まとめ

かずきのXamarin.Forms入門のKindle版だしました(Prismもあるよ)

$
0
0

先日SlideShareに公開したXamarin.FormsのPDFですが

www.slideshare.net

こちらは、SlideShareにログインすると無料でダウンロードできます。

それに加えて、Kindleで販売も始めました。こちらはKindleで見たい人向けです1250円になります。 因みに無料で配ってる関係で、売り上げの35%しか入ってこないので本を買うよりもお寿司奢ってくれる方が喜びます?

かずきのXamarin.Forms入門(Kindle)

ということでよいお年を!!


MacのXamarin.iOSでSegueが作れない

$
0
0

Ctrl + Dragでページを結んでもSegueが作れないというかメニューが一瞬出て消えるっていう動きをしていました。ググってみるとStackoverflowが引っかかりました。

stackoverflow.com

トラックパッドの設定で「強めのクリックと触覚フィードバック」のチェックを外すとメニューが消えなくなるみたいです。何じゃそりゃ。

f:id:okazuki:20170103163143p:plain

Prism.FormsでAutofacを使ってみよう

$
0
0

Xamarin Studioベースで話を進めます。(Visual Studioでもだいたい同じになると思うけど)

まずForms Appを新規作成してPCLで作ります。

NuGetから以下のパッケージを追加します。

  • Prism.Autofac.Forms

Views名前空間を作って、そこにMainPage.xamlを作成します。XAMLはいつも通り、ViewModelLocatorを設定しておきます。 今回は、ViewModelにMessageプロパティがあることを前提に作って見ました。あとでViewModelも作ります。

<?xml version="1.0" encoding="UTF-8"?><ContentPage xmlns="http://xamarin.com/schemas/2014/forms"xmlns:x="http://schemas.microsoft.com/winfx/2009/xaml"xmlns:mvvm="clr-namespace:Prism.Mvvm;assembly=Prism.Forms"mvvm:ViewModelLocator.AutowireViewModel="true"x:Class="PrismAutofac.Views.MainPage"><Label Text="{Binding Message}"HorizontalOptions="Center"VerticalOptions="Center" /></ContentPage>

ViewModels名前空間を作って以下のようなViewModelも作ります。ここら辺は普通のPrismの世界ですね。

using System;
using Prism.Mvvm;

namespace PrismAutofac.ViewModels
{
    publicclass MainPageViewModel : BindableBase
    {
        publicstring Message => "Hello world powered by Prism.Autofac.Forms";
    }
}

そして、App.xaml.csを以下の内容に書き換えます。

AutofacはUnityと違って登録されてないクラスのインスタンスは作ってくれないので、Unityでは必要のなかったViewModelの登録を行っています。と言ってもAssemblyをスキャンしてViewModelを一括登録する感じなので楽チンですけどね。

using Prism.Autofac;
using Prism.Autofac.Forms;
using Autofac;
using Xamarin.Forms;
using PrismAutofac.Views;
using PrismAutofac.ViewModels;
using System.Reflection;

namespace PrismAutofac
{
    publicpartialclass App : PrismApplication
    {
        protectedoverridevoid OnInitialized()
        {
            InitializeComponent();

            this.NavigationService.NavigateAsync("MainPage");
        }

        protectedoverridevoid RegisterTypes()
        {
            // ViewModelの登録
            var containerUpdater = new ContainerBuilder();
            containerUpdater
                .RegisterAssemblyTypes(typeof(App).GetTypeInfo().Assembly)
                .Where(x => x.IsInNamespace("PrismAutofac.ViewModels"))
                .Where(x => x.Name.EndsWith("ViewModel"))
                .AsSelf();
            containerUpdater.Update(this.Container);

            // Viewの登録this.Container.RegisterTypeForNavigation<MainPage>();
        }
    }
}

あとは、PrismApplicationを継承するようにしてるのでApp.xamlの内容もそれに合わせて書き換えます。

<?xml version="1.0" encoding="utf-8"?><prism:PrismApplication xmlns="http://xamarin.com/schemas/2014/forms"xmlns:x="http://schemas.microsoft.com/winfx/2009/xaml"xmlns:prism="clr-namespace:Prism.Autofac;assembly=Prism.Autofac.Forms"x:Class="PrismAutofac.App"><Application.Resources><!-- Application resource dictionary --></Application.Resources></prism:PrismApplication>

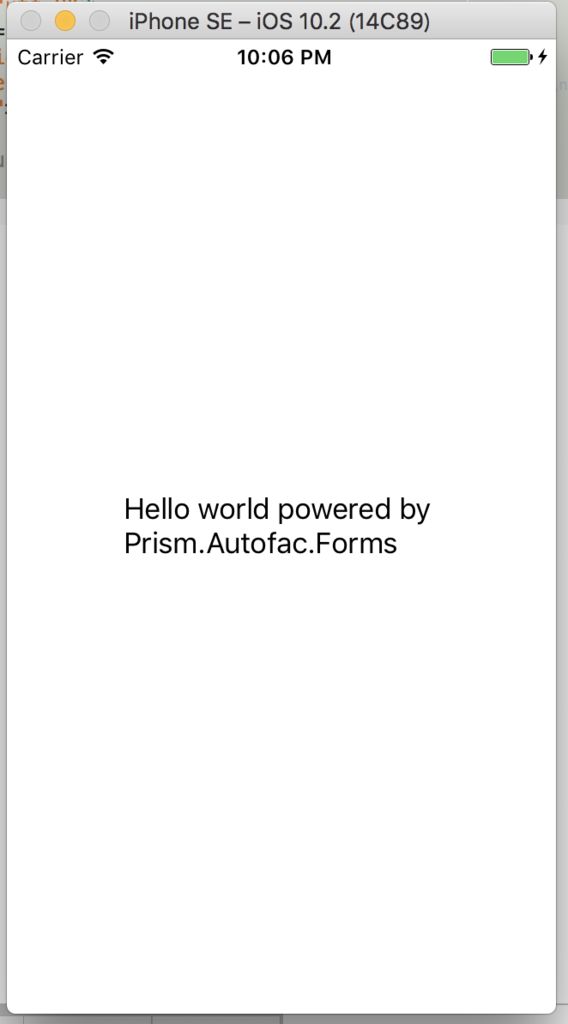
実行すると、以下のようにいい感じに表示されます。

f:id:okazuki:20170108220649p:plain

サービスとかの登録もしてみよう

サービスの登録もついでにして見ましょう。以下のようなIMessageServiceというインターフェースを定義します。

using System;
namespace PrismAutofac.Services
{
    publicinterface IMessageService
    {
        string GetMessage();
    }
}

実装も適当にやります。

using System;
namespace PrismAutofac.Services
{
    publicclass MessageService : IMessageService
    {
        publicstring GetMessage() => "Xamarin.Forms and Prism.Autofac.Forms.";
    }
}

App.xaml.csでサービスの登録をシングルトンで行います。これもサービスが増えて来たときのことを考えてAssemblyをスキャンしてやってしまいましょう。

using Prism.Autofac;
using Prism.Autofac.Forms;
using Autofac;
using Xamarin.Forms;
using PrismAutofac.Views;
using PrismAutofac.ViewModels;
using System.Reflection;

namespace PrismAutofac
{
    publicpartialclass App : PrismApplication
    {
        protectedoverridevoid OnInitialized()
        {
            InitializeComponent();

            this.NavigationService.NavigateAsync("MainPage");
        }

        protectedoverridevoid RegisterTypes()
        {
            // ViewModelの登録
            var containerUpdater = new ContainerBuilder();
            containerUpdater
                .RegisterAssemblyTypes(typeof(App).GetTypeInfo().Assembly)
                .Where(x => x.IsInNamespace("PrismAutofac.ViewModels"))
                .Where(x => x.Name.EndsWith("ViewModel"))
                .AsSelf();

            // Serviceの登録
            containerUpdater
                .RegisterAssemblyTypes(typeof(App).GetTypeInfo().Assembly)
                .Where(x => x.IsInNamespace("PrismAutofac.Services"))
                .Where(x => x.Name.EndsWith("Service"))
                .AsImplementedInterfaces()
                .SingleInstance();
            containerUpdater.Update(this.Container);

            // Viewの登録this.Container.RegisterTypeForNavigation<MainPage>();
        }
    }
}

MainPageViewModelを、IMessageServiceを使うように書き換えます。

using System;
using Prism.Mvvm;
using PrismAutofac.Services;

namespace PrismAutofac.ViewModels
{
    publicclass MainPageViewModel : BindableBase
    {
        private IMessageService MessageService { get; }

        public MainPageViewModel(IMessageService messageService)
        {
            this.MessageService = messageService;
        }

        publicstring Message => this.MessageService.GetMessage();
    }
}

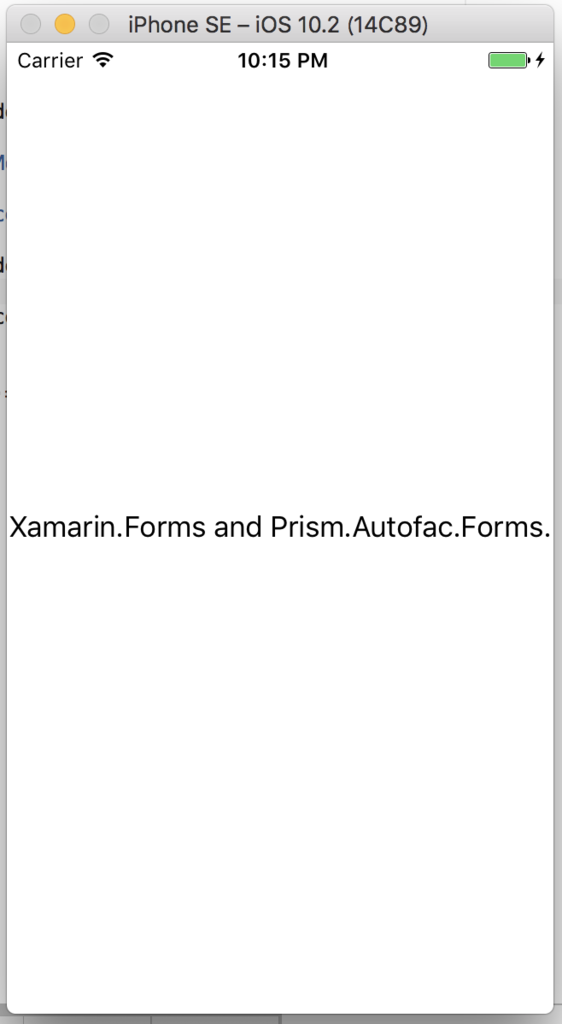
実行すると、ちゃんとViewModelにMessageServiceがインジェクションされていることが確認できます。

f:id:okazuki:20170108221600p:plain

まとめ

Unityがいなくなっても平気ではありそうだなぁと思った今日この頃でした。(Unityには頑張って欲しい)

MacBook Pro (Late 2016) 15インチをXamarin開発用に買ったので感想

$
0
0

使い方

私のMacBook Pro(Late 2016)の使い方は以下のような感じです。

Xamarin開発環境として

Xamarin StudioとVisual Studio for Macを入れてXamarinの開発環境とするために購入しました。 なので、この使い方がメインになります。

MacBook Proのメモリ16GBでSSD512GBモデルなので開発環境として申し分ない感じです。

Windowsとして

Windowsメインで使ってたのでParallelsを購入してWindows 10を入れました。 Parallelsって細かいところで色々気が利いてるので便利ですね。

個人的には、アプリ仮想化ができる点(Coherence)が好きです。 バックグラウンドでWindowsが動いていて、アプリをまるでMac上で動かしてるみたいなことができます。 私は、これでVisual Studio 2015をマック上で使っています。

管理者権限で起動したいとか言った特別な要件がない限りは割と満足できる使い勝手です。

入れたもの

インストールしたソフトウェアは以下のようなものになります。

  • Xamarin Studio
  • Visual Studio for Mac
  • Visual Studio Code
  • TweetDeck
  • Office
  • Slack
  • LINE
  • Kindle
  • Remote Desktop
  • SourceTree
  • Minecraft

ParallelsのWindowsには以下のようなものを入れています。

  • Visual Studio 2015 Update3
  • SourceTree
  • Office

本当にWindowsが使いたいときは、Surface Bookを持ってるのでそっちを使うので、Parallels上のWindowsは、あくまで開発環境といった感じです。

不満なところ

現時点使っていて不満に感じるところをつらつらとまず書いていこうと思います。

英語キーボードなので…

私は、1年前にSurface Bookをアメリカで買った時から英字配列のキーボードを使うようになりました。 そのためMacBook Proも英字配列で購入しました。 オプションとして英字配列を選ぶことのできるMacBook Pro素晴らしいと思いました。

まぁそんなわけで英字配列使ってると不便なことがあります。

WindowsはAlt + `が半角・全角の切り替えなのですがMacはCtrl + Spaceが切り替えに割り当たってます。 そのため、Parallels上のWindowsとMacで同じハードで同じデスクトップ上でアプリを使ってるのに半角・全角の切り替えが統一されてない!という状況になってます。 まぁ、これは誰が悪いわけでもないんですが不便ですね。

Minecraft

マウスホイールでのアイテムの切り替えがWindowsと逆なんですよ…。 マウスの設定でスクロールを逆にすると全体に効いてくるので変えるわけにもいかない。 まぁそんなところですね。

その他

まぁ郷に入れば郷に従えなので、他に不満点はないですね。MacっていいOSなんだなと思います。

便利なところ

ということで便利だと感じてるところを書いてみたいと思います。

仮想デスクトップ

アプリを全画面にして気持ちよく別デスクトップに割当たるという動きは気持ちいいです。

タッチバー

思ったほど悪くないです。

個人に依存するとは思うのですが私はF1〜F12は、もともと割と目を落として目視で押してたみたいなのでFnキーを押してから目視で選んで押すので割と間に合ってます。 まぁ押す機会自体少ないですしね。

Visual StudioやXamarin Studioでデバッグ実行するときくらいしか押してない感じ。

Safariを使ってると割とよくできていて、検索バーへのフォーカスの移動やタブ増やしたりとか、お気に入りへのアクセスとか簡単にできるのがいいです。 まぁショートカットの方が早いですが、検索バーへの移動ショートカットを未だに発見できていないのでタッチバー使ってます。 (タッチバーでできるから調べようという気力も起きない)

あと、音量の調整や画面輝度の調整がタッチバーでやれるのもなかなかいい感じです。 トラックパッドでバーをちまちまやるよりタッチでささっとやるのが気持ちいいですね。

文字変換

デフォルトの文字変換って勝手に変換してくれるんですよね。 これが最初は気持ち悪かったけど、慣れたらWindowsで変換忘れてしまうようになってしまいました。 これは、気持ちいいですね。

思ったよりない

便利なところはそれくらいでしょうか。

思ったこと

WindowsもMacもOSとして割と歴史あるものなので、それぞれ使いやすくなってて作法を知れば便利なようにできてるんだなと思いました。 仮想デスクトップについては、Macの方が古くからできているのでこなれてるなぁという印象です。

まぁMacのVMをWindows機の上に立てていいようなライセンスになったらMacBookとはさようならしそうだけど、そんな未来はないよね。 ということでXamarinやるならMacいるんだよね。 それが最大の不満点かも(不満点に書けばよかったか)

まぁそんなことで、久しぶりにプログラミングネタじゃない記事でした。

かずきのXamarin.Forms入門を更新しました

$
0
0

すっかりDataTemplateSelectorについて書くのを忘れてたのでSlideShareのPDFとKindleを差し替えました。 Kindleは反映までに1日くらいかかるのと、おそらく既に購入された方には変更は届けないとAmazonが判断すると思います…(よっぽどインパクトの大きな変更でない限り更新は配らないらしいです。しおりとかのデータが全部飛んじゃうらしいので)

申し訳ありませんが、既にKindle版を購入されてる方はSlideShareから更新内容をご確認ください。

www.slideshare.net

www.amazon.co.jp

Microsoft Azure ServiceFabricで複数のサービスで設定値を共通化したい

$
0
0

同じDBに繋ぐときとか一か所で設定を終えたいですよね。 ということで手順を備忘録的に残しておこうと思います。基本的には以下に書いてあることです。

Service Fabric での複数の環境の管理 | Microsoft Docs

Step1

サービスのプロジェクト/PackageRoot/COnfig/Settings.xmlに設定値を書く。これは設定を共通化したいプロジェクトが2個あったら2個ともにやります。

<?xml version="1.0" encoding="utf-8"?><Settings xmlns:xsd="http://www.w3.org/2001/XMLSchema"xmlns:xsi="http://www.w3.org/2001/XMLSchema-instance"xmlns="http://schemas.microsoft.com/2011/01/fabric"><!-- これは StateManager のレプリケーターにより使用されます。--><Section Name="ReplicatorConfig"><Parameter Name="ReplicatorEndpoint"Value="ReplicatorEndpoint" /></Section><!-- これは StateManager のレプリケーション トラフィックをセキュリティで保護するために使用されます。--><Section Name="ReplicatorSecurityConfig" /><!-- ここで、カスタム構成セクションとパラメーターを追加します。--><!--<Section Name="MyConfigSection"><Parameter Name="MyParameter" Value="Value1" /></Section>  --><!-- これを追加 --><Section Name="UserDatabase"><Parameter Name="ConnectionString"Value="" /></Section></Settings>

Valueにはなんか書いてもかまいませんが、どうせ後で上書きされるので適当な値を突っ込んでおきましょう。

Step2

アプリケーションのプロジェクトのApplicationPackageRoot/ApplicationManifest.xmlのServiceManifestImportのConfigOverridesで先ほどの設定をオーバーライドする定義を追加します。これも2サービスあったら2つぶんやります。

Valueのところでかっこで囲っているのがパラメータ名になります。

<ServiceManifestImport><ServiceManifestRef ServiceManifestName="Stateful1Pkg"ServiceManifestVersion="1.0.0" /><ConfigOverrides><!-- こんな感じ --><ConfigOverride Name="Config"><Settings><Section Name="UserDatabase"><Parameter Name="ConnectionString"Value="[ConnectionString]" /></Section></Settings></ConfigOverride></ConfigOverrides><!-- ServicePackage から ServiceManifest をインポートします。ServiceManifestName と ServiceManifestVersion は、     ServiceManifest.xml ファイルで定義されている ServiceManifest 要素の [Name] 属性と [Version] 属性と 一致しなければなりません。--></ServiceManifestImport>

そして、同じファイルのParametersタグに先ほど追加したかっこで囲ったパラメータ名のパラメータを追加します。

<Parameters><Parameter Name="Stateful1_MinReplicaSetSize"DefaultValue="3" /><Parameter Name="Stateful1_PartitionCount"DefaultValue="1" /><Parameter Name="Stateful1_TargetReplicaSetSize"DefaultValue="3" /><Parameter Name="Stateless1_InstanceCount"DefaultValue="-1" /><!-- これを追加 --><Parameter Name="ConnectionString"DefaultValue="DefaultConnectionString" /></Parameters>

Step3

アプリケーションのプロジェクトのAplicationParametersフォルダの下にある構成単位のxmlファイルの中身を構成に合わせて設定します。 Local.Node1.xmlやLocal.Node5.xmlの場合はローカルDBの接続文字列とか、Cloud.xmlはSQL Databaseとかいった感じです。

こんな風になります。

<?xml version="1.0" encoding="utf-8"?><Application xmlns:xsd="http://www.w3.org/2001/XMLSchema"xmlns:xsi="http://www.w3.org/2001/XMLSchema-instance"Name="fabric:/Application1"xmlns="http://schemas.microsoft.com/2011/01/fabric"><Parameters><Parameter Name="Stateful1_PartitionCount"Value="1" /><Parameter Name="Stateful1_MinReplicaSetSize"Value="1" /><Parameter Name="Stateful1_TargetReplicaSetSize"Value="1" /><Parameter Name="Stateless1_InstanceCount"Value="1" /><!-- これを追加 --><Parameter Name="ConnectionString"Value="Node1ConnectionString" /></Parameters></Application>

Step4

定義は完了です。あとはコードからの参照方法ですが以下のようなコードで出来ます。

this.Context
  .CodePackageActivationContext
  .GetConfigurationPackageObject("Config")
  .Settings
  .Sections["UserDatabase"]
  .Parameters["ConnectionString"]
  .Value

長いですね。記述場所はStatefulやStatelesの中になります。Contextにアクセスできれば何処で書いてもOKです。

Viewing all 1388 articles
Browse latest View live


<script src="https://jsc.adskeeper.com/r/s/rssing.com.1596347.js" async> </script>