Quantcast
Channel: かずきのBlog@hatena
Viewing all 1388 articles
Browse latest View live

Windows ストアアプリ開発の土台作り

$
0
0

Windows ストア アプリの開発で、今始めるうえで一番無難に便利にはじめれる個人的な考えを書いてみます。

選択するフレームワーク

MS公式のライブラリということで、やっぱり一番安定してますよね。安定というのは、別に機能が豊富だとか、イケてるだとかいうのではなく、プロジェクトで採用しやすいだろうとうそういう意図が込められていたりもします。

プロジェクトテンプレート

フレームワークを使った開発は、通常のテンプレートが吐き出すコードとは、必ずしもマッチするとは限らないので専用のプロジェクトテンプレートとアイテムテンプレートを入れましょう。最初からPrismの基本クラスを継承したAppクラスや、Pageクラスが作成されます。

選択するプロジェクトテンプレート

Prismのプロジェクトテンプレートには、以下の2種類があります。

  1. Prism App
  2. Prism App using Unity

特に理由が無い限りは、本気で作るならPrism App using Unityをお勧めします。View, ViewModel, Model, Prismの提供するクラス群を組み立てて適切にセットするという手間をUnityがかなり軽減してくれます。

土台作り

では、作成します。Prism App using Unityから新規作成します。とりあえず最終目標は仰々しい足し算アプリCalcAppという名前にします。

Models名前空間を作ろう

Models名前空間にアプリケーションのコア機能を実装します。ここらへんは、別にModelsじゃなくて、もっとしっくり来る名前があったり、単一名前空間に収まらないくらいの規模で整理整頓が必要だと感じたら、適時名前空間の分割を行ったりするといいと思います。今回は、単純にCalcAppModelという名前のクラスを作成します。プロパティの変更通知は、必須機能なので、Prismの基本クラスであるBindableBaseクラスを継承して殻だけ作っておきます。

using Microsoft.Practices.Prism.StoreApps;
using System;
using System.Collections.Generic;
using System.Linq;
using System.Text;
using System.Threading.Tasks;

namespace CalcApp.Models
{
    publicclass CalcAppModel : BindableBase
    {
    }
}

このCalcAppModelは、アプリケーション内では単一のインスタンスを使いまわすようにすることで、ページやViewModel間で同じデータを元にいろいろな表現ができるようにしたいと思います。これは、Unityの機能を使って行います。Prismでは、AppクラスのOnInitializeメソッドで行います。

protectedoverridevoid OnInitialize(IActivatedEventArgs args)
{
    _container.RegisterInstance(NavigationService);

    // Modelの登録// コンテナ内で1つのインスタンスしか作られないようにContainerControlledLifetimeManagerを設定する。
    _container.RegisterType<CalcAppModel>(new ContainerControlledLifetimeManager());
}

このように、アプリケーションのコア機能のルートになるようなクラスは、インスタンスを乱発することは少ないと思うので、Unityに管理を委ねるのが楽だと思います。

ViewModelでModelのインスタンスを使おう

では、メインのページのViewModelであるMainPageViewModel(プロジェクトテンプレートで作成されています)で先ほど作ったCalcAppModelを使用できるように準備したいと思います。Unityでコンテナに組み立ててもらうときにオブジェクトを貰うには、コンストラクタで受け取るようにするか、[Dependency]属性をつけたプロパティを作るかの2通りになります。どちらでも構わないのですが、個人的には引数受け取りすぎるコンストラクタは好みではないので、今回は後者のプロパティで受け渡してもらうようにします。

publicclass MainPageViewModel : ViewModel
{
    private INavigationService _navigationService;

    /// <summary>/// Unityからインスタンスをもらうためのプロパティ/// </summary>
    [Dependency]
    public CalcAppModel Model { get; set; }

    /// <summary>/// デフォルトではコンストラクタ経由で画面遷移を行うためのINavigationServiceを貰うようになってる/// </summary>/// <paramname="navigationService"></param>public MainPageViewModel(INavigationService navigationService)
    {
        _navigationService = navigationService;
    }
}

ViewとViewModelの紐づけ

デフォルトではViews名前空間のMainPageViewというクラスに対して、ViewModels名前空間のMainPageViewModelがDataContextにセットされるようになっています。ViewModelのインスタンスの生成はUnityで行われるため、先ほど行ったModelを受け取るという定義が効いて、Modelプロパティに値がセットされます。

ViewからViewModelの呼び出しの確認

ViewからViewModelを呼ぶには、一般的にICommandを経由しておこないます。DelegateCommandクラスがPrismでのICommandの実装なので、下記のようにMainPageViewModelにDelegateCommand型のプロパティを作成します。

private DelegateCommand _sampleCommand;

public DelegateCommand SampleCommand
{
    get
    {
        return _sampleCommand ?? (_sampleCommand = new DelegateCommand(() =>
        {
            // ここに何か処理を書く// 確認用にVSのデバッグの出力にModelを出力してみる
            Debug.WriteLine(this.Model);
        }));
    }
}

Commandは、ButtonなどのCommandプロパティのあるクラスや、InvokeCommandActionなどを使って呼び出すことが出来ます。動作確認には、画面に適当にボタンを貼り付けて、Commandプロパティにバインドするのが簡単です。

<Button Content="Button"HorizontalAlignment="Left"Margin="120,23,0,0"Grid.Row="1"VerticalAlignment="Top"Command="{Binding SampleCommand}"/>

実行して動作確認

ここまでで、デバッグ実行してボタンを押すと、出力ウィンドウに以下のようなメッセージが表示されます。

CalcApp.Models.CalcAppModel

ここまでのまとめ

  • Prism for Windows Runtimeを使う
  • プロジェクトテンプレートでUnityを使うものを使う
  • Modelを作ってUnityに管理は任せる
  • ViewModelとModelの関連付けはUnityに任せる
  • ViewからViewModelの呼び出しにはCommandを使う

足し算アプリに仕立て上げる

では、なんとなく土台が出来たので肉付けして足し算アプリにします。最初のページで2つのテキストボックスに値を入力して、計算ボタンを押すと画面遷移をして答えが出るというものです。答えのページから戻ると、前回の入力内容はそのまま残ってるという感じでいきましょう。

Modelを作る

足し算には仰々しいですが、足し算するクラスだけ別クラスに切り出して、残りの処理はCalcAppModelに持たせました。左辺値、右辺値、答えをプロパティで持って、計算を開始するメソッドを持ってる感じです。

using Microsoft.Practices.Prism.StoreApps;
using Microsoft.Practices.Unity;
using System;
using System.Threading.Tasks;

namespace CalcApp.Models
{
    publicclass CalcAppModel : BindableBase
    {
        privateint _lhs;

        /// <summary>/// 左辺値/// </summary>publicint Lhs
        {
            get { returnthis._lhs; }
            set { this.SetProperty(refthis._lhs, value); }
        }

        privateint _rhs;

        /// <summary>/// 右辺値/// </summary>publicint Rhs
        {
            get { returnthis._rhs; }
            set { this.SetProperty(refthis._rhs, value); }
        }

        privateint _answer;

        /// <summary>/// 答え/// </summary>publicint Answer
        {
            get { returnthis._answer; }
            set { this.SetProperty(refthis._answer, value); }
        }

        privatebool _isProcessing;

        /// <summary>/// 処理中かどうかを表す/// </summary>publicbool IsProcessing
        {
            get { returnthis._isProcessing; }
            set { this.SetProperty(refthis._isProcessing, value); }
        }


        /// <summary>/// Unityにインスタンスを入れてもらう/// </summary>
        [Dependency]
        public Calculator Calculator { get; set; }

        /// <summary>/// 時間がかかる計算をするということで…/// </summary>/// <returns></returns>public Task CalcAsync()
        {
            return DoTask<object>(async () =>
            {
                await Task.Delay(3000);
                this.Answer = this.Calculator.Add(this.Lhs, this.Rhs);
                returnnull;
            });
        }

        private async Task<T> DoTask<T>(Func<Task<T>> f)
        {
            this.IsProcessing = true;
            try
            {
                return await f();
            }
            finally
            {
                this.IsProcessing = false;
            }
        }
    }

    /// <summary>/// 計算をするクラス/// </summary>publicclass Calculator
    {
        publicint Add(int x, int y)
        {
            return x + y;
        }
    }
}

ViewModelを作る

計算の入力値を受け取りバリデーションをするクラス

using Microsoft.Practices.Prism.StoreApps;
using System;
using System.Collections.Generic;
using System.ComponentModel.DataAnnotations;
using System.Linq;
using System.Text;
using System.Threading.Tasks;

namespace CalcApp.ViewModels
{
    publicclass CalcInputViewModel : ValidatableBindableBase
    {
        privatestring _lhs;

        [Required(ErrorMessage = "左辺値を入力してください")]
        [CustomValidation(typeof(CalcInputViewModel), "ValidateIntValue", ErrorMessage = "左辺値は整数値で入力してください")]
        publicstring Lhs
        {
            get { returnthis._lhs; }
            set { this.SetProperty(refthis._lhs, value); }
        }

        privatestring _rhs;

        [Required(ErrorMessage = "右辺値を入力してください")]
        [CustomValidation(typeof(CalcInputViewModel), "ValidateIntValue", ErrorMessage = "右辺値は整数値で入力してください")]
        publicstring Rhs
        {
            get { returnthis._rhs; }
            set { this.SetProperty(refthis._rhs, value); }
        }

        publicstatic ValidationResult ValidateIntValue(stringvalue, ValidationContext ctx)
        {
            int dummy;
            returnint.TryParse(value, out dummy) ?
                ValidationResult.Success :
                new ValidationResult(null);
        }
    }
}

そして、それを保持して、コマンドの活性非活性を制御しつつ、コマンドが実行されたらモデルに値を渡して呼び出しを行って画面遷移してます。

using CalcApp.Models;
using Microsoft.Practices.Prism.StoreApps;
using Microsoft.Practices.Prism.StoreApps.Interfaces;
using Microsoft.Practices.Unity;
using System.Collections.Generic;
using System.Diagnostics;
using Windows.UI.Xaml.Navigation;
using System.Linq;

namespace CalcApp.ViewModels
{
    publicclass MainPageViewModel : ViewModel
    {
        private INavigationService _navigationService;

        /// <summary>/// Unityからインスタンスをもらうためのプロパティ/// </summary>
        [Dependency]
        public CalcAppModel Model { get; set; }

        private CalcInputViewModel _input;

        public CalcInputViewModel Input
        {
            get { returnthis._input; }
            set { this.SetProperty(refthis._input, value); }
        }

        public DelegateCommand CalcCommand { get; private set; }

        /// <summary>/// デフォルトではコンストラクタ経由で画面遷移を行うためのINavigationServiceを貰うようになってる/// </summary>/// <paramname="navigationService"></param>public MainPageViewModel(INavigationService navigationService)
        {
            _navigationService = navigationService;

            this.CalcCommand = new DelegateCommand(() =>
            {
                this.Model.Lhs = int.Parse(this.Input.Lhs);
                this.Model.Rhs = int.Parse(this.Input.Rhs);
                var nowait = this.Model.CalcAsync();
                this._navigationService.Navigate("Answer", null);
            },
            () => !this.Input.Errors.Errors.Any());
        }

        publicoverridevoid OnNavigatedTo(object navigationParameter, NavigationMode navigationMode, Dictionary<string, object> viewModelState)
        {
            base.OnNavigatedTo(navigationParameter, navigationMode, viewModelState);
            this.Input = new CalcInputViewModel
            {
                Lhs = this.Model.Lhs.ToString(),
                Rhs = this.Model.Rhs.ToString()
            };

            // エラーに変更があったらコマンドの活性非活性を切り替えるthis.Input.ErrorsChanged += (_, __) => this.CalcCommand.RaiseCanExecuteChanged();
        }

    }
}

Answerのほうは、ViewModelこんな感じで、ModelのプロパティをProxyするのがだるくなったのでModelをそのまま持つだけにしました。

using CalcApp.Models;
using Microsoft.Practices.Prism.StoreApps;
using Microsoft.Practices.Unity;
using System;
using System.Collections.Generic;
using System.ComponentModel;
using System.Linq;
using System.Text;
using System.Threading.Tasks;
using Windows.UI.Xaml.Navigation;

namespace CalcApp.ViewModels
{
    publicclass AnswerPageViewModel : ViewModel
    {
        [Dependency]
        public CalcAppModel Model { get; set; }
    }
}

あとは適当にViewつくっとけばいいです。

画面

力尽きた。コードだけ

<prism:VisualStateAwarePagex:Name="pageRoot"x:Class="CalcApp.Views.MainPage"xmlns="http://schemas.microsoft.com/winfx/2006/xaml/presentation"xmlns:x="http://schemas.microsoft.com/winfx/2006/xaml"xmlns:local="using:CalcApp.Views"xmlns:d="http://schemas.microsoft.com/expression/blend/2008"xmlns:mc="http://schemas.openxmlformats.org/markup-compatibility/2006"xmlns:prism="using:Microsoft.Practices.Prism.StoreApps"mc:Ignorable="d"prism:ViewModelLocator.AutoWireViewModel="True"d:DataContext="{d:DesignData /SampleData/MainPageViewModelSampleData.xaml}"><prism:VisualStateAwarePage.Resources><!-- TODO: Delete this line if the key AppName is declared in App.xaml --><x:String x:Key="AppName">MainPage</x:String></prism:VisualStateAwarePage.Resources><!--        This grid acts as a root panel for the page that defines two rows:        * Row 0 contains the back button and page title        * Row 1 contains the rest of the page layout    --><Grid Background="{ThemeResource ApplicationPageBackgroundThemeBrush}"><Grid.ColumnDefinitions><ColumnDefinition Width="120"/><ColumnDefinition/></Grid.ColumnDefinitions><Grid.ChildrenTransitions><TransitionCollection><EntranceThemeTransition/></TransitionCollection></Grid.ChildrenTransitions><Grid.RowDefinitions><RowDefinition Height="140"/><RowDefinition Height="*"/></Grid.RowDefinitions><!-- Back button and page title --><Grid Grid.ColumnSpan="2"><Grid.ColumnDefinitions><ColumnDefinition Width="120"/><ColumnDefinition Width="*"/></Grid.ColumnDefinitions><Button x:Name="backButton"AutomationProperties.Name="Back"AutomationProperties.AutomationId="BackButton"AutomationProperties.ItemType="Navigation Button"Command="{Binding GoBackCommand, ElementName=pageRoot}"Margin="39,59,39,0"Style="{StaticResource NavigationBackButtonNormalStyle}"VerticalAlignment="Top" /><TextBlock x:Name="pageTitle"Grid.Column="1"IsHitTestVisible="false"Margin="0,0,30,40"Style="{StaticResource HeaderTextBlockStyle}"Text="{StaticResource AppName}"TextWrapping="NoWrap"VerticalAlignment="Bottom" /></Grid><TextBox HorizontalAlignment="Left"Margin="67,10,0,0"Grid.Row="1"TextWrapping="Wrap"Text="{Binding Input.Lhs, Mode=TwoWay, UpdateSourceTrigger=PropertyChanged}"VerticalAlignment="Top"Grid.Column="1"Width="315"/><TextBox HorizontalAlignment="Left"Margin="67,63,0,0"Grid.Row="1"TextWrapping="Wrap"Text="{Binding Input.Rhs, Mode=TwoWay, UpdateSourceTrigger=PropertyChanged}"VerticalAlignment="Top"Grid.Column="1"Width="315"/><TextBlock Grid.Column="1"HorizontalAlignment="Left"Margin="11,10,0,0"Grid.Row="1"TextWrapping="Wrap"Text="左辺値"VerticalAlignment="Top"Style="{StaticResource CaptionTextBlockStyle}"/><TextBlock Grid.Column="1"HorizontalAlignment="Left"Margin="11,63,0,0"Grid.Row="1"TextWrapping="Wrap"Text="右辺値"VerticalAlignment="Top"Style="{StaticResource CaptionTextBlockStyle}" /><TextBlock Grid.Column="1"HorizontalAlignment="Left"Margin="398,10,0,0"Grid.Row="1"TextWrapping="Wrap"Text="{Binding Input.Errors[Lhs][0], Mode=OneWay}"VerticalAlignment="Top"Style="{StaticResource BaseTextBlockStyle}"Foreground="Red"/><TextBlock Grid.Column="1"HorizontalAlignment="Left"Margin="398,63,0,0"Grid.Row="1"TextWrapping="Wrap"Text="{Binding Input.Errors[Rhs][0], Mode=OneWay}"VerticalAlignment="Top"Style="{StaticResource BaseTextBlockStyle}"Foreground="Red"/><Button Content="計算"Grid.Column="1"HorizontalAlignment="Left"Margin="305,129,0,0"Grid.Row="1"VerticalAlignment="Top"Width="80"Command="{Binding Path=CalcCommand}"/></Grid></prism:VisualStateAwarePage>
<prism:VisualStateAwarePagexmlns="http://schemas.microsoft.com/winfx/2006/xaml/presentation"xmlns:x="http://schemas.microsoft.com/winfx/2006/xaml"xmlns:local="using:CalcApp.Views"xmlns:d="http://schemas.microsoft.com/expression/blend/2008"xmlns:mc="http://schemas.openxmlformats.org/markup-compatibility/2006"xmlns:prism="using:Microsoft.Practices.Prism.StoreApps"xmlns:Interactivity="using:Microsoft.Xaml.Interactivity"xmlns:Core="using:Microsoft.Xaml.Interactions.Core"x:Name="pageRoot"x:Class="CalcApp.Views.AnswerPage"mc:Ignorable="d"prism:ViewModelLocator.AutoWireViewModel="True"d:DataContext="{d:DesignData /SampleData/AnswerPageViewModelSampleData.xaml}"><prism:VisualStateAwarePage.Resources><!-- TODO: Delete this line if the key AppName is declared in App.xaml --><x:String x:Key="AppName">AnswerPage</x:String></prism:VisualStateAwarePage.Resources><!--        This grid acts as a root panel for the page that defines two rows:        * Row 0 contains the back button and page title        * Row 1 contains the rest of the page layout    --><Grid Background="{ThemeResource ApplicationPageBackgroundThemeBrush}"><Grid.ChildrenTransitions><TransitionCollection><EntranceThemeTransition/></TransitionCollection></Grid.ChildrenTransitions><Grid.RowDefinitions><RowDefinition Height="140"/><RowDefinition Height="*"/></Grid.RowDefinitions><!-- Back button and page title --><Grid><Grid.ColumnDefinitions><ColumnDefinition Width="120"/><ColumnDefinition Width="*"/></Grid.ColumnDefinitions><Button x:Name="backButton"AutomationProperties.Name="Back"AutomationProperties.AutomationId="BackButton"AutomationProperties.ItemType="Navigation Button"Command="{Binding GoBackCommand, ElementName=pageRoot}"IsEnabled="{Binding CanGoBack, ElementName=pageRoot}"Margin="39,59,39,0"Style="{StaticResource NavigationBackButtonNormalStyle}"VerticalAlignment="Top" /><TextBlock x:Name="pageTitle"Grid.Column="1"IsHitTestVisible="false"Margin="0,0,30,40"Style="{StaticResource HeaderTextBlockStyle}"Text="{StaticResource AppName}"TextWrapping="NoWrap"VerticalAlignment="Bottom" /></Grid><TextBlock Text="{Binding Model.Answer}"Margin="119,46,0,0"HorizontalAlignment="Left"VerticalAlignment="Top"Grid.Row="1"Style="{StaticResource BodyTextBlockStyle}"><Interactivity:Interaction.Behaviors><Core:DataTriggerBehavior x:Name="True1"Binding="{Binding Model.IsProcessing}"Value="True"><Core:ChangePropertyAction PropertyName="Visibility"><Core:ChangePropertyAction.Value><Visibility>Collapsed</Visibility></Core:ChangePropertyAction.Value></Core:ChangePropertyAction></Core:DataTriggerBehavior><Core:DataTriggerBehavior x:Name="False1"Binding="{Binding Model.IsProcessing}"Value="False"><Core:ChangePropertyAction PropertyName="Visibility"/></Core:DataTriggerBehavior></Interactivity:Interaction.Behaviors></TextBlock><ProgressRing HorizontalAlignment="Center"VerticalAlignment="Center"Grid.RowSpan="2"Width="50"Height="50"IsActive="True"><Interactivity:Interaction.Behaviors><Core:DataTriggerBehavior x:Name="True"Binding="{Binding Model.IsProcessing}"Value="True"><Core:ChangePropertyAction PropertyName="Visibility"><Core:ChangePropertyAction.Value><Visibility>Visible</Visibility></Core:ChangePropertyAction.Value></Core:ChangePropertyAction></Core:DataTriggerBehavior><Core:DataTriggerBehavior x:Name="False"Binding="{Binding Model.IsProcessing}"Value="False"><Core:ChangePropertyAction PropertyName="Visibility"><Core:ChangePropertyAction.Value><Visibility>Collapsed</Visibility></Core:ChangePropertyAction.Value></Core:ChangePropertyAction></Core:DataTriggerBehavior></Interactivity:Interaction.Behaviors></ProgressRing></Grid></prism:VisualStateAwarePage>

Modelが処理中の時はAnswerPageではプログレスリング出してます。それくらい?

Microsoft SkyDrive - Access files anywhere. Create docs with free Office Web Apps.


IPAddress.Parseに潜む罠というかはまった

$
0
0

IPアドレスを扱うのに便利なクラスのIPAddress。 入力された文字列がIPアドレスの形をしてるのかどうかTryParseに渡して判断してたら10.1とか10.1.1とかもIPアドレスとして解釈しやがった。

なんでかというと…。

IPAddress.Parse メソッド (System.Net)

下のよう便利に変換してくれるらしい。(上記ページより抜粋) "65536"→0.0.255.255 "20.2"→20.0.0.2 "20.65535"→20.0.255.255 "128.1.2"→128.1.0.2

詳細は、MSDNのページを参照のこと。個人的には、これは不便だったというだけのこと。

なぜプログラムのコードは複雑になっていくんだろう。

$
0
0

いろんなソースコードを見ていると、すんなり頭に入ってくるものと、そうでもないものに分かれてくる。個人的にすんなり頭に入ってくるもものは、大体以下のような形になってるんだなぁと思ったのでメモっておく。

ネストを深くしないために最初にいらないものは捨てる

メソッドとかで、本来したい処理と、そうじゃない値のチェック処理とかが混ざってると何がしたいのかわからなくなる。たとえばこんなの?

void Foo(int arg1, string arg2)
{
  for (int i = 0; i < 10; i++)
  {
    if (arg1 != 0&& i % 2 == 0)
    {
      if (arg2 != null)
      {
        // やりたいこと
      }
    }
  }
}

極端な例ですが、こんなのです。下手したら、やりたいことが複数個所に散らばってることもよくあります。これは

void Foo(int arg1, string arg2)
{
  if (arg1 != 0)
  {
    // arg1が0だとそもそも何もしないreturn;
  }

  if (arg2 == null)
  {
    // arg2がnullだと何もしないreturn;
  }

  for (int i = 0; i < 10; i++)
  {
    // やりたいこと
  }
}

こんな感じに書き直せると思います。(コンパイルもしてないし寝る前の頭なので、あまり自信はない)事前になるべく本来やりたいこととは関係ないことを切り捨てる。というのは大事だと思ってます。

コレクション処理だと

コレクションに対する処理だと、もっとひどくなります。ループしながらフィルタリングして、さらにフィルタリングして、何かのメソッドを実行した結果がOKだったら外部メソッドを呼び出すみたいな・・・。

var collection = ...何かのクラスのIEnumerable<T>...;
foreach (var item in collection)
{
  if (item.Foo == "Hoge")
  {
    var r = HogeHoge(item);
    if (r.Execute())
    {
        continue;
    }
    service.DoSomething(r.Property1);
  }
}

いらんものは先に捨てる。

var collection = ...何かのクラスのIEnumerable<T>...;
var targets = collection.Where(i => i.Foo == "Hoge")
  .Where(i => i.Execute());
foreach (var item in targets)
{
  service.DoShomething(item.Property1);
}

LINQみたいなのが無いときは、データのフィルタリングをするループと、そうじゃないメインの処理をやりたいループで2重ループになって無駄だとかいうのがありましたが、LINQは、ちゃんと書けば遅延実行なので、1重ループと同じです。

要約すると

情報はあらかじめ、処理しやすいように整理整頓してからメインのロジックにとりかかりましょう。ということでした。はい。 ねむいので、変な文章になってたらすいません。

Visual Studio 2013のXAMLエディターが頻繁にエラーになるようになったら

$
0
0

Gridは、定義されていませんだとかPageにContentはないだとか波線いっぱいになることがよくありました。Xamarinと競合するとストアアプリエラーまみれになるとかいうのは聞いたのですがXamarinは入れてない状態。

f:id:okazuki:20140125201401p:plain

とりあえずの対処として「C:\Users\ユーザ名\AppData\Local\Temp\AssemblyDataCache」をざっくりと消したら動いてるっぽい・・・。様子見だ

f:id:okazuki:20140125201846p:plain

FtpWebRequestで絶対パス指定でファイルをとったりしたい

$
0
0

これだとログインしたユーザーのホームからのパス

ftp://hogehoge/foo/bar

以下だと絶対パス・・・!

ftp://hogehoge/%2ffoo/bar

%2fが/なんだって。

参考

FtpWebRequest クラス (System.Net)

URI は相対 URI でも絶対 URI でもかまいません。 URI が "ftp://contoso.com/%2fpath" (%2f は "/"をエスケープしたもの) という形式である場合、この URI は絶対 URI であり、現在のディレクトリは /path になります。

はまったorz

Visual Studio OnlineことTeam Foundation ServiceでSourceTreeを使う

$
0
0

長らくGit Extensionsを使ってきたのですが、SourceTree人口が多そうだし、Windows版も日本語化されたみたいなので使ってみようと思いました。そんな中、Visual Studio OnlineでGitをソース管理に指定したときに、どうやってつなぐのよ…?という疑問にぶちあたりました。

MSアカウントで二段階認証かけてるせいか、MSアカウントのIDとパスワードだけではダメでした。

fatal: Authentication failed

というエラーメッセージが出ます。

解決策

ぐぐってみたら、同じ問題にぶち当たってる人がいました。(そりゃそうですよね)

SourceTree + TFS Service + HTTPS: Login failed - Atlassian Answers

そこによると以下の手順でいけるとのこと。

  • 自分のVS Onlineのサイトにいく
  • 画面右上の自分の名前をクリックする
  • 出てくるメニューでMy Profileを選ぶ
  • 出てきた画面でcredentialsタブを選択
  • Enable alternate credentialsを押す
  • ユーザ名パスワードは自分で設定

こうしておくと、無事SourceTree(やGit ExtensionsみたいなVisual Studio以外のツール)からコミットとかできるようになりました。

めでたしめでたし。

GridViewの項目でタップしたときのアニメーションを要素によって無効化したり有効化したるする方法

$
0
0

先日、酢酸先生(id:ch3cooh393)に、タップしたときのアニメーション無効化する方法ないの?って聞かれたので、全部無効化してしまいました。コードレシピにコードをあげてます。

でも、GridViewの中のアイテムを全部無効化したいんじゃなくて一部だけ無効化したりしたいんだよというご要望だったので、それのやりかたを・・・。

結局ItemContainerStyleを指定してやれば、どうにでもなるので、ItemContainerStyleSelectorプロパティにStyleを選択するようなのをつっこんでやればOKです。

using Windows.UI.Xaml;
using Windows.UI.Xaml.Controls;

namespace NoSwipeAnimationGridViewApp
{
    publicclass GridViewItemContainerStyleSelector : StyleSelector
    {
        /// <summary>/// 奇数の値用スタイル/// </summary>public Style OddStyle { get; set; }

        /// <summary>/// 偶数の値用スタイル/// </summary>public Style EvenStyle { get; set; }

        protectedoverride Style SelectStyleCore(object item, DependencyObject container)
        {
            var i = (int)item;
            return i % 2 == 0 ?
                EvenStyle :
                OddStyle;
        }
    }

}

コードレシピのサンプルに普通のGridViewItemのStyleを定義しておいて、こんな感じでXAMLを書いておくと

<Pagex:Name="pageRoot"x:Class="NoSwipeAnimationGridViewApp.MainPage"DataContext="{Binding DefaultViewModel, RelativeSource={RelativeSource Self}}"xmlns="http://schemas.microsoft.com/winfx/2006/xaml/presentation"xmlns:x="http://schemas.microsoft.com/winfx/2006/xaml"xmlns:local="using:NoSwipeAnimationGridViewApp"xmlns:common="using:NoSwipeAnimationGridViewApp.Common"xmlns:d="http://schemas.microsoft.com/expression/blend/2008"xmlns:mc="http://schemas.openxmlformats.org/markup-compatibility/2006"xmlns:System="using:System"mc:Ignorable="d"><Page.Resources><!-- TODO: Delete this line if the key AppName is declared in App.xaml --><x:String x:Key="AppName">GridView no swipe animation application</x:String><Style x:Key="NoSwipeAnimationGridViewItemStyle"TargetType="GridViewItem"><Setter Property="FontFamily"Value="{ThemeResource ContentControlThemeFontFamily}"/><Setter Property="FontSize"Value="{ThemeResource ControlContentThemeFontSize}"/><Setter Property="Background"Value="Transparent"/><Setter Property="TabNavigation"Value="Local"/><Setter Property="IsHoldingEnabled"Value="True"/><Setter Property="Margin"Value="0,0,2,2"/><Setter Property="Template"><Setter.Value><ControlTemplate TargetType="GridViewItem"><Border Padding="{TemplateBinding Padding}"><ContentPresenter /></Border></ControlTemplate></Setter.Value></Setter></Style><Style x:Key="GridViewItemStyle"TargetType="GridViewItem"><Setter Property="FontFamily"Value="{ThemeResource ContentControlThemeFontFamily}"/><Setter Property="FontSize"Value="{ThemeResource ControlContentThemeFontSize}"/><Setter Property="Background"Value="Transparent"/><Setter Property="TabNavigation"Value="Local"/><Setter Property="IsHoldingEnabled"Value="True"/><Setter Property="Margin"Value="0,0,2,2"/><Setter Property="Template"><Setter.Value><ControlTemplate TargetType="GridViewItem"><GridViewItemPresenter CheckHintBrush="{ThemeResource ListViewItemCheckHintThemeBrush}"CheckBrush="{ThemeResource ListViewItemCheckThemeBrush}"ContentMargin="4"ContentTransitions="{TemplateBinding ContentTransitions}"CheckSelectingBrush="{ThemeResource ListViewItemCheckSelectingThemeBrush}"DragForeground="{ThemeResource ListViewItemDragForegroundThemeBrush}"DragOpacity="{ThemeResource ListViewItemDragThemeOpacity}"DragBackground="{ThemeResource ListViewItemDragBackgroundThemeBrush}"DisabledOpacity="{ThemeResource ListViewItemDisabledThemeOpacity}"FocusBorderBrush="{ThemeResource ListViewItemFocusBorderThemeBrush}"HorizontalContentAlignment="{TemplateBinding HorizontalContentAlignment}"Padding="{TemplateBinding Padding}"PointerOverBackgroundMargin="1"PlaceholderBackground="{ThemeResource ListViewItemPlaceholderBackgroundThemeBrush}"PointerOverBackground="{ThemeResource ListViewItemPointerOverBackgroundThemeBrush}"ReorderHintOffset="{ThemeResource ListViewItemReorderHintThemeOffset}"SelectedPointerOverBorderBrush="{ThemeResource ListViewItemSelectedPointerOverBorderThemeBrush}"SelectionCheckMarkVisualEnabled="True"SelectedForeground="{ThemeResource ListViewItemSelectedForegroundThemeBrush}"SelectedPointerOverBackground="{ThemeResource ListViewItemSelectedPointerOverBackgroundThemeBrush}"SelectedBorderThickness="{ThemeResource GridViewItemCompactSelectedBorderThemeThickness}"SelectedBackground="{ThemeResource ListViewItemSelectedBackgroundThemeBrush}"VerticalContentAlignment="{TemplateBinding VerticalContentAlignment}"/></ControlTemplate></Setter.Value></Setter></Style><local:GridViewItemContainerStyleSelector x:Key="itemContainerStyleSelector"OddStyle="{StaticResource GridViewItemStyle}"EvenStyle="{StaticResource NoSwipeAnimationGridViewItemStyle}"/></Page.Resources><!--        This grid acts as a root panel for the page that defines two rows:        * Row 0 contains the back button and page title        * Row 1 contains the rest of the page layout    --><Grid Background="{ThemeResource ApplicationPageBackgroundThemeBrush}"><Grid.ChildrenTransitions><TransitionCollection><EntranceThemeTransition/></TransitionCollection></Grid.ChildrenTransitions><Grid.RowDefinitions><RowDefinition Height="140"/><RowDefinition Height="*"/></Grid.RowDefinitions><!-- Back button and page title --><Grid><Grid.ColumnDefinitions><ColumnDefinition Width="120"/><ColumnDefinition Width="*"/></Grid.ColumnDefinitions><Button x:Name="backButton"Margin="39,59,39,0"Command="{Binding NavigationHelper.GoBackCommand, ElementName=pageRoot}"Style="{StaticResource NavigationBackButtonNormalStyle}"VerticalAlignment="Top"AutomationProperties.Name="Back"AutomationProperties.AutomationId="BackButton"AutomationProperties.ItemType="Navigation Button"/><TextBlock x:Name="pageTitle"Text="{StaticResource AppName}"Style="{StaticResource HeaderTextBlockStyle}"Grid.Column="1"IsHitTestVisible="false"TextWrapping="NoWrap"VerticalAlignment="Bottom"Margin="0,0,30,40"/></Grid><GridView Name="gridViewItem"Grid.Row="1"Padding="120,0,0,10"ItemsSource="{Binding GridViewItems}"SelectionMode="Single"IsSwipeEnabled="False"ItemContainerStyleSelector="{StaticResource itemContainerStyleSelector}"><GridView.ItemTemplate><!-- Dummy item template --><DataTemplate><Border Width="250"Height="250"BorderBrush="{ThemeResource ListBoxBorderThemeBrush}"BorderThickness="1"Background="{ThemeResource ListBoxBackgroundThemeBrush}" /></DataTemplate></GridView.ItemTemplate></GridView></Grid></Page>

これで、データが偶数のものは選択しても反応しなくて、奇数のものはぷにっとアニメーションします。

ReactiveProperty v0.4.1.0をリリースしました

$
0
0

NuGetからさくっとインストールできるはずです。

変わった点の説明

ReactivePropertyには、値の検証を行う方法がいくつかります。

  • SetValidateNotifyErrorメソッドでラムダ式内で値の検証ロジックを書く方法
  • SetValidateAttributeメソッドでSystem.ComponentModel.DataAnnotationsの属性べーうでの検証を行うようにする方法

PCLに移植する前のReactivePropertyでは、最初のメソッドがINotifyDataErrorInfo、2つ目のメソッドをIDataErrorInfoで管理していました(と思います)。PCLにはIDataErrorInfoが無くてINotifyDataErrorInfoに一本化されたため、ReactivePropertyをPCLにするタイミングで、両方ともそっちに寄せました。

できなくなってたこと

管理場所が別だったのでSetValidateNotifyErrorとSetValidateAttributeを両方呼ぶことで属性での検証+ラムダ式での検証を両方走らせることが出来てましたが、一本化してしまったため、両方を同時に指定することができなくなってました…。あとからSetした検証方法のみ実行されるようになってました。

対処するための追加したメソッド

これまでの、SetValidateNotifyErrorメソッドとSetValidateAttributeメソッドに加えて、AddValidateNotifyErrorメソッドとAddValidateAttributeメソッドを追加して、1つのReactivePropertyに対して複数の検証方法を追加できるようにしました。

publicclass ValidationViewModel
{
    [StringLength(5, ErrorMessage = "Length < 5")]
    public ReactiveProperty<string> ValidationBoth { get; private set; }

    public ValidationViewModel()
    {
        // SetValidateAttributeに、AddValidateNotifyErrorでラムダ式での検証ロジックを追加
        ValidationBoth = new ReactiveProperty<string>()
            .SetValidateAttribute(() => ValidationBoth)
            .AddValidateNotifyError((string s) => string.IsNullOrEmpty(s) ? 
                "required" : 
                s.Cast<char>().All(Char.IsLower) ? 
                    null :"not all lowercase");
    }
}

とりあえず一安心。


ループの最初だけ特別な処理を行いたい(追記あり)

$
0
0

データの配列やListがあったときに、ループを回して処理を行うことってよくありますよね。しかも、最初だけなにか特別なことをおこないたい。一般的な方法だと、ループのインデックスを見て処理するほうほうがあります。

var data = new[] { 0, 1, 2, 3, 4, 5, 6, 7 };

// ループインデックスfor (int i = 0; i < data.Length; i++)
{
    if (i == 0)
    {
        Console.WriteLine("最初にやる処理 {0}", i);
        continue;
    }

    Console.WriteLine("{0}", i);
}

まぁ特に問題はないですけど、なんとなくいつも書いててもやっとしてる処理です。あとは、foreachで回したいときとかはフラグを使ったりしますよね。

var data = new[] { 0, 1, 2, 3, 4, 5, 6, 7 };

// フラグbool isFirst = true;
foreach (var i in data)
{
    if (isFirst)
    {
        Console.WriteLine("最初にやる処理 {0}", i);
        isFirst = false;
        continue;
    }

    Console.WriteLine("{0}", i);
}

これらのやりかたは、別にいいんですけど何かデータのループ処理で最初の要素のためだけに分岐を入れるのはコードがちょっと複雑になりがちでいやだったんです。ということで、LINQ使ってこんな方法。

var data = new[] { 0, 1, 2, 3, 4, 5, 6, 7 };

// LINQif (data.Any())
{
    var first = data.First();
    Console.WriteLine("最初にやる処理 {0}", first);
    foreach (var i in data.Skip(1))
    {
        Console.WriteLine("{0}", i);
    }
}

Firstで最初の要素を取得して、最初の要素のための処理をおこなって、Skipで最初の要素をスキップして残りの要素にループを行うという方法です。Firstは、シーケンスが空だと例外が出るので、Anyをつかってコレクションが空じゃないときだけ処理するようにしています。今度から、こういう風に書こうかな。

追記:LINQの書き方のダメなところ

Any ->処理はIEnumerableの場合遅延評価で重たい処理が走る可能性 + そのあとのループで再度重たい処理が走るという可能性があるのでNGでした。Facebookで指摘してくれたのいえさん多謝です。ということでフラグかな…。

汎用的な部品については、のいえさんが以前書かれてたので、どうしても必要な場合はこれでいいかも。

neue cc - Razorで空テンプレートとセパレータテンプレート

TypeScriptとd3.js

$
0
0

グラフ描きたい・・・!Webで(詰んだ)

  • HTML苦手
  • CSS苦手
  • JavaScript苦手

d3.js

苦手といっても何か使えるものはないか?ということで、探してみたのがd3.js。こいつjQueryみたいなセレクタで要素を選択したりもできるし、グラフ描いたりもできるとは…。素敵だ。

TypeScript

言わずと知れた、C#の父のアンダーズ・ヘルズバーグが開発してるaltJSシリーズの言語。こいつなら・・・!と思って以下のページを流し読みして書いてみたらとてもいい!なじむ!

module Hoge {
    export class Foo {
        constructor(public x: number, public y: number) {}
        hoge(callback: (result: number) => void): void {}
    }
}

みたいな感じで書けるじゃないですか。素敵。しかもCtrl + Spaceも効く。JavaScriptのライブラリも追加の型の定義を書いてやれば普通に使える・・・!いいね!

とりあえず

使わなきゃいけない内部のJavaScriptライブラリのd.tsファイルを作った。Ctrl + Spaceで補完効くようになったのでストレスが1つ減った。

d3.js

このライブラリは、チュートリアルが秀逸なので、やりたいと思った人はここからスタートするといいと思います。

事例集を見てると、これをWebでやってるのか!?変態(ほめ言葉)と思うようなのばっかりなのですが…。

TypeScriptで使う

Visual Studio 2013用のTypeScriptの最新版を入れます。現時点では9.5。早く1.0欲しいですね~。

そしてTypeScriptのプロジェクトを作って以下の2つをNuGetでインストール。型定義がきちんとあるのはメジャーなライブラリの強みですね。

お試し

app.tsを以下のような感じにしてみた。0~100の値を0~50の間に収まるように変換して画面にdivタグを使って表示してます。(グラフのスケーリングで、この値の変換使う)

window.onload = () => {
    var r = d3.scale.linear().domain([0, 100]).range([0, 50]);
    d3.select("body")
        .selectAll("datas")
        .data([0, 10, 20, 30, 40, 50, 60, 70, 80, 90, 100])
        .enter()
        .append("div")
        .text(d => JSON.stringify({ original: d, scaled: r(d) }));
};

HTMLは、こんな感じ。

<!DOCTYPE html><htmllang="ja"><head><metacharset="utf-8" /><title>TypeScript HTML App</title><linkrel="stylesheet"href="app.css"type="text/css" /><scriptsrc="Scripts/d3.v3.min.js"></script><scriptsrc="app.js"></script></head><body></body></html>

実行結果のHTMLは以下のような感じになりました。

<htmllang="ja"><head><metacharset="utf-8"><title>TypeScript HTML App</title><linkhref="app.css"rel="stylesheet"type="text/css"><scriptsrc="Scripts/d3.v3.min.js"></script><scriptsrc="app.js"></script></head><body><div>{"original":0,"scaled":0}</div><div>{"original":10,"scaled":5}</div><div>{"original":20,"scaled":10}</div><div>{"original":30,"scaled":15}</div><div>{"original":40,"scaled":20}</div><div>{"original":50,"scaled":25}</div><div>{"original":60,"scaled":30}</div><div>{"original":70,"scaled":35}</div><div>{"original":80,"scaled":40}</div><div>{"original":90,"scaled":45}</div><div>{"original":100,"scaled":50}</div></body></html>

いい感じ。グラフとか描けるように使ってみよう。

TypeScriptとd3.jsでグラフ描こうぞ

$
0
0

昨日の続きです。

d3.jsで線を引きたい

基本的にSVGでやるのでpathを使うことになります。でもPathの書式が変態!!(XAMLとかもそうですけど、あんまり手書きするものではないですよね…)

ということでd3.jsにはpathを簡単に作れるd3.svg.lineというのがあるみたいです。d3.svg.lineを呼び出して返ってきた結果に対してx座標とy座標の変換ルールを指定してやればOK。あとは、データ(大体配列なのかなあ?)を渡して呼び出してやるとpathの書式になおしてくれる。

var svg = d3.select("body").append("svg");

var datas = [[1,0], [2,3], [3,2]];
var l = d3.svg.line()
    .x(data => data[0])
    .y(data => data[1])
svg.append("path").attr("d", l(datas)).attr("fill", "none");

上の例では、二次元配列で点を表してる。んで、二次元配列の要素の中の0番目がx座標、1番目がy座標として使うようにしてます。ちなみに、pathは、そのままだと線じゃなくて閉じた領域を塗りつぶすみたいなのでfillにnoneを指定して透明にしておかないと線にならなかったです。

ということで線を引いてみた

データを表示するためのHTMLをさくっと用意します。

<!DOCTYPE html><htmllang="ja"><head><metacharset="utf-8" /><title>TypeScript HTML App</title><linkrel="stylesheet"href="app.css"type="text/css" /><scriptsrc="Scripts/d3.v3.min.js"></script><scriptsrc="app.js"></script></head><body><h1>Graph</h1><divid="content"></div></body></html>

そして、app.tsの中で適当にデータを作ってpathにしてます。ついでなのでデータの箇所に丸をうったり、データを表示したりしてます。

/// <reference path="Scripts/typings/d3/d3.d.ts" />

window.onload = () => {
    // 50セットのデータを生成
    var datas: Array<{ x: number; y: number }> = [];
    var seed = d3.random.normal(200, 200);
    for (var i = 0; i < 50; i++) {
        datas.push({ x: i * 10, y: seed() });
    }

    // xの最小値とxの最大値を0~500の間にスケーリングするrxを作成
    var rx = d3.scale
        .linear()
        .domain([d3.min(datas, a => a.x), d3.max(datas, a => a.x)])
        .range([0, 500]);
    // yの最小値とyの最大値を0~500の間にスケーリングするryを作成
    var ry = d3.scale
        .linear()
        .domain([d3.min(datas, a => a.y), d3.max(datas, a => a.y)])
        .range([0, 500]);

    // id="content"の中に500x500のsvg要素を作成
    var svg = d3.select("#content")
        .append("svg")
        .attr("width", 500)
        .attr("height", 500);

    // pathを組み立ててくれるlineを作成
    var line = d3.svg.line()
        // x座標はrxでスケーリングした結果
        .x(d => rx(d.x))
        // y座標はryでスケーリングした結果
        .y(d => ry(d.y));

    // pathを作成して
    svg.append("path")
        // データはlineで組み立てて
        .attr("d", line(datas))
        // 塗りつぶしは無しで
        .attr("fill", "none")
        // かっこいい青色で線の太さは1
        .attr("stroke", "steelblue")
        .attr("stroke-width", 1);

    // データの場所に点をうっていく
    svg.selectAll("circle")
        .data(datas)
        .enter()
        // x座標とy座標はスケーリングした結果で半径は2でかっこいい青色
        .append("circle")
        .attr("cx", d => rx(d.x))
        .attr("cy", d => ry(d.y))
        .attr("r", 2)
        .attr("fill", "steelblue");

    // データの場所にyの値を表示する
    svg.selectAll("text")
        .data(datas)
        .enter()
        .append("text")
        .attr("x", d => rx(d.x))
        .attr("y", d => ry(d.y))
        .attr("font-size", 10)
        .text(d => "[" + d3.round(d.y, 0) + "]");
};

昨日つかったスケーリングしてくれる機能を使ってデータがsvgタグの中に納まるようにしてるのもポイントかも?

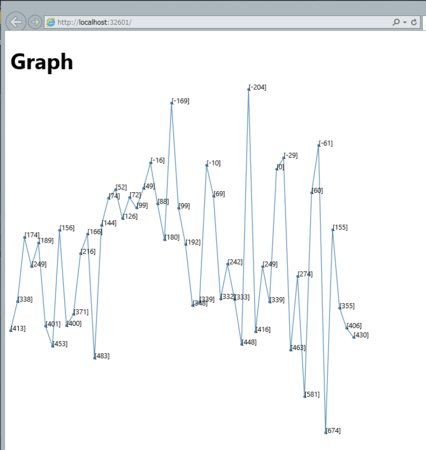
実行すると以下のようにそれっぽい表示結果が得られました。データはランダムに作ってるので実行するたびにグラフの形は変わります。素敵。

f:id:okazuki:20140209161302p:plain

TypeScriptとd3.jsでグラフを描こうぞ 2

$
0
0

下の続き。

y方向の値の調整

パソコンとかの描画関係のAPIの座標系は左上が0,0なのが一般的です。svgも例にもれず。でも、グラフの座標は左下が0,0だったりしますよね。ということで、y座標のスケールのrangeを逆転させると、いい感じになります。

// yの最小値とyの最大値を500~0の間にスケーリングするryを作成
var ry = d3.scale
    .linear()
    .domain([d3.min(datas, a => a.y), d3.max(datas, a => a.y)])
    .range([500, 0]); // ここを0, 500だったのを500, 0にする

これでデータの出力が逆になるので、いい感じに左下が小さい値になります。d3.jsのチュートリアルにもある通りですね。

軸の作成

あとは、チュートリアルのここをなぞっていきます。

cssを用意します。TypeScriptのプロジェクトはデフォルトでapp.cssが用意されてるのでそこに足していきます。

本当はsvgの領域内に綺麗に収まるようにデータとか軸の幅とかを調整するのが望ましいんですが、今回は手抜きでsvgを囲むdivタグに余白を設けてお茶を濁してます。これできちんと表示されてるんですがブラウザ依存かもしれません。

.axis path,
.axis line {
    fill: none;
    stroke: black;
    shape-rendering: crispEdges;
}.axistext{font-family: 'Meiryo UI';
    font-size: 11px;
}#content{margin: 50px;
}

そして、app.tsにチュートリアルの通りのコードを前回のコードに足していきます。

// x軸
var xAxis = d3.svg.axis().scale(rx).orient("bottom");
svg.append("g")
    // 軸にあてるスタイル用のクラスを設定
    .attr("class", "axis")
    // デフォルトで上に表示されるので下に移動
    .attr("transform", "translate(0, 500)")
    .call(xAxis);

// y軸
var yAxis = d3.svg.axis().scale(ry).orient("left");
svg.append("g").attr("class", "axis").call(yAxis);

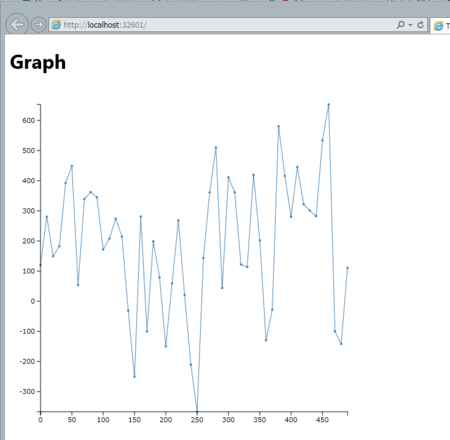
これで、実行すると以下のような結果に。

f:id:okazuki:20140209211128p:plain

いい感じ・・・!あとは、細かい調整とかの範囲でなんとかなりそう。

コード

一応コード全体をのせておきます。

default.htm

<!DOCTYPE html><htmllang="ja"><head><metacharset="utf-8" /><title>TypeScript HTML App</title><linkrel="stylesheet"href="app.css"type="text/css" /><scriptsrc="Scripts/d3.v3.min.js"></script><scriptsrc="app.js"></script></head><body><h1>Graph</h1><divid="content"></div></body></html>

app.css

body{font-family: 'Segoe UI', sans-serif}span{font-style: italic}.axis path,
.axis line {
    fill: none;
    stroke: black;
    shape-rendering: crispEdges;
}.axistext{font-family: 'Meiryo UI';
    font-size: 11px;
}#content{margin: 50px;
}

app.ts

/// <reference path="Scripts/typings/d3/d3.d.ts" />

window.onload = () => {
    // 50セットのデータを生成
    var datas: Array<{ x: number; y: number }> = [];
    var seed = d3.random.normal(200, 200);
    for (var i = 0; i < 50; i++) {
        datas.push({ x: i * 10, y: seed() });
    }

    // xの最小値とxの最大値を0~500の間にスケーリングするrxを作成
    var rx = d3.scale
        .linear()
        .domain([d3.min(datas, a => a.x), d3.max(datas, a => a.x)])
        .range([0, 500]);
    // yの最小値とyの最大値を500~0の間にスケーリングするryを作成
    var ry = d3.scale
        .linear()
        .domain([d3.min(datas, a => a.y), d3.max(datas, a => a.y)])
        .range([500, 0]);

    // id="content"の中に500x500のsvg要素を作成
    var svg = d3.select("#content")
        .append("svg")
        .attr("width", 500)
        .attr("height", 500);

    // pathを組み立ててくれるlineを作成
    var line = d3.svg.line()
        // x座標はrxでスケーリングした結果
        .x(d => rx(d.x))
        // y座標はryでスケーリングした結果
        .y(d => ry(d.y));

    // pathを作成して
    svg.append("path")
        // データはlineで組み立てて
        .attr("d", line(datas))
        // 塗りつぶしは無しで
        .attr("fill", "none")
        // かっこいい青色で線の太さは1
        .attr("stroke", "steelblue")
        .attr("stroke-width", 1);

    // データの場所に点をうっていく
    svg.selectAll("circle")
        .data(datas)
        .enter()
        // x座標とy座標はスケーリングした結果で半径は2でかっこいい青色
        .append("circle")
        .attr("cx", d => rx(d.x))
        .attr("cy", d => ry(d.y))
        .attr("r", 2)
        .attr("fill", "steelblue");

    // x軸
    var xAxis = d3.svg.axis().scale(rx).orient("bottom");
    svg.append("g")
        // 軸にあてるスタイル用のクラスを設定
        .attr("class", "axis")
        // デフォルトで上に表示されるので下に移動
        .attr("transform", "translate(0, 500)")
        .call(xAxis);

    // y軸
    var yAxis = d3.svg.axis().scale(ry).orient("left");
    svg.append("g").attr("class", "axis").call(yAxis);
};

TypeScriptとd3.jsで折れ線グラフ描いてみた

$
0
0

ということで、これまでの練習の成果という感じで折れ線グラフを1つ描いてみた。

点と線

ということで、これまで、べたっと描いてたのを点をあらわすクラスと線を表すクラスにわけてみた。

// 点class Point<TX, TY> {
    constructor(public x: TX = null, public y: TY = null) { }
}

// 線class Line<TX, TY> {
    constructor(public points: Array<Point<TX, TY>> = []) { }
}

そして、Lineの配列を管理して描画するTimelineChartというクラスを作成。drawメソッドに今までやってきたことを使ってSVGでグラフを描画してる。

// 横軸が時間の折れ線グラフclass TimelineChart {
    constructor(public lines: Array<Line<Date, number>> = []) { }

    draw(position: { x: number; y: number; width: number; height: number; padding: number }, svg: D3.Selection): void {
        // 全データから最小値最大値を取得する
        var minMax = {
            minX: d3.min(this.lines, l => d3.min(l.points, p => p.x)),
            minY: Math.min(0, d3.min(this.lines, l => d3.min(l.points, p => p.y))),
            maxX: d3.max(this.lines, l => d3.max(l.points, p => p.x)),
            maxY: d3.max(this.lines, l => d3.max(l.points, p => p.y))
        };

        // スケール。x軸は時間
        var xScale = d3.time.scale()
            .domain([minMax.minX, minMax.maxX])
            .range([position.padding, position.width - position.padding]);
        var yScale = d3.scale.linear()
            .domain([minMax.minY, minMax.maxY])
            .range([position.height - position.padding, position.padding]);

        // 軸// x軸は月/日でラベル表示する
        var xAxis = d3.svg.axis().scale(xScale).tickFormat(d3.time.format("%m/%d"));
        var yAxis = d3.svg.axis().scale(yScale).orient("left");

        // 描画のホストになる要素を作成
        var host = svg.append("g")
            .attr("x", position.x)
            .attr("y", position.y)
            .attr("width", position.width)
            .attr("height", position.height);

        var line = d3.svg.line()
            .x(d => xScale(d.x))
            .y(d => yScale(d.y));

        host.selectAll("path")
            .data(this.lines)
            .enter()
            .append("path")
            .attr("d", l => line(l.points))
            .attr("fill", "none")
            .attr("stroke", "steelblue")
            .attr("stroke-width", 1);

        // 軸の描画
        host.append("g")
            .attr("class", "axis")
            .attr("transform", "translate(0, " + (position.height - position.padding) + ")")
            .call(xAxis);
        host.append("g")
            .attr("class", "axis")
            .attr("transform", "translate(" + position.padding + ", 0)")
            .call(yAxis);
    }
}

目新しいのは、横軸を時間にしたかったのでx軸のデータのスケールをd3.scaleではなくd3.time.scaleから作っているところです。domainに日付を渡してrangeに数値を渡すような感じで使います。

ついでに横軸のラベルの日付は03/01みたいに月/日の形で表示するようにxAisのtickFormat関数を使って指定しています。フォーマットの処理はd3.time.formatにお任せできるので簡単でした。フォーマットに使える書式は、ドキュメントの以下のページを参照しました。

使ってみる

window.onloadで適当なデータを作って描画する処理を書きます。

window.onload = () => {
    var chart = new TimelineChart();
    // テスト用ダミーデータ 03/01~03/10まで一日単位に適当なデータを突っ込む x 3本for (var i = 0; i < 3; i++) {
        var l = new Line<Date, number>();
        for (var j = 0; j < 10; j++) {
            l.points.push(new Point<Date, number>(new Date(2014, 2, 1 + j), Math.round(Math.random() * 1000)));
        }
        chart.lines.push(l);
    }

    // svg要素を作成
    var svg = d3.select("#content").append("svg")
        .attr("width", 600)
        .attr("height", 600);

    // 描画
    chart.draw({ x: 10, y: 10, width: 500, height: 500, padding: 50 }, svg);
};

そうすると、以下のような感じで描画されます。線ごとに色情報を持たせるかランダムに色を変えたほうがよさげですね…。

f:id:okazuki:20140211161958p:plain

コード全体

一応コード全体を。

default.htm

<!DOCTYPE html><htmllang="en"><head><metacharset="utf-8" /><title>TypeScript HTML App</title><linkrel="stylesheet"href="app.css"type="text/css" /><scriptsrc="Scripts/d3.v3.min.js"></script><scriptsrc="app.js"></script></head><body><h1>TypeScript HTML App</h1><divid="content"></div></body></html>

app.css

body{font-family: 'Segoe UI', sans-serif;
}span{font-style: italic;
}.axis path,
.axis line {
    fill: none;
    stroke: black;
    shape-rendering: crispEdges;
}.axistext{font-family: sans-serif;
    font-size: 10px;
}

app.ts

/// <reference path="scripts/typings/d3/d3.d.ts" />// 点class Point<TX, TY> {
    constructor(public x: TX = null, public y: TY = null) { }
}

// 線class Line<TX, TY> {
    constructor(public points: Array<Point<TX, TY>> = []) { }
}

// 横軸が時間の折れ線グラフclass TimelineChart {
    constructor(public lines: Array<Line<Date, number>> = []) { }

    draw(position: { x: number; y: number; width: number; height: number; padding: number }, svg: D3.Selection): void {
        // 全データから最小値最大値を取得する
        var minMax = {
            minX: d3.min(this.lines, l => d3.min(l.points, p => p.x)),
            minY: Math.min(0, d3.min(this.lines, l => d3.min(l.points, p => p.y))),
            maxX: d3.max(this.lines, l => d3.max(l.points, p => p.x)),
            maxY: d3.max(this.lines, l => d3.max(l.points, p => p.y))
        };

        // スケール。x軸は時間
        var xScale = d3.time.scale()
            .domain([minMax.minX, minMax.maxX])
            .range([position.padding, position.width - position.padding]);
        var yScale = d3.scale.linear()
            .domain([minMax.minY, minMax.maxY])
            .range([position.height - position.padding, position.padding]);

        // 軸// x軸は月/日でラベル表示する
        var xAxis = d3.svg.axis().scale(xScale).tickFormat(d3.time.format("%m/%d"));
        var yAxis = d3.svg.axis().scale(yScale).orient("left");

        // 描画のホストになる要素を作成
        var host = svg.append("g")
            .attr("x", position.x)
            .attr("y", position.y)
            .attr("width", position.width)
            .attr("height", position.height);

        var line = d3.svg.line()
            .x(d => xScale(d.x))
            .y(d => yScale(d.y));

        host.selectAll("path")
            .data(this.lines)
            .enter()
            .append("path")
            .attr("d", l => line(l.points))
            .attr("fill", "none")
            .attr("stroke", "steelblue")
            .attr("stroke-width", 1);

        // 軸の描画
        host.append("g")
            .attr("class", "axis")
            .attr("transform", "translate(0, " + (position.height - position.padding) + ")")
            .call(xAxis);
        host.append("g")
            .attr("class", "axis")
            .attr("transform", "translate(" + position.padding + ", 0)")
            .call(yAxis);
    }
}

window.onload = () => {
    var chart = new TimelineChart();
    // テスト用ダミーデータ 03/01~03/10まで一日単位に適当なデータを突っ込む x 3本for (var i = 0; i < 3; i++) {
        var l = new Line<Date, number>();
        for (var j = 0; j < 10; j++) {
            l.points.push(new Point<Date, number>(new Date(2014, 2, 1 + j), Math.round(Math.random() * 1000)));
        }
        chart.lines.push(l);
    }

    // svg要素を作成
    var svg = d3.select("#content").append("svg")
        .attr("width", 600)
        .attr("height", 600);

    // 描画
    chart.draw({ x: 10, y: 10, width: 500, height: 500, padding: 50 }, svg);
};

TypeScriptでthree.js

$
0
0

今日デブサミ2013 Day0に行ったんですが、デバイスとかセンサーで得た情報を視覚化するのって大事だなと思ったりしたんですが、自分にはその手段がないということに気付きました。3Dグラフィックとか現実をシミュレートするような基礎的な知識が何もない。

よく使われてるのは

Unityでした。ちょっとSDK入れてとかやるのがだるかったので…。

three.jsを試してみた

最近TypeScriptを触ってるのもあるのでWebGLをラップしてくれるデファクトスタンダードっぽいライブラリのthree.jsを試してみました。NuGetで探してみたところ、型定義はあるみたいなので。three.js本体はNuGetになかったので本家サイトからDLしました。

そして、本家のドキュメントのIntroductionをTypeScriptで写経。

/// <reference path="scripts/typings/threejs/three.d.ts" />

window.onload = () => {
    var scene = new THREE.Scene();
    var camera = new THREE.PerspectiveCamera(75, window.innerWidth / window.innerHeight, 0.1, 1000);

    var renderer = new THREE.WebGLRenderer();
    renderer.setSize(window.innerWidth, window.innerHeight);
    document.body.appendChild(renderer.domElement);

    var geometry = new THREE.CubeGeometry(1, 1, 1);
    var material = new THREE.MeshBasicMaterial({ color: 0x00ff00 });
    var cube = new THREE.Mesh(geometry, material);

    scene.add(cube);

    camera.position.z = 3;

    // ここがちょっと違う・・・!!
    var render = () => {
        requestAnimationFrame(render);

        cube.rotation.x += 0.1;
        cube.rotation.y += 0.1;

        renderer.render(scene, camera);
    };
    render();
};

なんというか、完璧にインテリセンスが効いて気持ちいい!!型定義がきちんとしてるっていうのは大事ですね…。個々のパラメータにどんな意味があるのかはよくわからないので要勉強・・・。

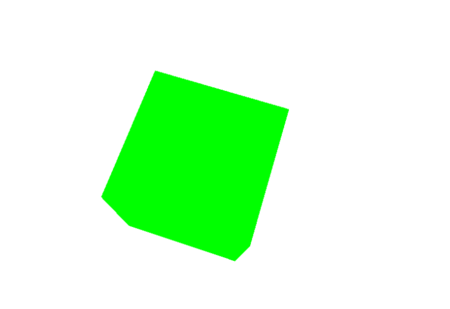
特に面白くないのですが実行結果

3Dの緑色のキューブがぐるぐる回ってる・・・!

f:id:okazuki:20140212231606p:plain

まとめ

地味に人生初の3Dプログラミングが動いたのでうれしくて写経しただけですがBlogってしまいました。こういうはじめてのことって動くと楽しくてテンション上がりますよね!

現在押されているキーと修飾キーを取得する

$
0
0

ぱぱっと取れるものなのかしら。と思ってみたら若干めんどくさかった。

現在押されているキー

Window.Current.CoreWindowのGetKeyStateで指定したキーが押されたかどうかわかるので、VirtualKey全走査すればいいのか?修飾キーあたり排除してFirstOrDefaultっと・・・。動かしてません・・・!

var vkyes = VirtualKeys = Enum
    .GetValues(typeof(VirtualKey))
    .Cast<VirtualKey>()
    .Where(k => k != VirtualKey.Menu && 
        k != VirtualKey.LeftWindows && 
        k != VirtualKey.Control && 
        k != VirtualKey.Shift)
    .ToArray();

var currentKey = vkeys.FirstOrDefault(k =>
    Window.Current.CoreWindow.GetKeyState(k) == CoreVirtualKeyStates.Down);

現在押されている修飾キー

VirtualKeyModifiersで表してるらしい。これもCoreWindowのGetAsyncKeyStateみたいなメソッドで押せるかどうか判別できるらしい。まぁ、これくらいの数なら愚直にやってもいいかなってことで押されてる奴を|=でつないでいく。

var m = VirtualKeyModifiers.None;
if (Window.Current.CoreWindow.GetAsyncKeyState(VirtualKey.Shift) == CoreVirtualKeyStates.Down)
{
    m |= VirtualKeyModifiers.Shift;
}
if (Window.Current.CoreWindow.GetAsyncKeyState(VirtualKey.Control) == CoreVirtualKeyStates.Down)
{
    m |= VirtualKeyModifiers.Control;
}
if (Window.Current.CoreWindow.GetAsyncKeyState(VirtualKey.Menu) == CoreVirtualKeyStates.Down)
{
    m |= VirtualKeyModifiers.Menu;
}
if (Window.Current.CoreWindow.GetAsyncKeyState(VirtualKey.LeftWindows) == CoreVirtualKeyStates.Down)
{
    m |= VirtualKeyModifiers.Windows;
}

まとめ

MSDN見ながら書いただけで動かしてないので間違えてる可能性大。次の記事で、これを使ってあれをする・・・!予定。


接続中のみ処理したい…!

$
0
0

ほんとは、whileループの中はHttpClient使った処理あたり・・・?う~ん、無理やり感があるかなぁ?というメモ。

using System;
using System.Reactive.Concurrency;
using System.Reactive.Disposables;
using System.Reactive.Linq;
using System.Reactive.Subjects;
using System.Threading.Tasks;

namespace ConsoleApplication1
{
    class Program
    {
        staticvoid Main(string[] args)
        {
            var connectionSubject = new Subject<bool>();
            var connectObservable = connectionSubject.Where(b => b).AsObservable();
            var disconnectObservable = connectionSubject.Where(b => !b).AsObservable();
            var src = connectObservable.SelectMany(_ =>
                {
                    return Observable.Create<string>(async o =>
                    {
                        Console.WriteLine("connection start!");
                        var connected = true;
                        while (connected)
                        {
                            o.OnNext("foo");
                            await Task.Delay(1000);
                            o.OnNext("ooo");
                            await Task.Delay(1000);
                        }
                    });
                })
                .TakeUntil(disconnectObservable)
                .Repeat();

            src.ObserveOn(Scheduler.Default).Subscribe(Console.WriteLine);
            while (true)
            {
                Console.ReadKey();
                Console.WriteLine("OnNext(true)");
                connectionSubject.OnNext(true);
                Console.ReadKey();
                Console.WriteLine("OnNext(false)");
                connectionSubject.OnNext(false);
            }
        }
    }
}

Xamarinに感じてること

$
0
0

ここ1年くらいDLして使えるようになってたのですが、なかなか使ってませんでした。理由としては以下のような感じです。

  • iOSアプリの開発にはMacが必要…。
  • Androidアプリの開発は、エミュレータが遅すぎて使いものにならないので実機がほぼ必須
    • 早いエミュレータも探せばあるみたいですがHyper-Vと共存できなかったり色々難点が
  • 日本語環境だとちゃんと動かないっぽいという噂?
  • XamarinのVisual Studio拡張機能を入れたらWindows ストア アプリのXAMLエディタが壊れる(これ一番インパクトでかかった)
  • XamarinのVisual Studio拡張は、新規作成したあとちょっとした修正しないと動かなかったりと微妙だった

現状は?

ただ、結構Xamarinは頻繁に更新がされていて不具合っぽい動きは、ちょっとずつですが確実に改修されていってます。とりあえず、個人的に一番大きなダメージだったWindows ストア アプリのXAMLエディタが壊れる件はなくなり、日本語環境にインストールしても既存環境が壊れるということはなくなりました。

個人的にはこれから・・・!と感じてます。

PCL対応

Xamarinが出てから、ここ一年でPortable Class Libraryがかなり充実してきました。クライアントサイドの処理は、こいつで大体サポートできるうえに、サーバーサイドも.NETで作る際は共通のREST API等で返すクラスを共有することで、サーバーサイドでもクライアントサイドでも似たようなコードを書かないといけないということもなくなります。地味だけど、単純作業がなくなってとても嬉しいと個人的に思ってます。

ただ、ReactivePropertyをPCLにして、ターゲットフレームワークにXamarin.iOSとXamarin.Androidを含めただけだと、うまいことインストールできない(ビルド時にエラーになる)ので、Android, iOS, Windows desktop, Windows store, Windows phoneで共通で使えるライブラリとかを作るのは、ちょいとノウハウがいりそうに感じてます。

画面は個別に作ろうという思想

個人的には、この思想はいいと思うのですが、HTML/JavaScriptで1ソースだよね。Xamarinは画面をプラットフォームの数だけつくらないといけないの?というのに「はい!」というのがつらいところ。

まぁ、プラットフォームのガイドに合わせたアプリと、どのプラットフォームでも同じ画面のどちらがいいのか、コンシューマ向けでは前者だけど、社内向けだと…?どっちもいい点がありそうで悩ましいと思ってたり思わなかったり。ユーザーさんから、なんで、おんなじことするのに画面が違うの??という突っ込みがきたら嫌だ。(作る側の立場)そういう意味では、画面まで含めて1ソースで作れるようなものもあってもいいのではないかと思う今日この頃でもあります(難しいけど)

まとめ

Xamarinのサブスクリプションが、あとちょっとで切れるよ・・・!というメールが来て、そういえばTwitterで○○が動かない…!とかxxxがダメだ!とかしかつぶやいてないなぁと思ったので、今思ってることを書き綴ってみました。

まぁ、色々書きましたがC#という強力な言語(async, await, yiled return, ラムダ etc...)が使えるというのがメリットですよね・・・!Love C#!!

d3.jsのコレクション操作系関数

$
0
0

いろいろあるんですね…。知らないと損しちゃう。

個人的に特に便利と感じたのはnest関数からのkeyやrollupです。keyがgroup byみたいなものでrollupがグルーピングしたものを集計する処理です。

画面用にこんなHTMLがあるとして

<!DOCTYPE html><htmllang="ja"><head><metacharset="utf-8" /><title>TypeScript HTML App</title><linkrel="stylesheet"href="app.css"type="text/css" /><scriptsrc="Scripts/d3.v3.min.js"></script><scriptsrc="app.js"></script></head><body><divid="content"></div></body></html>

サンプルデータでidとageを持ったオブジェクトを適当に20個作って10代, 20代ごとのグループにしてます。

window.onload = () => {
    var data = d3.range(0, 20).map(i => { return { id: i, age: 0 | Math.random() * 40 + 20 }; });
    d3.select("#content").append("div").text(JSON.stringify(data));
    d3.select("#content").append("hr");

    var nestedData = d3.nest()
        .key(d => (0 | d.age / 10).toString())
        .entries(data);
    d3.select("#content").append("div").text(JSON.stringify(nestedData));
};

実行すると以下のようなHTMLが得られます。

<htmllang="ja"><head><metacharset="utf-8"><title>TypeScript HTML App</title><linkhref="app.css"rel="stylesheet"type="text/css"><scriptsrc="Scripts/d3.v3.min.js"></script><scriptsrc="app.js"></script></head><body><divid="content"><div>[{"id":0,"age":41},{"id":1,"age":59},{"id":2,"age":41},{"id":3,"age":29},{"id":4,"age":59},{"id":5,"age":34},{"id":6,"age":56},{"id":7,"age":41},{"id":8,"age":20},{"id":9,"age":23},{"id":10,"age":43},{"id":11,"age":57},{"id":12,"age":21},{"id":13,"age":46},{"id":14,"age":50},{"id":15,"age":31},{"id":16,"age":22},{"id":17,"age":21},{"id":18,"age":59},{"id":19,"age":45}]</div><hr><div>[{"key":"4","values":[{"id":0,"age":41},{"id":2,"age":41},{"id":7,"age":41},{"id":10,"age":43},{"id":13,"age":46},{"id":19,"age":45}]},
{"key":"5","values":[{"id":1,"age":59},{"id":4,"age":59},{"id":6,"age":56},{"id":11,"age":57},{"id":14,"age":50},{"id":18,"age":59}]},
{"key":"2","values":[{"id":3,"age":29},{"id":8,"age":20},{"id":9,"age":23},{"id":12,"age":21},{"id":16,"age":22},{"id":17,"age":21}]},{"key":"3","values":[{"id":5,"age":34},{"id":15,"age":31}]}]</div></div></body></html>

keyにグループピングのキーにつかった値が、valuesに値の配列が入ってます。rollupを使うと年齢の平均とかを出すこともできます。(あまり意味ない例ですが…)

/// <reference path="scripts/typings/d3/d3.d.ts" />
window.onload = () => {
    var data = d3.range(0, 20).map(i => { return { id: i, age: 0 | Math.random() * 40 + 20 }; });
    d3.select("#content").append("div").text(JSON.stringify(data));
    d3.select("#content").append("hr");

    var nestedData = d3.nest()
        .key(d => (0 | d.age / 10).toString())
        .rollup((d: { id: number; age: number }[]) => d3.mean(d, d => d.age))
        .entries(data);
    d3.select("#content").append("div").text(JSON.stringify(nestedData));
};

実行するとこんな感じ

<htmllang="ja"><head><metacharset="utf-8"><title>TypeScript HTML App</title><linkhref="app.css"rel="stylesheet"type="text/css"><scriptsrc="Scripts/d3.v3.min.js"></script><scriptsrc="app.js"></script></head><body><divid="content"><div>
[{"id":0,"age":53},{"id":1,"age":21},{"id":2,"age":47},{"id":3,"age":59},{"id":4,"age":37},{"id":5,"age":51},{"id":6,"age":30},{"id":7,"age":29},{"id":8,"age":40},{"id":9,"age":29},{"id":10,"age":43},{"id":11,"age":43},{"id":12,"age":40},{"id":13,"age":49},{"id":14,"age":55},{"id":15,"age":42},{"id":16,"age":46},{"id":17,"age":25},{"id":18,"age":31},{"id":19,"age":24}]
</div><hr><div>
[{"key":"5","values":54.5},
{"key":"2","values":25.6},
{"key":"4","values":43.75},
{"key":"3","values":32.666666666666664}]
</div></div></body></html>

便利っぽい。

データビジュアライゼーションの美

配列からN件取り出す

$
0
0

LINQでいうTakeみたいなやつです。sliceというメソッドが配列に定義されてるんですね。しかも、startとend指定でSkipとTakeを合わせたような動きをしてくれるみたいです。

startは0から始まるインデックス、endも0から始まるインデックスです。endは、endで示した要素は含まないので要注意。

なので、先頭からN件とりたいというときはslice(0, N -1)を呼べばOK。

var data = [1, 2, 3, 4, 5];
console.log(data.slice(0, 3)); // [1, 2]
console.log(data.slice(0, 1000)); // [1, 2, 3, 4, 5]

例にあるとおり、endは配列より大きな値を指定してもエラーにならないのでサイズチェックは不要です。

Viewing all 1388 articles
Browse latest View live


<script src="https://jsc.adskeeper.com/r/s/rssing.com.1596347.js" async> </script>