UserControlで、独自コントロールを作る方法を紹介しましたが、UserControlではできないことがあります。ControlTemplateへ対応です。ControlTemplateへ対応した完全なWPFの独自コントロールを作るには、これから紹介するカスタムコントロールを作成する必要があります。
カスタムコントロールは、新規作成のカスタムコントロール(WPF)から作成します。作成すると、クラスが1つとThemesフォルダの中にGeneric.xamlが作成されます。このGeneric.xaml内にコントロールのデフォルトのStyleを定義してコントロールを作成します。コントロールのデフォルトのStyleのキーはクラスの静的コンストラクタで以下のようにDefaultStyleKey依存関係プロパティのデフォルト値を上書きすることで指定されています。
static NumericUpDown()
{
    DefaultStyleKeyProperty.OverrideMetadata(typeof(NumericUpDown),
new FrameworkPropertyMetadata(typeof(NumericUpDown)));
}
Generic.xamlは、以下のようにデフォルトのStyle(型名がキーのStyle)のみが定義されています。
<ResourceDictionaryxmlns="http://schemas.microsoft.com/winfx/2006/xaml/presentation"xmlns:x="http://schemas.microsoft.com/winfx/2006/xaml"xmlns:local="clr-namespace:CreateControlSample02"><Style TargetType="{x:Type local:NumericUpDown}"><Setter Property="Template"><Setter.Value><ControlTemplate TargetType="{x:Type local:NumericUpDown}"><Border Background="{TemplateBinding Background}"BorderBrush="{TemplateBinding BorderBrush}"BorderThickness="{TemplateBinding BorderThickness}"></Border></ControlTemplate></Setter.Value></Setter></Style></ResourceDictionary>
ここでは、UserControlと同じようにNumericUpDownコントロールを作成していきます。UserControlの時と同じようにXAMLを定義します。異なる点は、イベントハンドラの紐づけはXAMLで行わない点です。カスタムコントロールではXAMLではなく、C#で指定します。C#から参照するために、RepeatButtonには名前をつけています。名前は、カスタムコントロールではPART_名前という命名規約でつけることが多いです。UserControlと同様にVisualStateManagerの定義と、TextBlockのTextプロパティをコントロールのValueプロパティとBindingしています。
<ControlTemplate TargetType="{x:Type local:NumericUpDown}"><Border Background="{TemplateBinding Background}"BorderBrush="{TemplateBinding BorderBrush}"BorderThickness="{TemplateBinding BorderThickness}"d:DesignWidth="231"d:DesignHeight="86"><VisualStateManager.VisualStateGroups><VisualStateGroup x:Name="PositiveNegative"><VisualState x:Name="Positive" /><VisualState x:Name="Negative"><Storyboard><ColorAnimationStoryboard.TargetName="textBlockValue"Storyboard.TargetProperty="Foreground.Color"To="Red" /></Storyboard></VisualState></VisualStateGroup></VisualStateManager.VisualStateGroups><Grid><Grid.RowDefinitions><RowDefinition Height="21*"/><RowDefinition Height="22*"/></Grid.RowDefinitions><Grid.ColumnDefinitions><ColumnDefinition Width="Auto"/><ColumnDefinition Width="Auto"/></Grid.ColumnDefinitions><TextBlock x:Name="textBlockValue"TextWrapping="Wrap"Text="{Binding Value, RelativeSource={RelativeSource FindAncestor, AncestorType={x:Type local:NumericUpDown}}}"Height="Auto"Grid.RowSpan="2"Width="Auto"HorizontalAlignment="Right"VerticalAlignment="Center"Foreground="Black" /><RepeatButton x:Name="PART_UpButton"Content="Up"Grid.Column="1"Height="Auto"Width="Auto"Margin="2.5"/><RepeatButton x:Name="PART_DownButton"Content="Down"Grid.Column="1"Grid.Row="1"Margin="2.5"/></Grid></Border></ControlTemplate>
NumericUpDownコントロールでは、UserControlと同様にValue依存関係プロパティの定義と、VisualStateの切り替えのコードを記述します。
publicstaticreadonly DependencyProperty ValueProperty =
    DependencyProperty.Register(
        "Value",
        typeof(int),
        typeof(NumericUpDown),
        new PropertyMetadata(0, ValueChanged));

privatestaticvoid ValueChanged(DependencyObject d, DependencyPropertyChangedEventArgs e)
{
    ((NumericUpDown)d).UpdateState(true);
}


publicint Value
{
    get { return (int)GetValue(ValueProperty); }
    set { SetValue(ValueProperty, value); }
}

privatevoid UpdateState(bool useTransition)
{
    if (this.Value >= 0)
    {
        VisualStateManager.GoToState(this, "Positive", useTransition);
    }
    else
    {
        VisualStateManager.GoToState(this, "Negative", useTransition);
    }
}
カスタムコントロールのRepeatButtonにイベントハンドラの紐づけを行います。これは、カスタムコントロールにテンプレートが適用されたときに呼び出されるOnApplyTemplateメソッドで行います。ここでは、古いテンプレートから取得したコントロールの後始末と、新しいテンプレートから取得したコントロールの初期化を行います。ここでは、イベントハンドラの解除と登録がそれにあたります。テンプレートで定義されたコントロールの取得にはGetTemplateChildメソッドで名前を指定して取得します。
// XAMLで定義されたボタン格納用変数private RepeatButton upButton;
private RepeatButton downButton;

// ボタンのクリックイベントprivatevoid UpClick(object sender, RoutedEventArgs e) { this.Value++; }
privatevoid DownClick(object sender, RoutedEventArgs e) { this.Value--; }

publicoverridevoid OnApplyTemplate()
{
    base.OnApplyTemplate();

    // 前のテンプレートのコントロールの後処理if (this.upButton != null)
    {
        this.upButton.Click -= this.UpClick;
    }
    if (this.downButton != null)
    {
        this.downButton.Click -= this.DownClick;
    }

    // テンプレートからコントロールの取得this.upButton = this.GetTemplateChild("PART_UpButton") as RepeatButton;
    this.downButton = this.GetTemplateChild("PART_DownButton") as RepeatButton;

    // イベントハンドラの登録if (this.upButton != null)
    {
        this.upButton.Click += this.UpClick;
    }
    if (this.downButton != null)
    {
        this.downButton.Click += this.DownClick;
    }

    // VSMの更新this.UpdateState(false);
}
このコントロールは、ControlTemplateをサポートした完全なコントロールです。以下のように定義することで見た目のカスタマイズが使用者側で出来るようになっています。
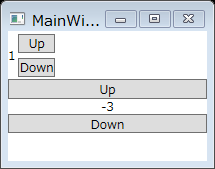
<StackPanel><!-- 通常の見た目 --><local:NumericUpDown /><!-- コントロールテンプレートの差し替え --><local:NumericUpDown><local:NumericUpDown.Template><ControlTemplate TargetType="{x:Type local:NumericUpDown}"><StackPanel><RepeatButton x:Name="PART_UpButton"Content="Up" /><TextBlock Text="{Binding Value, RelativeSource={RelativeSource AncestorType=local:NumericUpDown}}"HorizontalAlignment="Center"/><RepeatButton x:Name="PART_DownButton"Content="Down" /></StackPanel></ControlTemplate></local:NumericUpDown.Template></local:NumericUpDown></StackPanel>
実行結果を以下に示します。テンプレートが置き換わってUpボタンとDownボタンの位置が変わっていることが確認できます。

過去記事
- WPF4.5入門 その1 「はじめに」
- WPF4.5入門 その2 「WPFとは」
- WPF4.5入門 その3 「Hello world」
- WPF4.5入門 その4 「Mainメソッドはどこにいった?」
- WPF4.5入門 その5 「全てC#でHello world」
- WPF4.5入門 その6 「WPFを構成するものを考えてみる」
- WPF4.5入門 その7 「XAMLのオブジェクト要素と名前空間」
- WPF4.5入門 その8 「オブジェクト要素のプロパティ」
- WPF4.5入門 その9 「コレクション構文」
- WPF4.5入門 その10 「コンテンツ構文」
- WPF4.5入門 その11 「マークアップ拡張」
- WPF4.5入門 その12 「その他のXAMLの機能」
- WPF4.5入門 その13 「簡単なレイアウトを行うコントロール」
- WPF4.5入門 その14 「レイアウトコントロールのCanvasとStackPanel」
- WPF4.5入門 その15 「レイアウトコントロールのDockPanelとWrapPanel」
- WPF4.5入門 その16 「ViewBoxコントロール」
- WPF4.5入門 その17 「ScrollViewerコントロール」
- WPF4.5入門 その18 「Gridコントロール part 1」
- WPF4.5入門 その19 「Gridコントロール part 2」
- WPF4.5入門 その20 「レイアウトに影響を与えるプロパティ」
- WPF4.5入門 その21 「WPFのコンセプトと重要な機能つまみ食い」
- WPF4.5入門 その22 「Buttonコントロール」
- WPF4.5入門 その23 「DataGridコントロール その1」
- WPF4.5入門 その24 「DataGridコントロール その2」
- WPF4.5入門 その25 「TreeViewコントロール その1」
- WPF4.5入門 その26 「TreeViewコントロール その2」
- WPF4.5入門 その28 「Calendarコントロール」 - かずきのBlog@hatena
- WPF4.5入門 その29 「ContextMenuコントロール」 - かずきのBlog@hatena
- WPF4.5入門 その30「Menuコントロール」 - かずきのBlog@hatena
- WPF4.5入門 その31 「ToolBarコントロール」 - かずきのBlog@hatena
- WPF4.5入門 その32 「CheckBoxコントロール」 - かずきのBlog@hatena
- WPF4.5入門 その33 「ComboBoxコントロール」 - かずきのBlog@hatena
- WPF4.5入門 その34 「ListBoxコントロール」 - かずきのBlog@hatena
- WPF4.5入門 その35 「RadioButtonコントロール」 - かずきのBlog@hatena
- WPF4.5入門 その36 「Sliderコントロール」 - かずきのBlog@hatena
- WPF4.5入門 その37 「TabControl」 - かずきのBlog@hatena
- WPF4.5入門 その38 「ファイルダイアログ」 - かずきのBlog@hatena
- WPF4.5入門 その39 「情報を表示するコントロール」 - かずきのBlog@hatena
- WPF4.5入門 その40 「Popup、ToolTip、TextBox、Image、MediaElementコントロール」 - かずきのBlog@hatena
- WPF4.5入門 その41 「DispatcherObject」 - かずきのBlog@hatena
- WPF4.5入門 その42 「WPFのプロパティシステム」 - かずきのBlog@hatena
- WPF4.5入門 その43 「読み取り専用の依存関係プロパティ」 - かずきのBlog@hatena
- 拡張されたプロパティメタデータ - かずきのBlog@hatena
- WPF4.5入門 その45 「添付プロパティ」 - かずきのBlog@hatena
- WPF4.5入門 その46 「WPFのイベントシステム」 - かずきのBlog@hatena
- WPF4.5入門 その47 「コンテンツモデル」 - かずきのBlog@hatena
- WPF4.5入門 その48 「WPFのアニメーション その1」 - かずきのBlog@hatena
- WPF4.5入門 その49 「WPFのアニメーション その2」 - かずきのBlog@hatena
- WPF4.5入門 その50 「Style」 - かずきのBlog@hatena
- WPF4.5入門 その51 「リソース」 - かずきのBlog@hatena
- WPF入門 その52 「コントロールテンプレート」 - かずきのBlog@hatena
- WPF4.5入門 その53 「ユーザーコントロール」 - かずきのBlog@hatena