Windows 10 Insider Preview 10074 + VS2015 RC時点の情報です
ハンバーガーメニューがぱかぱか開いたりするあの画面です。
ヘッダー部の作成
簡単にヘッダー部分をさくっと作ります。
<Pagex:Class="App17.MainPage"xmlns="http://schemas.microsoft.com/winfx/2006/xaml/presentation"xmlns:x="http://schemas.microsoft.com/winfx/2006/xaml"xmlns:local="using:App17"xmlns:d="http://schemas.microsoft.com/expression/blend/2008"xmlns:mc="http://schemas.openxmlformats.org/markup-compatibility/2006"mc:Ignorable="d"><Grid Background="{ThemeResource ApplicationPageBackgroundThemeBrush}"><Grid.RowDefinitions><RowDefinition Height="Auto" /><RowDefinition /></Grid.RowDefinitions><!-- Header --><RelativePanel><ToggleButton x:Name="toggleButton"Content=""FontFamily="{ThemeResource SymbolThemeFontFamily}"Background="Transparent"Width="40"Height="40" /><Button x:Name="buttonBack"Style="{ThemeResource NavigationBackButtonNormalStyle}"RelativePanel.RightOf="toggleButton"/><TextBlock Text="My App"Style="{ThemeResource TitleTextBlockStyle}"Margin="10, 0"RelativePanel.RightOf="buttonBack"RelativePanel.AlignVerticalCenterWith="buttonBack"/></RelativePanel><!-- Body --><SplitView x:Name="splitView"Grid.Row="1"></SplitView></Grid></Page>
ToggleButtonでハンバーガーメニューのボタンを準備します。文字コードは0xE700なので、それを指定しましょう。ハンバーガーメニューのボタンの横には戻るボタンを用意しておきます。そしてその横には、アプリタイトルを表示しています。
SplitViewの作成
メインのコンテンツ部分はSplitViewで作成しています。これからここを作りこんでいきます。
<!-- Body --><SplitView x:Name="splitView"Grid.Row="1"IsPaneOpen="{Binding IsChecked, ElementName=toggleButton, Mode=TwoWay}"CompactPaneLength="40"><SplitView.Pane><ListView><ListViewItem><StackPanel Orientation="Horizontal"><FontIcon FontFamily="{ThemeResource SymbolThemeFontFamily}"Glyph=""FontSize="20" /><TextBlock Text="ItemItemItem"Style="{ThemeResource BodyTextBlockStyle}"Margin="10,0" /></StackPanel></ListViewItem><ListViewItem><StackPanel Orientation="Horizontal"><FontIcon FontFamily="{ThemeResource SymbolThemeFontFamily}"Glyph=""FontSize="20" /><TextBlock Text="ItemItemItem"Style="{ThemeResource BodyTextBlockStyle}"Margin="10,0" /></StackPanel></ListViewItem><ListViewItem><StackPanel Orientation="Horizontal"><FontIcon FontFamily="{ThemeResource SymbolThemeFontFamily}"Glyph=""FontSize="20" /><TextBlock Text="ItemItemItem"Style="{ThemeResource BodyTextBlockStyle}"Margin="10,0" /></StackPanel></ListViewItem></ListView></SplitView.Pane><Frame x:Name="rootFrame" /></SplitView>
ListViewに適当なアイテムを3つ置いています。SplitViewは、ここに画面遷移するためのコンテンツを置くためのFrameを置いています。これだけで、大分それっぽくなります。

サイズに応じた見た目の作成
次に、VisualStateを作りこんでいきます。ルートのGridの下に以下のようなVisualStateを定義します。
<VisualStateManager.VisualStateGroups><VisualStateGroup x:Name="LayoutVisualStateGroup"><!-- 最小幅 --><VisualState x:Name="NarrowLayout"><VisualState.StateTriggers><AdaptiveTrigger MinWindowWidth="0" /></VisualState.StateTriggers></VisualState><!-- 普通 --><VisualState x:Name="NormalLayout"><VisualState.StateTriggers><AdaptiveTrigger MinWindowWidth="321" /></VisualState.StateTriggers><VisualState.Setters><Setter Target="splitView.DisplayMode"Value="CompactOverlay" /></VisualState.Setters></VisualState><!-- 広い --><VisualState x:Name="WideLayout"><VisualState.StateTriggers><AdaptiveTrigger MinWindowWidth="1025" /></VisualState.StateTriggers><VisualState.Setters><Setter Target="splitView.DisplayMode"Value="Inline" /><Setter Target="toggleButton.IsChecked"Value="True" /><Setter Target="toggleButton.Visibility"Value="Collapsed" /></VisualState.Setters></VisualState></VisualStateGroup></VisualStateManager.VisualStateGroups>
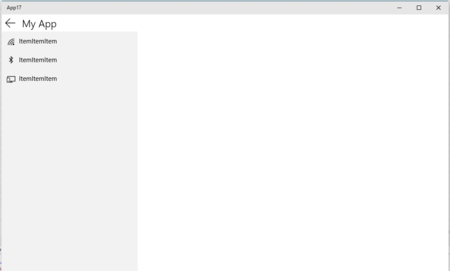
こうすると、画面の幅に応じてそれっぽい見た目になってくれます。
電話
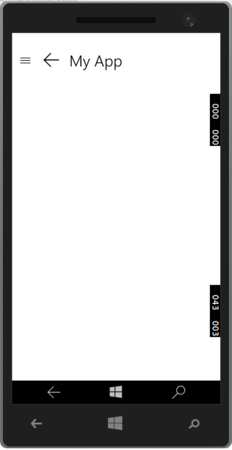
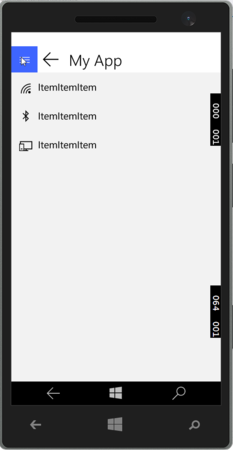
パソコンで幅が狭いとき
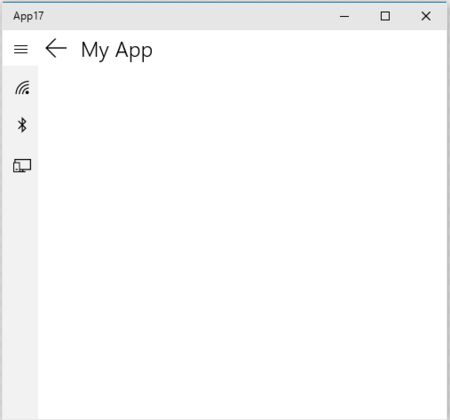
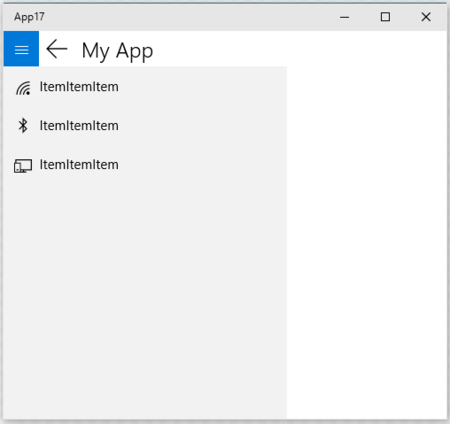
パソコンで幅が広いとき
RootFrameの差し替え
SplitView内に置いたFrameをアプリケーションのルートのFrameにします。App.xaml.csのOnLaunchedを以下のように書き換えます。(BlankPage1.xamlに初期状態で遷移するようにしています)
/// <summary>/// Invoked when the application is launched normally by the end user.  Other entry points/// will be used such as when the application is launched to open a specific file./// </summary>/// <paramname="e">Details about the launch request and process.</param>protectedoverridevoid OnLaunched(LaunchActivatedEventArgs e)
        {

#if DEBUGif (System.Diagnostics.Debugger.IsAttached)
            {
                this.DebugSettings.EnableFrameRateCounter = true;
            }
#endif

            var root = Window.Current.Content as MainPage;
            var rootFrame = root?.FindName("rootFrame") as Frame ?? null;

            // Do not repeat app initialization when the Window already has content,// just ensure that the window is activeif (root == null)
            {
                // Create a Frame to act as the navigation context and navigate to the first page
                root = new MainPage();
                rootFrame = root.FindName("rootFrame") as Frame;

                rootFrame.NavigationFailed += OnNavigationFailed;

                if (e.PreviousExecutionState == ApplicationExecutionState.Terminated)
                {
                    //TODO: Load state from previously suspended application
                }

                // Place the frame in the current Window
                Window.Current.Content = root;
            }


            if (rootFrame.Content == null)
            {
                // When the navigation stack isn't restored navigate to the first page,// configuring the new page by passing required information as a navigation// parameter
                rootFrame.Navigate(typeof(BlankPage1), e.Arguments);
            }
            // Ensure the current window is active
            Window.Current.Activate();
        }
仕上げ
最後にSplitViewのPaneのListViewのListViewItemをクリックしたら画面遷移するようにします。
普通のBehaviorのNavigateToPageActionだと動かないので、自前の画面遷移のアクションを定義します。
using Microsoft.Xaml.Interactivity;
using System;
using Windows.UI.Xaml;
using Windows.UI.Xaml.Controls;

namespace App17
{
    publicclass CustomNavigateToPageAction : DependencyObject, IAction
    {
        publicstring Page
        {
            get { return (string)GetValue(PageProperty); }
            set { SetValue(PageProperty, value); }
        }

        // Using a DependencyProperty as the backing store for Page.  This enables animation, styling, binding, etc...publicstaticreadonly DependencyProperty PageProperty =
            DependencyProperty.Register("Page", typeof(string), typeof(CustomNavigateToPageAction), new PropertyMetadata(null));

        publicobject Execute(object sender, object parameter)
        {
            var root = Window.Current.Content as MainPage;
            var frame = root?.FindName("rootFrame") as Frame;
            frame?.Navigate(Type.GetType(this.Page));
            returnnull;
        }
    }
}
あとは、ListViewItemをクリックしたときにこのActionが呼ばれるようにすればOK。全体のXAMLは以下のようになります。
<Pagexmlns="http://schemas.microsoft.com/winfx/2006/xaml/presentation"xmlns:x="http://schemas.microsoft.com/winfx/2006/xaml"xmlns:local="using:App17"xmlns:d="http://schemas.microsoft.com/expression/blend/2008"xmlns:mc="http://schemas.openxmlformats.org/markup-compatibility/2006"xmlns:Interactivity="using:Microsoft.Xaml.Interactivity"xmlns:Core="using:Microsoft.Xaml.Interactions.Core"x:Class="App17.MainPage"mc:Ignorable="d"><Grid Background="{ThemeResource ApplicationPageBackgroundThemeBrush}"><VisualStateManager.VisualStateGroups><VisualStateGroup x:Name="LayoutVisualStateGroup"><!-- 最小幅 --><VisualState x:Name="NarrowLayout"><VisualState.StateTriggers><AdaptiveTrigger MinWindowWidth="0" /></VisualState.StateTriggers></VisualState><!-- 普通 --><VisualState x:Name="NormalLayout"><VisualState.StateTriggers><AdaptiveTrigger MinWindowWidth="321" /></VisualState.StateTriggers><VisualState.Setters><Setter Target="splitView.DisplayMode"Value="CompactOverlay" /></VisualState.Setters></VisualState><!-- 広い --><VisualState x:Name="WideLayout"><VisualState.StateTriggers><AdaptiveTrigger MinWindowWidth="1025" /></VisualState.StateTriggers><VisualState.Setters><Setter Target="splitView.DisplayMode"Value="Inline" /><Setter Target="toggleButton.IsChecked"Value="True" /><Setter Target="toggleButton.Visibility"Value="Collapsed" /></VisualState.Setters></VisualState></VisualStateGroup></VisualStateManager.VisualStateGroups><Grid.RowDefinitions><RowDefinition Height="Auto" /><RowDefinition /></Grid.RowDefinitions><!-- Header --><RelativePanel><ToggleButton x:Name="toggleButton"Content=""FontFamily="{ThemeResource SymbolThemeFontFamily}"Background="Transparent"Width="40"Height="40" /><Button x:Name="buttonBack"Style="{ThemeResource NavigationBackButtonNormalStyle}"RelativePanel.RightOf="toggleButton" /><TextBlock Text="My App"Style="{ThemeResource TitleTextBlockStyle}"Margin="10, 0"RelativePanel.RightOf="buttonBack"RelativePanel.AlignVerticalCenterWith="buttonBack"/></RelativePanel><!-- Body --><SplitView x:Name="splitView"Grid.Row="1"IsPaneOpen="{Binding IsChecked, ElementName=toggleButton, Mode=TwoWay}"CompactPaneLength="40"><SplitView.Pane><ListView><ListViewItem><Interactivity:Interaction.Behaviors><Core:EventTriggerBehavior EventName="Tapped"><local:CustomNavigateToPageAction Page="App17.BlankPage1"/></Core:EventTriggerBehavior></Interactivity:Interaction.Behaviors><StackPanel Orientation="Horizontal"><FontIcon FontFamily="{ThemeResource SymbolThemeFontFamily}"Glyph=""FontSize="20" /><TextBlock Text="ItemItemItem"Style="{ThemeResource BodyTextBlockStyle}"Margin="10,0" /></StackPanel></ListViewItem><ListViewItem><Interactivity:Interaction.Behaviors><Core:EventTriggerBehavior EventName="Tapped"><local:CustomNavigateToPageAction Page="App17.BlankPage2"/></Core:EventTriggerBehavior></Interactivity:Interaction.Behaviors><StackPanel Orientation="Horizontal"><FontIcon FontFamily="{ThemeResource SymbolThemeFontFamily}"Glyph=""FontSize="20" /><TextBlock Text="ItemItemItem"Style="{ThemeResource BodyTextBlockStyle}"Margin="10,0" /></StackPanel></ListViewItem><ListViewItem><StackPanel Orientation="Horizontal"><Interactivity:Interaction.Behaviors><Core:EventTriggerBehavior EventName="Tapped"><local:CustomNavigateToPageAction Page="App17.BlankPage3"/></Core:EventTriggerBehavior></Interactivity:Interaction.Behaviors><FontIcon FontFamily="{ThemeResource SymbolThemeFontFamily}"Glyph=""FontSize="20" /><TextBlock Text="ItemItemItem"Style="{ThemeResource BodyTextBlockStyle}"Margin="10,0" /></StackPanel></ListViewItem></ListView></SplitView.Pane><Frame x:Name="rootFrame" /></SplitView></Grid></Page>