Quantcast
Channel: かずきのBlog@hatena
Viewing all 1388 articles
Browse latest View live

WPFのDataGridの左上を押しても全選択したくない

$
0
0

というときどうするか。ControlTemplateをいじりましょう(完

WPFのいいところはControlTemplateで、完全にコントロールの見た目をカスタマイズする余地が残されてるという点ですが、WPFのプロパティの範囲でできないカスタマイズとかが出てきたらControlTemplateを差し替えるとかいう、いきなりハードル高い感じになってしまうところですね。ということで、こういうControlTemplate当てればOKです。

<Style x:Key="DataGridStyle1"TargetType="{x:Type DataGrid}"><Setter Property="Background"Value="{DynamicResource {x:Static SystemColors.ControlBrushKey}}" /><Setter Property="Foreground"Value="{DynamicResource {x:Static SystemColors.ControlTextBrushKey}}" /><Setter Property="BorderBrush"Value="#FF688CAF" /><Setter Property="BorderThickness"Value="1" /><Setter Property="RowDetailsVisibilityMode"Value="VisibleWhenSelected" /><Setter Property="ScrollViewer.CanContentScroll"Value="true" /><Setter Property="ScrollViewer.PanningMode"Value="Both" /><Setter Property="Stylus.IsFlicksEnabled"Value="False" /><Setter Property="Template"><Setter.Value><ControlTemplate TargetType="{x:Type DataGrid}"><Border BorderBrush="{TemplateBinding BorderBrush}"BorderThickness="{TemplateBinding BorderThickness}"Background="{TemplateBinding Background}"Padding="{TemplateBinding Padding}"SnapsToDevicePixels="True"><ScrollViewer x:Name="DG_ScrollViewer"Focusable="false"><ScrollViewer.Template><ControlTemplate TargetType="{x:Type ScrollViewer}"><Grid><Grid.ColumnDefinitions><ColumnDefinition Width="Auto" /><ColumnDefinition Width="*" /><ColumnDefinition Width="Auto" /></Grid.ColumnDefinitions><Grid.RowDefinitions><RowDefinition Height="Auto" /><RowDefinition Height="*" /><RowDefinition Height="Auto" /></Grid.RowDefinitions><!-- Original --><!--<Button Command="{x:Static DataGrid.SelectAllCommand}"                                            Focusable="false"                                            Style="{DynamicResource {ComponentResourceKey ResourceId=DataGridSelectAllButtonStyle, TypeInTargetAssembly={x:Type DataGrid}}}"                                            Visibility="{Binding HeadersVisibility, ConverterParameter={x:Static DataGridHeadersVisibility.All}, Converter={x:Static DataGrid.HeadersVisibilityConverter}, RelativeSource={RelativeSource AncestorType={x:Type DataGrid}}}"                                            Width="{Binding CellsPanelHorizontalOffset, RelativeSource={RelativeSource AncestorType={x:Type DataGrid}}}" />                                    --><!-- 変更後 --><Button Focusable="false"Style="{DynamicResource {ComponentResourceKey ResourceId=DataGridSelectAllButtonStyle, TypeInTargetAssembly={x:Type DataGrid}}}"Visibility="{Binding HeadersVisibility, ConverterParameter={x:Static DataGridHeadersVisibility.All}, Converter={x:Static DataGrid.HeadersVisibilityConverter}, RelativeSource={RelativeSource AncestorType={x:Type DataGrid}}}"Width="{Binding CellsPanelHorizontalOffset, RelativeSource={RelativeSource AncestorType={x:Type DataGrid}}}" /><DataGridColumnHeadersPresenter x:Name="PART_ColumnHeadersPresenter"Grid.Column="1"Visibility="{Binding HeadersVisibility, ConverterParameter={x:Static DataGridHeadersVisibility.Column}, Converter={x:Static DataGrid.HeadersVisibilityConverter}, RelativeSource={RelativeSource AncestorT<ScrollContentPresenter x:Name="PART_ScrollContentPresenter"                                                            CanContentScroll="{TemplateBindingCanContentScroll}"                                                            Grid.ColumnSpan="2"                                                            Grid.Row="1" /><ScrollBar x:Name="PART_VerticalScrollBar"                                               Grid.Column="2"                                               Maximum="{TemplateBindingScrollableHeight}"                                               Orientation="Vertical"                                               Grid.Row="1"                                               Visibility="{TemplateBindingComputedVerticalScrollBarVisibility}"                                               Value="{BindingVerticalOffset, Mode=OneWay, RelativeSource={RelativeSourceTemplatedParent}}"                                               ViewportSize="{TemplateBindingViewportHeight}" /><Grid Grid.Column="1"                                          Grid.Row="2"><Grid.ColumnDefinitions><ColumnDefinition Width="{BindingNonFrozenColumnsViewportHorizontalOffset, RelativeSource={RelativeSourceAncestorType={x:TypeDataGrid}}}" /><ColumnDefinition Width="*" /></Grid.ColumnDefinitions><ScrollBar x:Name="PART_HorizontalScrollBar"                                                   Grid.Column="1"                                                   Maximum="{TemplateBindingScrollableWidth}"                                                   Orientation="Horizontal"                                                   Visibility="{TemplateBindingComputedHorizontalScrollBarVisibility}"                                                   Value="{BindingHorizontalOffset, Mode=OneWay, RelativeSource={RelativeSourceTemplatedParent}}"                                                   ViewportSize="{TemplateBindingViewportWidth}" /></Grid></Grid></ControlTemplate></ScrollViewer.Template><ItemsPresenter SnapsToDevicePixels="{TemplateBindingSnapsToDevicePixels}" /></ScrollViewer></Border></ControlTemplate></Setter.Value></Setter><Style.Triggers><MultiTrigger><MultiTrigger.Conditions><Condition Property="IsGrouping"                           Value="true" /><Condition Property="VirtualizingPanel.IsVirtualizingWhenGrouping"                           Value="false" /></MultiTrigger.Conditions><Setter Property="ScrollViewer.CanContentScroll"                    Value="false" /></MultiTrigger></Style.Triggers></Style>

長いですね。途中にあるコメントのあるところのButtonにSelectAllのコマンドがバインドされてるのが全選択機能を有効化してるので、そのコマンドを外してやる感じです。


Global Azure Boot Camp in Japan 2016でLTしてきました

UWPのPivotで左右の余白を0にする

$
0
0

Pivotコントロールを使うと、コンテンツを表示するところの左右に余白が作られてしまいます。 こいつを消したい!というときにどうするかというと…

方法1

PivotItemのMarginを0に設定する。

PivotItemの数が固定で、自分PivotItemを置いてるだけならこれがお手軽です。

<Pivot><PivotItem Margin="0" ...>
    ...
  </PivotItem></Pivot>

方法2

PivotのItemContainerStyleでPivotItemのStyleを指定してMarginを消す。

これもお手軽です。というか、方法1よりも正攻法っぽい。

<Pivot><Pivot.ItemContainerStyle><Style TargetType="PivotItem"><Setter Property="Margin"Value="0" /></Style></Pivot.ItemContainerStyle><PivotItem Header="Item1"><Border Background="Red" /></PivotItem><PivotItem Header="Item2"><Border Background="Red" /></PivotItem><PivotItem Header="Item3"><Border Background="Red" /></PivotItem></Pivot>

方法3

PivotItemのデフォルトのマージンを置き換える。

PivotItemのMarginはgeneric.xamlにThemeResourceでPivotItemMarginという値で12,0という感じで定義されています。これを上書きしてやる方法です。

App.xamlに以下のように定義してやることで、アプリで使うすべてのPivotの余白を消します。

<Applicationx:Class="App25.App"xmlns="http://schemas.microsoft.com/winfx/2006/xaml/presentation"xmlns:x="http://schemas.microsoft.com/winfx/2006/xaml"xmlns:local="using:App25"RequestedTheme="Light"><Application.Resources><ResourceDictionary><ResourceDictionary.ThemeDictionaries><ResourceDictionary x:Key="Default"><Thickness x:Key="PivotItemMargin">0</Thickness></ResourceDictionary></ResourceDictionary.ThemeDictionaries></ResourceDictionary></Application.Resources></Application>

まとめ

基本、方法2かな?PivotのStyleを定義しておいて、そこでItemContainerStyleを指定しておく感じ。そして、余白消したいPivotのStyleに、定義しておいたStyleを適用すればよさそうです。

アプリ全体の方針としてPivotの余白消えていいよっていうなら方法3あたりでもいいかも。

XamarinでPrismを使ったHello world

$
0
0

PrismってXamarinにも対応してるんですよね(Previewですけど)ということで、Hello worldしながら、基本的な手順をやっていこうと思います。

プロジェクトの新規作成

まず、プロジェクトの新規作成を行います。Cross-Platform/Blank App (Xamarin.Forms Portable)を選択します。プロジェクト名は、ここではXamarinPrismHelloWorldにしました。UWPのターゲットバージョンをいくつにするかとか聞かれるのでOKを押してプロジェクトを作成します。

私の場合だけなのかもしれませんが、Xamarin.Formsのプロジェクトを作ったらAndroidのエミュレータ起動できない状態になることがあるのですが、そういう時は一度ソリューションを閉じて開きなおすことで解決します。

Prism.Formsの追加

まず、AndroidのプロジェクトからXamarin.FormsとSupport系のライブラリの参照をNuGetから削除しておきます。これをしないとコンパイルエラーが出る状態になってしまうので気を付けよう。

f:id:okazuki:20160416161737p:plain

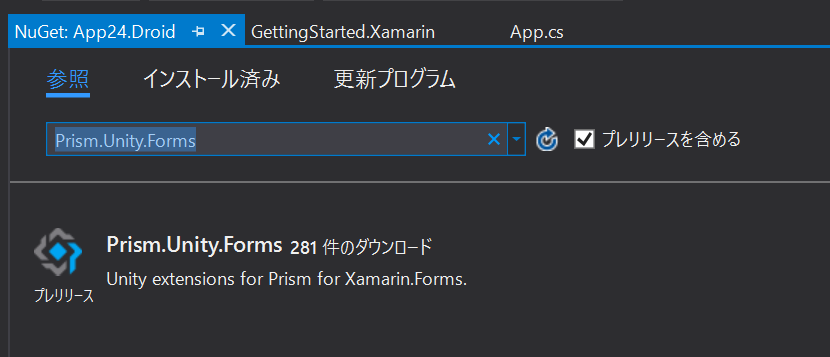
次に、Prism.Unity.FormsをNuGetから全プロジェクトに追加します。

f:id:okazuki:20160416161906p:plain

Appクラスの書き換え

PrismApplicationを継承するように書き直します。

using Prism.Unity;

namespace App24
{
    publicclass App : PrismApplication
    {
        protectedoverridevoid OnStart()
        {
            // Handle when your app starts
        }

        protectedoverridevoid OnSleep()
        {
            // Handle when your app sleeps
        }

        protectedoverridevoid OnResume()
        {
            // Handle when your app resumes
        }

        protectedoverridevoid OnInitialized()
        {
        }

        protectedoverridevoid RegisterTypes()
        {
        }
    }
}

ここには、後で、初期画面に遷移するような処理を追加します。

Viewの作成

次にViewを作成します。Viewは、Views名前空間に定義します。Views/MainPageを作成します。もちろんXAMLで!

<?xml version="1.0" encoding="utf-8"?><ContentPage xmlns="http://xamarin.com/schemas/2014/forms"xmlns:x="http://schemas.microsoft.com/winfx/2009/xaml"x:Class="App24.Views.MainPage"><Label Text="Hello world"VerticalOptions="Center"HorizontalOptions="Center" /></ContentPage>

Appクラスへの追記

ページを作ったらAppクラスのRegisterTypesで画面としてUnityのコンテナに登録します。登録にはUnityContainerに定義されている拡張メソッドのRegisterTypeForNavigationを使用します。 ページを登録したら、OnInitializedでMainPageに遷移する処理を書きます。

using App24.Views;
using Prism.Unity;

namespace App24
{
    publicclass App : PrismApplication
    {
        protectedoverridevoid OnStart()
        {
        }

        protectedoverridevoid OnSleep()
        {
        }

        protectedoverridevoid OnResume()
        {
        }

        protectedoverride async void OnInitialized()
        {
            // MainPageに画面遷移
            await this.NavigationService.Navigate("MainPage");
        }

        protectedoverridevoid RegisterTypes()
        {
            // ページを登録するthis.Container.RegisterTypeForNavigation<MainPage>();
        }
    }
}

実行

実行すると以下のように画面が表示されます

f:id:okazuki:20160416163717p:plain

ViewModelの追加

次にViewModelを追加してみます。PrismにはViewとViewModelを命名規約(カスタマイズは可能)によって紐づける機能があります。 この機能を有効化するにはViewにViewModelLocator.AutowireViewModel="True"を追加する必要があります。なのでMainPage.xamlは以下のような感じになります。

<?xml version="1.0" encoding="utf-8"?><ContentPage xmlns="http://xamarin.com/schemas/2014/forms"xmlns:x="http://schemas.microsoft.com/winfx/2009/xaml"xmlns:prism="clr-namespace:Prism.Mvvm;assembly=Prism.Forms"prism:ViewModelLocator.AutowireViewModel="True"x:Class="App24.Views.MainPage"><Label Text="Hello world"VerticalOptions="Center"HorizontalOptions="Center" /></ContentPage>

次にViewModels名前空間にMainPageViewModelという名前でViewModelクラスを作成します。ViewModelクラスはViewのクラス名 + ViewModelという名前で作ります。

以下のような感じでコマンドもつけてみましょう。BindableBaseというクラスはPrismが提供しているINotifyPropertyChangedのデフォルト実装クラスになります。

using Prism.Commands;
using Prism.Mvvm;
using System;

namespace App24.ViewModels
{
    publicclass MainPageViewModel : BindableBase
    {
        privatestring message;

        publicstring Message
        {
            get { returnthis.message; }
            set { this.SetProperty(refthis.message, value); }
        }

        public DelegateCommand UpdateMessageCommand { get; }

        public MainPageViewModel()
        {
            this.UpdateMessageCommand = new DelegateCommand(() => this.Message = DateTime.Now.ToString());
        }
    }
}

これに合わせてViewも書き換えます。

<?xml version="1.0" encoding="utf-8"?><ContentPage xmlns="http://xamarin.com/schemas/2014/forms"xmlns:x="http://schemas.microsoft.com/winfx/2009/xaml"xmlns:prism="clr-namespace:Prism.Mvvm;assembly=Prism.Forms"prism:ViewModelLocator.AutowireViewModel="True"x:Class="App24.Views.MainPage"><StackLayout HorizontalOptions="Center"VerticalOptions="Center"><Label Text="{Binding Message}" /><Button Text="UpdateMessage"Command="{Binding UpdateMessageCommand}" /></StackLayout></ContentPage>

実行すると以下のように表示されます。ボタンを押すとLabeのTextが更新されます。

まとめ

こんな感じでPrism.Formsのプロジェクトを作っていきます。後は、ViewやViewModelを追加していって作っていくだけです。 その他の機能についてはおいおい説明していこうと思います。

因みに

拡張機能でPrismで検索して出てくるPrismのテンプレートパックをインストールすると、ここらへんの下準備をしてくれたプロジェクトテンプレートが追加されてるのでそれを使うと幸せです。

f:id:okazuki:20160416164758p:plain

f:id:okazuki:20160416164428p:plain

Xamarin.Forms + Prism.FormsでViewの登録

$
0
0

Prism.Formsを使ってViewを作成するには、Views名前空間にXAMLの形式で作るのが素直でいい感じです。

Viewは、利用可能にするには、Views名前空間に作成するのに加えてAppクラスのRegisterTypesメソッドでUnityのコンテナに登録する必要があります。この登録処理は、専用のRegisterTypeForNavigation拡張メソッドが定義されています。これをしないと画面遷移ができないので要注意です。

例えばNextPageというViewを作った場合は以下のように、RegisterTypesメソッドで以下のように登録処理を行います。

protectedoverridevoid RegisterTypes()
{
    this.Container.RegisterTypeForNavigation<MainPage>();
    // 追加が必要!this.Container.RegisterTypeForNavigation<NextPage>();
}

そうするとOnInitializedでやっているようにNavigationServiceのNavigateメソッドで画面遷移ができるようになります。 

this.NavigationService.Navigate("NextPage");

Xamarin.Forms + Prism.FormsでVとVMを結びつける

$
0
0

Prism.Formsを使えば簡単にMVVMのViewのBindingContextにViewModelを設定できます。Hello worldでもやったっちゃやりましたが、もう一度改めてやってみようと思います。

VとVMを紐づけるには、ViewModelLocatorというクラスを使用します。ViewModelLocatorクラスのAutowireViewModel添付プロパティをTrueにすることでViewとViewModelを命名規約に従って紐づけることができます。この添付プロパティは、Pageに対して設定を行います。

命名規約

ViewとViewModelの紐づけの命名規約はデフォルトでは以下のようになっています。

Viewの名前

Viewの名前は、Views名前空間に任意の名前で作成します。

ViewModelの名前

ViewModelはViewModels名前空間にViewのクラス名 + ViewModelという名前で作成します。 例えばViews/MainPageというViewに対しては、ViewModels/MainPageViewModelという名前で作ります。例外として、Viewの名前がXXXViewのようにViewで終わる場合は、XXXViewModelというようにModelが名前の最後につく形になります。

やってみる

Prism Unity App (Forms)のプロジェクトを作成します。すると出来上がってます!ということで見て行ってみましょう。

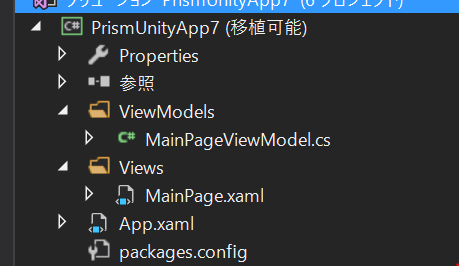
Prism Unity App (Forms)のプロジェクトを新規作成すると以下のような形になっています。

f:id:okazuki:20160417143255p:plain

先ほど説明した命名規約に従ってViewとViewModelが作成されていることがわかります。

MainPage.xamlを見ると、最初に説明したViewModelLocator.AutowireViewModel="True"という記述があるということがわかります。

<?xml version="1.0" encoding="utf-8"?><ContentPage xmlns="http://xamarin.com/schemas/2014/forms"xmlns:x="http://schemas.microsoft.com/winfx/2009/xaml"xmlns:prism="clr-namespace:Prism.Mvvm;assembly=Prism.Forms"prism:ViewModelLocator.AutowireViewModel="True"x:Class="PrismUnityApp7.Views.MainPage"Title="MainPage"><StackLayout HorizontalOptions="Center"VerticalOptions="Center"><Label Text="{Binding Title}" /></StackLayout></ContentPage>

見るだけではなんなので、自分でもやってみようと思います。Viewをまず作ります。NextPageという名前でPrism Content Pageを作成します。(Prism Template Packをインストールしていると出てきます。)

そうすると、ViewModelLocatorが設定された画面が作成されます。

<?xml version="1.0" encoding="utf-8"?><ContentPage xmlns="http://xamarin.com/schemas/2014/forms"xmlns:x="http://schemas.microsoft.com/winfx/2009/xaml"xmlns:prism="clr-namespace:Prism.Mvvm;assembly=Prism.Forms"prism:ViewModelLocator.AutowireViewModel="True"x:Class="PrismUnityApp7.Views.NextPage"></ContentPage>

ViewModels名前空間にNextPageViewModelという名前でPrism ViewModelを作成します。新規作成時点で以下のようなコードが生成されます。

using Prism.Commands;
using Prism.Mvvm;
using System;
using System.Collections.Generic;
using System.Linq;

namespace PrismUnityApp7.ViewModels
{
    publicclass NextPageViewModel : BindableBase
    {
        public NextPageViewModel()
        {

        }
    }
}

ViewとViewModelが紐づけされていることが確認できるように、ViewModelにプロパティを追加して、Viewで表示してみようと思います。 ViewModelにTextプロパティを追加します。

using Prism.Commands;
using Prism.Mvvm;
using System;
using System.Collections.Generic;
using System.Linq;

namespace PrismUnityApp7.ViewModels
{
    publicclass NextPageViewModel : BindableBase
    {
        publicstring Text => "Hello MVVM world!!";
        public NextPageViewModel()
        {

        }
    }
}

ViewにLabelを追加します。

<?xml version="1.0" encoding="utf-8"?><ContentPage xmlns="http://xamarin.com/schemas/2014/forms"xmlns:x="http://schemas.microsoft.com/winfx/2009/xaml"xmlns:prism="clr-namespace:Prism.Mvvm;assembly=Prism.Forms"prism:ViewModelLocator.AutowireViewModel="True"x:Class="PrismUnityApp7.Views.NextPage"><Label Text="{Binding Text}" /></ContentPage>

ViewをUnityのコンテナに登録

AppクラスのRegisterTypesメソッドでNextPageを登録します。

protectedoverridevoid RegisterTypes()
{
    this.Container.RegisterTypeForNavigation<MainPage>();
    this.Container.RegisterTypeForNavigation<NextPage>();
}

OnInitializedで現在MainPageに遷移している処理をMainPageに遷移するのからNextPageに変更します。

protectedoverride async void OnInitialized()
{
    InitializeComponent();

    await this.NavigationService.Navigate("NextPage");
}

実行して動作確認

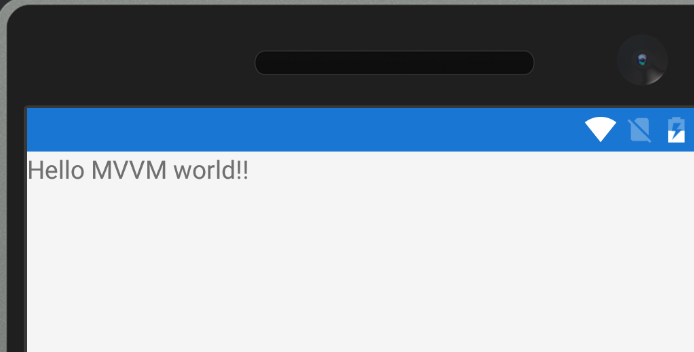
実行すると以下のようになります。

f:id:okazuki:20160417145154p:plain

ViewとViewModelが紐づけされて、ちゃんとBindingされてることが確認できます。

Xamarin.Forms + Prism.FormsでViewModelから画面遷移をする

$
0
0

Prism.Formsのプロジェクトを新規作成します。

Prism ContentPageを1つ追加します。NextPageという名前で作りました。こんな感じで。

<?xml version="1.0" encoding="utf-8"?><ContentPage xmlns="http://xamarin.com/schemas/2014/forms"xmlns:x="http://schemas.microsoft.com/winfx/2009/xaml"xmlns:prism="clr-namespace:Prism.Mvvm;assembly=Prism.Forms"prism:ViewModelLocator.AutowireViewModel="True"x:Class="PrismUnityApp8.Views.NextPage"><Label Text="NextPage!!" /></ContentPage>

次に、Viewの登録をします。App.xaml.csのRegisterTypesメソッドを以下のように変更します。

protectedoverridevoid RegisterTypes()
{
    this.Container.RegisterTypeForNavigation<MainPage>();
    this.Container.RegisterTypeForNavigation<NextPage>();
}

Prism.Formsで画面遷移するには、ViewModelでINavigationServiceを受け取ります。このクラスのNavigateメソッドを使うことで画面遷移が行えます。こんな感じで、Commandが実行されたら、NextPageに遷移する感じのコードは以下のようになります。

public DelegateCommand NavigateCommand { get; }

public MainPageViewModel(INavigationService navigationService)
{
    this.NavigateCommand = new DelegateCommand(async () => await navigationService.Navigate("NextPage"));
}

引数のnavigationServiceという名前も大事なので要注意です。

MainPage.xamlにボタンを追加してCommandをバインドします。

<?xml version="1.0" encoding="utf-8"?><ContentPage xmlns="http://xamarin.com/schemas/2014/forms"xmlns:x="http://schemas.microsoft.com/winfx/2009/xaml"xmlns:prism="clr-namespace:Prism.Mvvm;assembly=Prism.Forms"prism:ViewModelLocator.AutowireViewModel="True"x:Class="PrismUnityApp8.Views.MainPage"Title="MainPage"><StackLayout HorizontalOptions="Center"VerticalOptions="Center"><Label Text="{Binding Title}" /><Button Text="NextPage"Command="{Binding NavigateCommand}" /></StackLayout></ContentPage>

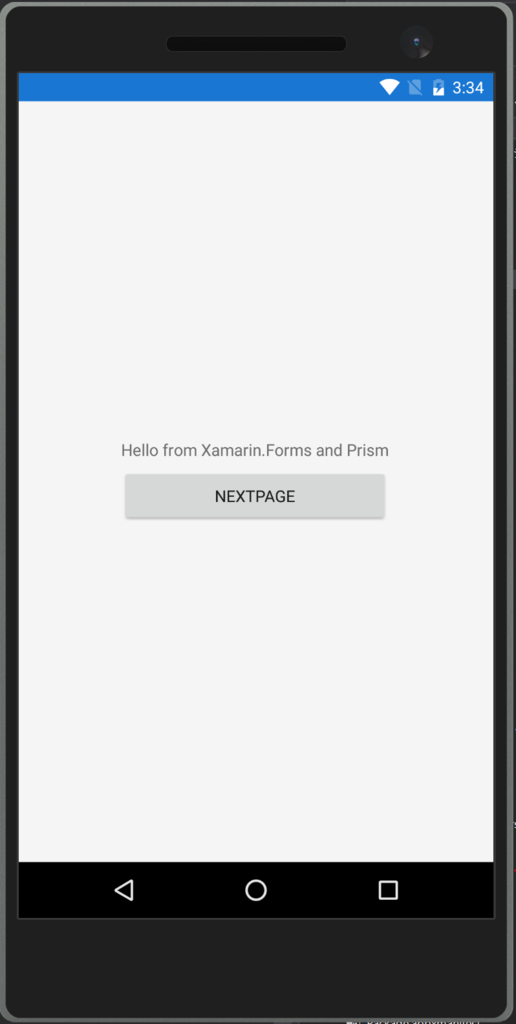
実行してみると以下のようになります。

まず、最初のMainPage。

f:id:okazuki:20160421153513p:plain

そして、ボタンを押すとNextPageへ。

f:id:okazuki:20160421153640p:plain

まとめ

Prism.Formsのテンプレートを使うとViewModelにINavigationService navigationServiceというシグネチャの引数を渡すことで、画面遷移するためのクラスのインスタンスがわたってきます。こいつに遷移したい画面名を渡すことで画面遷移ができます。

非同期のメソッドなのにAsyncって名前になってない点が気に入らない(Issueにもあがってた気がする)

Xamarin.Forms + Prism.FormsのMVVMの基本的なクラス

$
0
0

変更通知用のINotifyPropertyChangedとコマンド用のICommand実装クラスが提供されています。

INotifyPropertyChangedの実装クラス

BindableBaseクラスになります。SetPropertyというメソッドがあって、変更通知プロパティを以下のように定義できるようになっています。

privateint hoge;
publicint Hoge
{
  get { returnthis.hoge; }
  set { this.SetProperty(refthis.hoge, value); }
}

この他に、指定したプロパティの変更通知ができるOnPropertyChangedメソッドなど、MVVMでアプリ書いたことがある人ならだれもが一度は実装したことあるようなおなじみのメソッドがあります。

ICommandの実装クラス

DelegateCommandクラスになります。コンストラクタの引数にExecute時に呼ばれる処理と、CanExecute時に呼ばれる処理を渡します。

this.HogeCommand = new DelegateCommand(this.HogeExecute, this.CanHogeExecute);

CanExecuteの変更通知に関してはRaiseCanExecuteChangedメソッドで行います。

this.HogeCommand.RaiseCanExecuteChanged();

RaiseCanExecuteChangedを呼ぶのは大体プロパティの変更タイミングなので、そういうケースに対応するためにObservePropertyというメソッドも定義されていたりします。式木で、プロパティを渡すことで、渡したプロパティが変更があったときにRaiseCanExecuteChangedを自動で呼び出してくれるようになります。 例えば、Titleプロパティが変わったときにRaiseCanExecuteChangedが呼ばれるようにするには以下のように書きます。

this.HogeCommand = new DelegateCommand(this.HogeExecute, this.CanHogeExecute)
    .ObservesProperty(() => this.Title);

Xamarin.Forms + Prism.Formsで画面遷移DeepDive

$
0
0

Prism.Formsは、地味にネストした画面遷移みたいなのをサポートしています。 画面遷移のINavigationService#Navigateメソッドに渡すURLに"/HogePage/FugaPage/BarPage?id=10"みたいに/で区切ってページ指定が出来ます。

最初が/だと絶対パスになるっぽくて画面全体を置き換えて、/から始まらない状態だと現在のページを起点に画面を置き換えるような動きをしています。(コード複雑で追いかけきれてないので自信がない)

これが出来て何が嬉しいのかと言うと、NavigationPageとかの中にPageを入れ込んで画面遷移するというのが簡単に出来るようになります。とりあえずやってみましょう。MainPageの他にNextPageを作ってRegisterTypesで登録します。続けて、NavigationPageも登録しておきます。

protectedoverridevoid RegisterTypes()
{
    this.Container.RegisterTypeForNavigation<MainPage>();
    this.Container.RegisterTypeForNavigation<NextPage>();
    this.Container.RegisterTypeForNavigation<NavigationPage>();
}

そして、OnInitializedでMainPageに画面遷移している部分を/NavigationPage/MainPageに書き換えます。

protectedoverridevoid OnInitialized()
{
    InitializeComponent();

    this.NavigationService.Navigate("/NavigationPage/MainPage");
}

MainPageViewModelにコマンドを追加して相対パスでの画面遷移もするようにしてみましょう。NavigateCommandという名前でDelegateCommandを追加して画面に適当なボタンを置いてBindingします。

public DelegateCommand NavigateCommand { get; }

public MainPageViewModel(INavigationService navigationService)
{
    this.NavigateCommand = new DelegateCommand(async () => await navigationService.Navigate("NextPage"));
}

画面側はこんな感じでButtonを置きました。

<?xml version="1.0" encoding="utf-8"?><ContentPage xmlns="http://xamarin.com/schemas/2014/forms"xmlns:x="http://schemas.microsoft.com/winfx/2009/xaml"xmlns:prism="clr-namespace:Prism.Mvvm;assembly=Prism.Forms"prism:ViewModelLocator.AutowireViewModel="True"x:Class="PrismUnityApp11.Views.MainPage"Title="MainPage"><StackLayout HorizontalOptions="Center"VerticalOptions="Center"><Label Text="{Binding Title}" /><Button Text="Navigation"Command="{Binding NavigateCommand}" /></StackLayout></ContentPage>

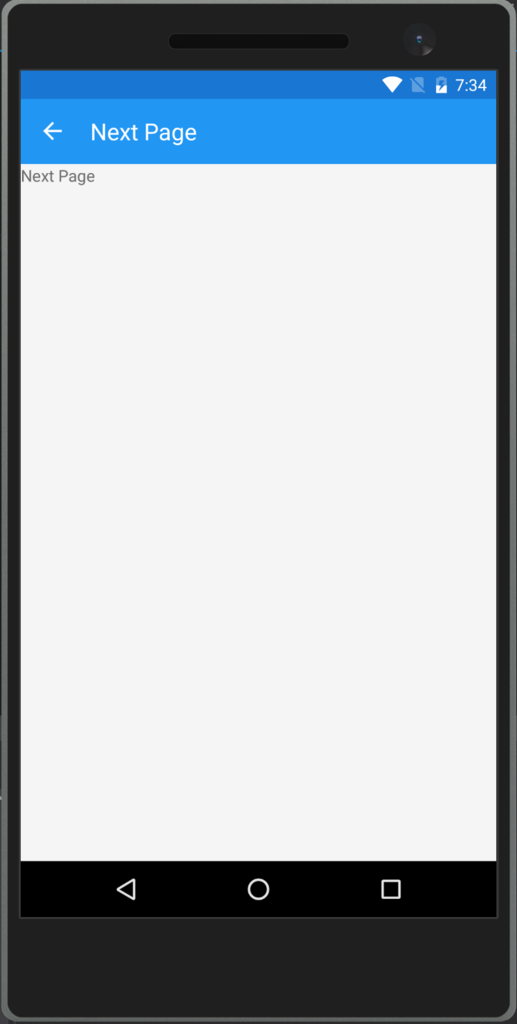
実行してみると以下のようになります。

まず起動直後。タイトルバーついててNavigationPageにホストされたMainPageであることがわかります。

f:id:okazuki:20160423193303p:plain

Navigationのボタンを押すと画面遷移します。左上に戻る矢印出てるのがわかると思います。ばっちりNavigationPageでホスト出来てますね!

f:id:okazuki:20160423193446p:plain

Xamarin.Forms + Prism.FormsでMasterDetailPageを使うには

$
0
0

ytabuchi.hatenablog.com

上記記事をPrism.Formsを使ってやるとどうなるだろうという奴です。

まず、Prism MasterDetailPage (Forms)でRootPageという名前のページを作ります。

続けて、メニュー部を担当するMenuPageをPrism ContentPage (Forms)で作ります。

Menuに表示するための要素を表すMenuItemクラスを作成しましょう。オリジナルと違うのはPrismの画面遷移は名前でやるので、PageTypeではなくPageNameを持たせてるところと、アイコンは用意するのがめんどくさいので諦めました。

namespace PrismUnityApp12.ViewModels
{
    publicclass MenuItem
    {
        publicstring Title { get; set; }
        publicstring PageName { get; set; }
    }
}

RootPageViewModelを作ってメニューを組み立てます。

publicclass RootPageViewModel : BindableBase
{
    public ObservableCollection<MenuItem> Menus { get; } = new ObservableCollection<MenuItem>
    {
        new MenuItem
        {
            Title = "Contracts",
            PageName = "ContractsPage"
        },
        new MenuItem
        {
            Title = "Leads",
            PageName = "LeadsPage"
        },
        new MenuItem
        {
            Title = "Accounts",
            PageName = "AccountsPage"
        },
        new MenuItem
        {
            Title = "Opportunities",
            PageName = "OpportunitiesPage"
        },
    };
}

このメニューを表示するためのMenuPage.xamlを作ります。

<?xml version="1.0" encoding="utf-8" ?>
<ContentPage xmlns="http://xamarin.com/schemas/2014/forms"             xmlns:x="http://schemas.microsoft.com/winfx/2009/xaml"             x:Class="PrismUnityApp12.Views.MenuPage"
             Title="Menu">
  <StackLayout>
    <Label Text="Menu" 
           FontSize="18"
           Margin="10,36,0,5"/>
    <ListView ItemsSource="{Binding Menus}"
              VerticalOptions="FillAndExpand"
              ItemSelected="ListViewMenu_ItemSelected">
      <ListView.ItemTemplate>
        <DataTemplate>
          <ViewCell>
            <StackLayout Orientation="Horizontal">
              <Label Text="{Binding Title}"
                     HorizontalOptions="FillAndExpand" />
            </StackLayout>
          </ViewCell>
        </DataTemplate>
      </ListView.ItemTemplate>
    </ListView>
  </StackLayout>
</ContentPage>

MenuPageは、RootPage.MasterプロパティにセットするのでBindingContextはRootPageViewModelです。コードビハインドは以下のような感じです。

using PrismUnityApp12.ViewModels;
using System;
using Xamarin.Forms;

namespace PrismUnityApp12.Views
{
    publicpartialclass MenuPage : ContentPage
    {
        private RootPageViewModel ViewModel => this.BindingContext as RootPageViewModel;

        public MenuPage()
        {
            InitializeComponent();
        }

        private async void ListViewMenu_ItemSelected(object sender, SelectedItemChangedEventArgs e)
        {
            await this.ViewModel.PageChangeAsync(e.SelectedItem as ViewModels.MenuItem);
        }
    }
}

RootPageViewModelに以下のようなコードを追加して画面遷移対応させます。

using Prism.Mvvm;
using Prism.Navigation;
using System.Collections.ObjectModel;
using System.Threading.Tasks;

namespace PrismUnityApp12.ViewModels
{
    publicclass RootPageViewModel : BindableBase
    {
        public ObservableCollection<MenuItem> Menus { get; } = new ObservableCollection<MenuItem>
        {
            new MenuItem
            {
                Title = "Contracts",
                PageName = "ContractsPage"
            },
            new MenuItem
            {
                Title = "Leads",
                PageName = "LeadsPage"
            },
            new MenuItem
            {
                Title = "Accounts",
                PageName = "AccountsPage"
            },
            new MenuItem
            {
                Title = "Opportunities",
                PageName = "OpportunitiesPage"
            },
        };

        private INavigationService NavigationService { get; }

        privatebool isPresented;

        publicbool IsPresented
        {
            get { returnthis.isPresented; }
            set { this.SetProperty(refthis.isPresented, value); }
        }

        public RootPageViewModel(INavigationService navigationService)
        {
            this.NavigationService = navigationService;
        }

        public async Task PageChangeAsync(MenuItem menuItem)
        {
            await this.NavigationService.Navigate($"NavigationPage/{menuItem.PageName}");
            this.IsPresented = false;
        }
    }
}

Prism MasterDetailPage (Forms)をRootPageという名前で作って以下のように書きます。

<?xml version="1.0" encoding="utf-8" ?>
<MasterDetailPage xmlns="http://xamarin.com/schemas/2014/forms"                  xmlns:x="http://schemas.microsoft.com/winfx/2009/xaml"                  xmlns:prism="clr-namespace:Prism.Mvvm;assembly=Prism.Forms"                  xmlns:Views="clr-namespace:PrismUnityApp12.Views;assembly=PrismUnityApp12"                  prism:ViewModelLocator.AutowireViewModel="True"                  x:Class="PrismUnityApp12.Views.RootPage"
                  IsPresented="{Binding IsPresented, Mode=TwoWay}">
  <MasterDetailPage.Master>
    <Views:MenuPage />
  </MasterDetailPage.Master>
  <MasterDetailPage.Detail>
    <ContentPage Title="Dummy" /> <!-- Dummy -->
  </MasterDetailPage.Detail>
</MasterDetailPage>

IsPresentedをViewModelとバインドするのを忘れずに。

あとは、AccountsPage, ContractsPage, LeadsPage, OpportunitiesPageを作ってApp.xaml.csで登録しておきます。

using Prism.Unity;
using PrismUnityApp12.Views;
using Xamarin.Forms;

namespace PrismUnityApp12
{
    publicpartialclass App : PrismApplication
    {
        protectedoverride async void OnInitialized()
        {
            InitializeComponent();

            await this.NavigationService.Navigate("/RootPage/NavigationPage/ContractsPage");
        }

        protectedoverridevoid RegisterTypes()
        {
            this.Container.RegisterTypeForNavigation<RootPage>();
            this.Container.RegisterTypeForNavigation<NavigationPage>();
            this.Container.RegisterTypeForNavigation<ContractsPage>();
            this.Container.RegisterTypeForNavigation<LeadsPage>();
            this.Container.RegisterTypeForNavigation<AccountsPage>();
            this.Container.RegisterTypeForNavigation<OpportunitiesPage>();
        }
    }
}

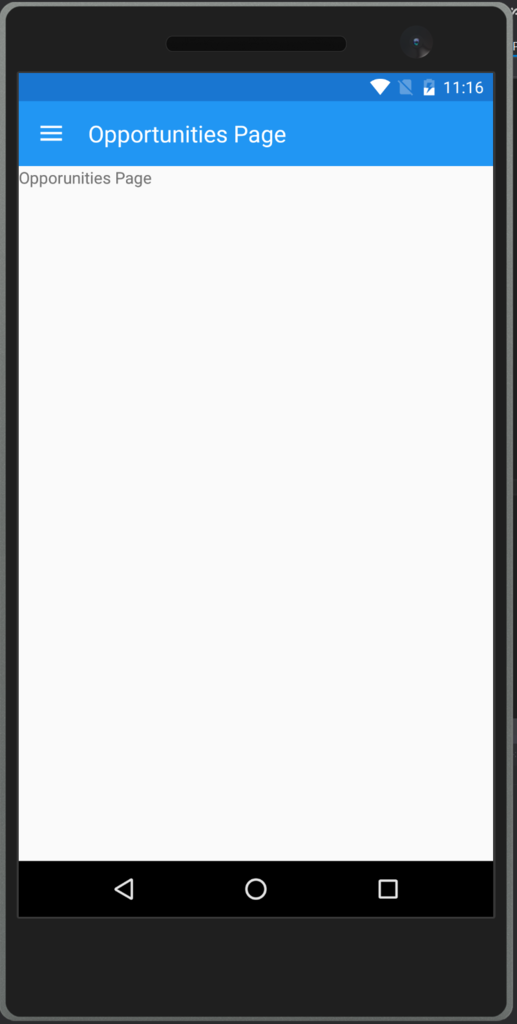
これで実行すると、以下のようになります。

f:id:okazuki:20160423231619p:plain

f:id:okazuki:20160423231627p:plain

f:id:okazuki:20160423231655p:plain

ReactiveProperty v2.7.2をリリースしてました

$
0
0

www.nuget.org

ReadOnlyReactiveCollectionが、過負荷のときに処理順番がおかしくなることがあるという報告がきたのでなおしました。

UWPのListBox/ListViewで、選択状態によって見た目を変える

$
0
0

選択されてるときには、何かを出したいとか出したくないとか、そういう要件です。

まずは、バインドされてる要素が自分は今選択されているのかどうかを知っておくと話が早くなります。それについては、以下の記事を参照。

blog.okazuki.jp

あとは、このIsSelectedプロパティを見て表示・非表示あたりを切り替えてやればOKだと思われます。とりあえずやってみましょう。

データの入れ物を作ります。

using Prism.Mvvm;
using System;
using System.Collections.Generic;
using System.Linq;
using System.Text;
using System.Threading.Tasks;

namespace App27.ViewModels
{
    publicclass Person : BindableBase
    {
        privatebool isSelected;

        publicbool IsSelected
        {
            get { returnthis.isSelected; }
            set { this.SetProperty(refthis.isSelected, value); }
        }

        privatestring name;

        publicstring Name
        {
            get { returnthis.name; }
            set { this.SetProperty(refthis.name, value); }
        }

    }
}

ここのIsSelectedの選択状態が入るようにします。ListBoxを拡張したコントロールを作って選択状態と、上記クラスのIsSelectedをバインドしておきます。

using System;
using System.Collections.Generic;
using System.Linq;
using System.Text;
using System.Threading.Tasks;
using Windows.UI.Xaml;
using Windows.UI.Xaml.Controls;
using Windows.UI.Xaml.Data;
using Windows.UI.Xaml.Media;

namespace App27.Controls
{
    publicclass ListBoxEx : ListBox
    {
        protectedoverridevoid PrepareContainerForItemOverride(DependencyObject element, object item)
        {
            base.PrepareContainerForItemOverride(element, item);
            var b = new Binding();
            b.Path = new PropertyPath("IsSelected");
            b.Source = item;
            b.Mode = BindingMode.TwoWay;
            ((ListBoxItem)element).SetBinding(ListBoxItem.IsSelectedProperty, b);
        }

    }
}

次に、画面を組み立てます。今回は選択状態のときはボタンを消すという処理をしています。

<Page x:Class="App27.Views.MainPage"xmlns="http://schemas.microsoft.com/winfx/2006/xaml/presentation"xmlns:x="http://schemas.microsoft.com/winfx/2006/xaml"xmlns:local="using:App27.Views"xmlns:d="http://schemas.microsoft.com/expression/blend/2008"xmlns:mc="http://schemas.openxmlformats.org/markup-compatibility/2006"xmlns:Mvvm="using:Prism.Windows.Mvvm"xmlns:Controls="using:App27.Controls"xmlns:ViewModels="using:App27.ViewModels"Mvvm:ViewModelLocator.AutoWireViewModel="True"mc:Ignorable="d"><Grid Background="{ThemeResource ApplicationPageBackgroundThemeBrush}"><Controls:ListBoxEx ItemsSource="{x:Bind ViewModel.Users}"><ListBox.ItemTemplate><DataTemplate x:DataType="ViewModels:Person"><StackPanel><TextBlock Text="{x:Bind Name}" /><Button x:Name="ButtonDelete"Content="削除"Visibility="{x:Bind IsSelected, Mode=OneWay, Converter={StaticResource InverseBooleanToVisibilityConverter}}"/></StackPanel></DataTemplate></ListBox.ItemTemplate></Controls:ListBoxEx></Grid></Page>

InverseBooleanToVisibilityConverterは、まぁ誰もが実装するような以下のようなコンバータです。

using System;
using System.Collections.Generic;
using System.Linq;
using System.Text;
using System.Threading.Tasks;
using Windows.UI.Xaml;
using Windows.UI.Xaml.Data;

namespace App27.Converters
{
    publicclass BooleanToVisibilityConverter : IValueConverter
    {
        publicbool IsInverse { get; set; }

        publicobject Convert(objectvalue, Type targetType, object parameter, string language)
        {
            var b = (bool)value;
            if (this.IsInverse)
            {
                b = !b;
            }
            return b ? Visibility.Visible : Visibility.Collapsed;
        }

        publicobject ConvertBack(objectvalue, Type targetType, object parameter, string language)
        {
            var v = (Visibility)value;
            if (this.IsInverse)
            {
                return v == Visibility.Collapsed;
            }
            else
            {
                return v == Visibility.Visible;
            }
        }
    }
}

App.xamlで以下のような雰囲気で定義しています。

<Prism:PrismUnityApplication x:Class="App27.App"xmlns="http://schemas.microsoft.com/winfx/2006/xaml/presentation"xmlns:x="http://schemas.microsoft.com/winfx/2006/xaml"xmlns:Prism="using:Prism.Unity.Windows"xmlns:Converters="using:App27.Converters"xmlns:local="using:App27"RequestedTheme="Light"><Prism:PrismUnityApplication.Resources><Converters:BooleanToVisibilityConverter x:Key="InverseBooleanToVisibilityConverter"IsInverse="True" /></Prism:PrismUnityApplication.Resources></Prism:PrismUnityApplication>

因みにPrism.Windows使ってます!それについては下記を参照してください。

github.com

UWPでBindingのAncestorTypeを指定したい

$
0
0

出来ません。

なので疑似的にやるBehaviorを作ってみました。以下のような感じです。

using Microsoft.Xaml.Interactivity;
using System;
using System.Reflection;
using Windows.UI.Xaml;
using Windows.UI.Xaml.Data;
using Windows.UI.Xaml.Media;

namespace App28
{
    publicclass AncestorBindingBehavior : DependencyObject, IBehavior
    {
        /// <summary>/// Binding対象のオブジェクト/// </summary>public DependencyObject AssociatedObject { get; set; }

        /// <summary>/// Binding/// </summary>public Binding Binding { get; set; }

        /// <summary>/// 親方向に遡って探したい型の名前/// </summary>publicstring AncestorType { get; set; }

        /// <summary>/// Binding対象のプロパティ名/// </summary>publicstring TargetPropertyName { get; set; }

        publicvoid Attach(DependencyObject associatedObject)
        {
            this.AssociatedObject = associatedObject;
            // プロパティの設定が未完全の場合は何もしないif (this.Binding == null || string.IsNullOrWhiteSpace(this.TargetPropertyName) || string.IsNullOrWhiteSpace(this.AncestorType)) { return; }
            // VisualTree構築後に1度だけ実行する
            ((FrameworkElement)this.AssociatedObject).Loaded += this.AncestorBindingBehavior_Loaded;
        }

        privatevoid AncestorBindingBehavior_Loaded(object sender, RoutedEventArgs e)
        {
            // イベント解除
            ((FrameworkElement)this.AssociatedObject).Loaded -= this.AncestorBindingBehavior_Loaded;

            // 親を遡ってソースとなるオブジェクトを探す
            var source = FindAncestorType(this.AssociatedObject, this.AncestorType);
            // バインドする添付プロパティを探す
            var targetProperty = GetDependencyProperty(this.AssociatedObject.GetType(), this.TargetPropertyName);
            // 失敗したら何もしないif (source == null || targetProperty == null) { return; }
            // Bindingのソースをセットしてプロパティにバインドするthis.Binding.Source = source;
            ((FrameworkElement)this.AssociatedObject).SetBinding(targetProperty,
                this.Binding);
        }

        publicvoid Detach()
        {
        }

        /// <summary>/// VisualTreeを親へ辿っていって指定した型名のものがあったら返す/// </summary>/// <paramname="element"></param>/// <paramname="type"></param>/// <returns></returns>privatestatic DependencyObject FindAncestorType(DependencyObject element, string type)
        {
            if (element.GetType().Name == type) { return element; }

            var parent = VisualTreeHelper.GetParent(element);
            if (parent == null) { returnnull; }
            return FindAncestorType(parent, type);
        }

        /// <summary>/// 継承関係を親へ辿っていきながら指定した添付プロパティが定義されてたらそれを返す/// </summary>/// <paramname="type"></param>/// <paramname="propertyName"></param>/// <returns></returns>privatestatic DependencyProperty GetDependencyProperty(Type type, string propertyName)
        {
            var field = type
                .GetTypeInfo()
                .GetDeclaredField($"{propertyName}Property");
            if (field != null)
            {
                return (DependencyProperty) field.GetValue(null);
            }

            var property = type
                .GetTypeInfo()
                .GetDeclaredProperty($"{propertyName}Property");
            if (property != null)
            {
                return (DependencyProperty) property.GetValue(null);
            }

            var baseType = type.GetTypeInfo().BaseType;
            if (baseType == typeof(object)) { returnnull; }

            return GetDependencyProperty(baseType, propertyName);
        }
    }
}

使い方は簡単。バインド対象にぽとっとBehaviorを落として各種プロパティを設定するだけ。 ButtonのVisibilityと、ListViewItemのIsSelectedをバインドするには以下のように使います。

<Page xmlns="http://schemas.microsoft.com/winfx/2006/xaml/presentation"      xmlns:x="http://schemas.microsoft.com/winfx/2006/xaml"      xmlns:local="using:App28"      xmlns:d="http://schemas.microsoft.com/expression/blend/2008"      xmlns:mc="http://schemas.openxmlformats.org/markup-compatibility/2006"      xmlns:Interactivity="using:Microsoft.Xaml.Interactivity"      x:Class="App28.MainPage"      mc:Ignorable="d">
    <Page.Resources>
        <local:BooleanToVisibilityConverter x:Key="InverseBooleanToVisibilityConverter"
                                            IsInverse="True"/>
    </Page.Resources>
    <Grid Background="{ThemeResource ApplicationPageBackgroundThemeBrush}">
        <ListView ItemsSource="{x:Bind Users}">
            <ListView.ItemTemplate>
                <DataTemplate>
                    <StackPanel>
                        <TextBlock Text="{Binding}" />
                        <Button Content="削除">
                            <Interactivity:Interaction.Behaviors>
                                <!-- ここ! -->
                                <local:AncestorBindingBehavior AncestorType="ListViewItem"
                                                               TargetPropertyName="Visibility"
                                                               Binding="{Binding IsSelected, Mode=TwoWay, Converter={StaticResource InverseBooleanToVisibilityConverter}}" />
                            </Interactivity:Interaction.Behaviors>
                        </Button>
                    </StackPanel>
                </DataTemplate>
            </ListView.ItemTemplate>
        </ListView>
    </Grid>
</Page>

Xamarin.Forms + Prism.Formsでダイアログを出す

$
0
0

Prism.Formsでは、IPageDialogServiceというインターフェースが提供されていて、ダイアログの表示もばっちりViewModelで出来るようになっています。

IPageDialogServiceには、DisplayAlertメソッドと、DisplayActionSheetメソッドが定義されています。DisplayAlertメソッドは単純なアラートダイアログを出して、DisplayActionSheetメソッドは選択肢を提供するメソッドになります。

DisplayActionSheetメソッドは、キャンセルのメッセージ、破棄のメッセージ、その他のメッセージの可変長引数という形になっています。さくっと使ってみましょう。

publicclass MainPageViewModel : BindableBase, INavigationAware
{
    privatestring _title;
    publicstring Title
    {
        get { return _title; }
        set { SetProperty(ref _title, value); }
    }

    public DelegateCommand AlertCommand { get; }

    public DelegateCommand ConfirmCommand { get; }

    public MainPageViewModel(IPageDialogService pageDialogService)
    {
        this.AlertCommand = new DelegateCommand(async () =>
        {
            await pageDialogService.DisplayAlert("Title", "Hello world", "キャンセル");
        });

        this.ConfirmCommand = new DelegateCommand(async () =>
        {
            var result = await pageDialogService.DisplayActionSheet("Title",
                "キャンセル",
                "破棄",
                "やってやんよ",
                "やってやんよ2");
            await pageDialogService.DisplayAlert("選択したもの", result, "閉じる");
        });
    }

    publicvoid OnNavigatedFrom(NavigationParameters parameters)
    {

    }

    publicvoid OnNavigatedTo(NavigationParameters parameters)
    {
        if (parameters.ContainsKey("title"))
            Title = (string)parameters["title"] + " and Prism";
    }
}

XAML側でボタンを2つおいて、Commandをバインドしておきます。

<?xml version="1.0" encoding="utf-8"?><ContentPage xmlns="http://xamarin.com/schemas/2014/forms"xmlns:x="http://schemas.microsoft.com/winfx/2009/xaml"xmlns:prism="clr-namespace:Prism.Mvvm;assembly=Prism.Forms"prism:ViewModelLocator.AutowireViewModel="True"x:Class="PrismUnityApp9.Views.MainPage"Title="MainPage"><StackLayout HorizontalOptions="Center"VerticalOptions="Center"><Label Text="{Binding Title}" /><Button Text="Alert"Command="{Binding AlertCommand}" /><Button Text="Confirm"Command="{Binding ConfirmCommand}" /></StackLayout></ContentPage>

実行すると、以下のようになります。

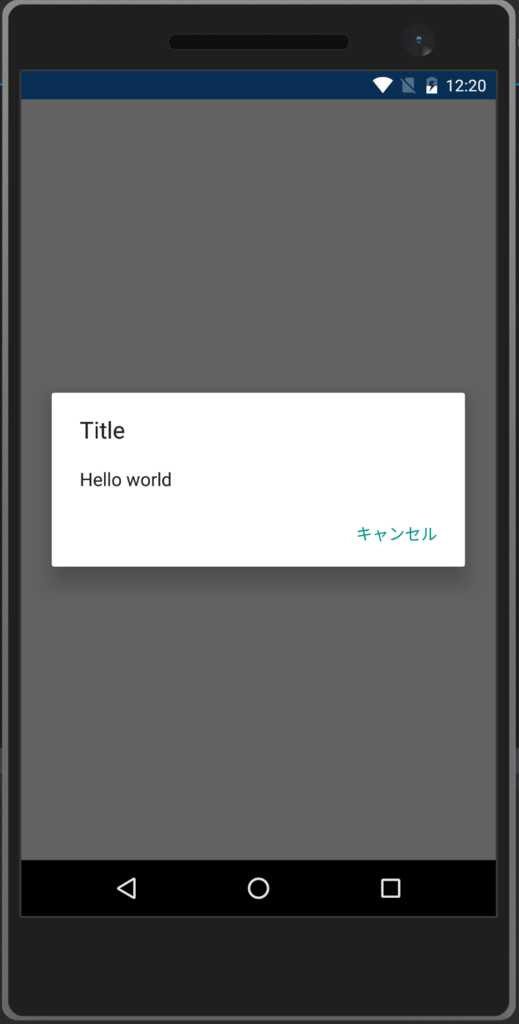
まず、DisplayAlertの場合。

f:id:okazuki:20160423122108p:plain

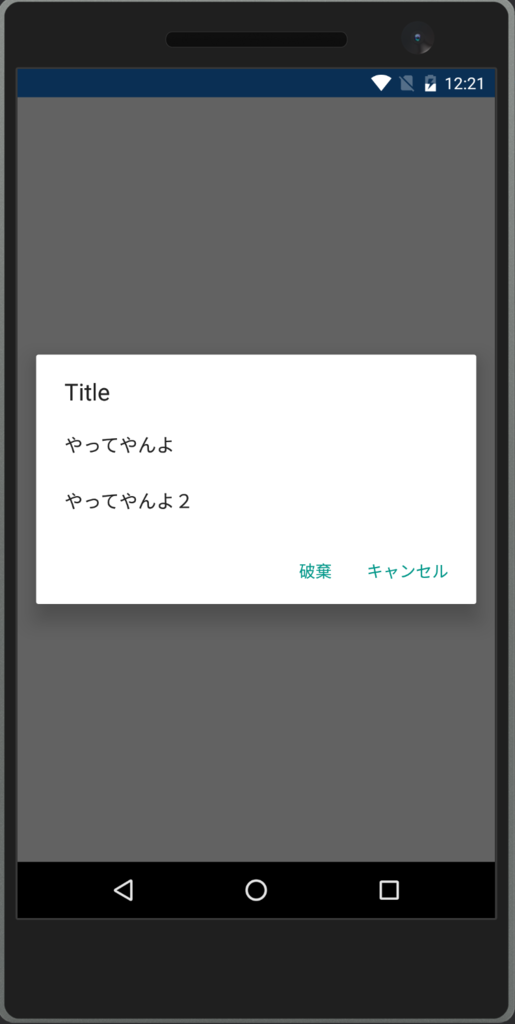
DisplayActionSheetの場合

f:id:okazuki:20160423122150p:plain

HoloLens開封の儀という夢のような世界 #HoloLensJP

$
0
0

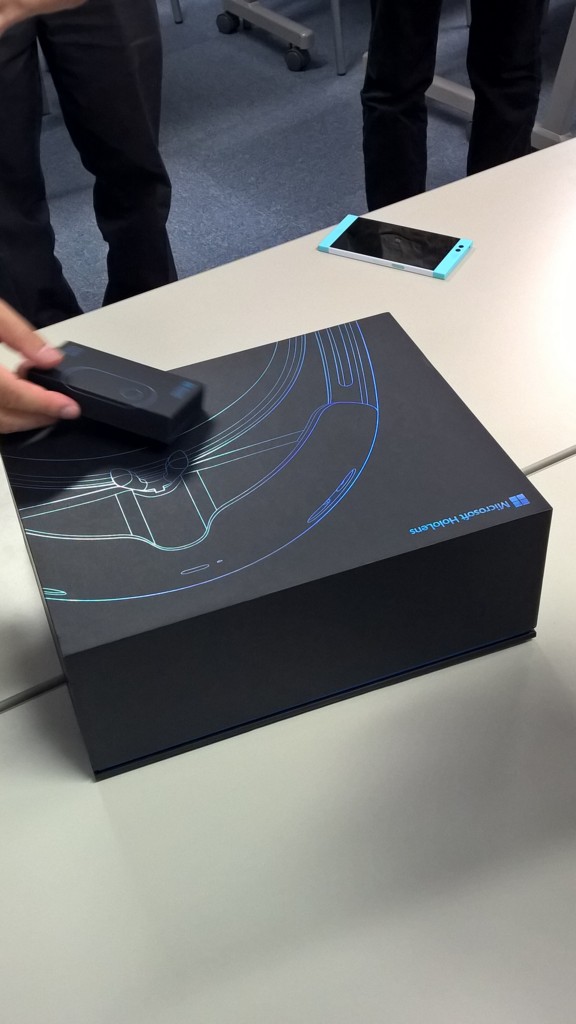
本日カルフォルニアにも支社のある、エクセルソフトさんでHoloLensの開封の儀に参加してきました。

XLsoft エクセルソフト : C++、Fortran、Java、.NET、Excel、Web、PDF、セキュリティ ソフトウェアなど、世界中の優れた開発ツールを販売

HoloLens

箱はシックな感じで黒くてかっこいいです。

f:id:okazuki:20160429140754j:plain

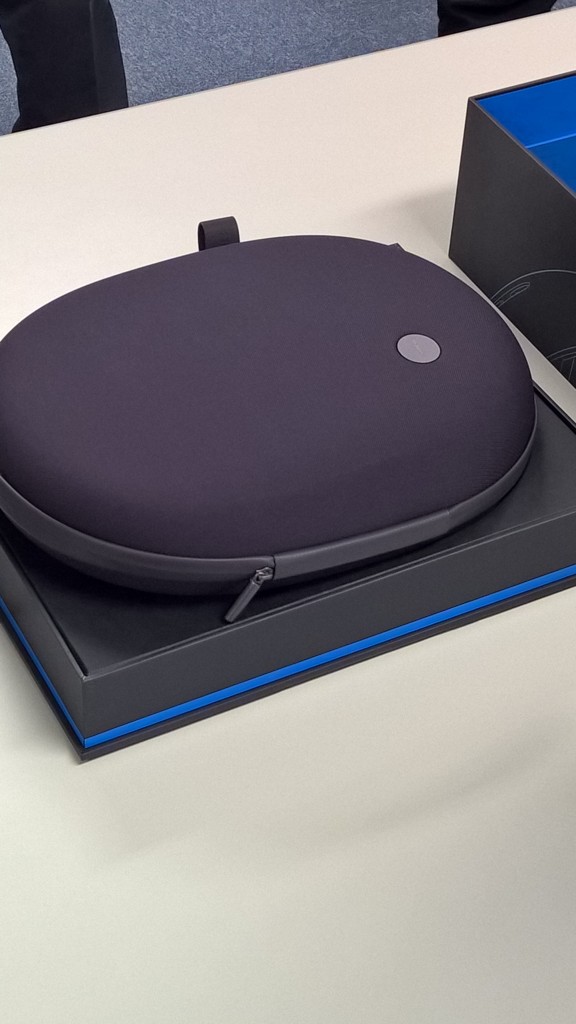
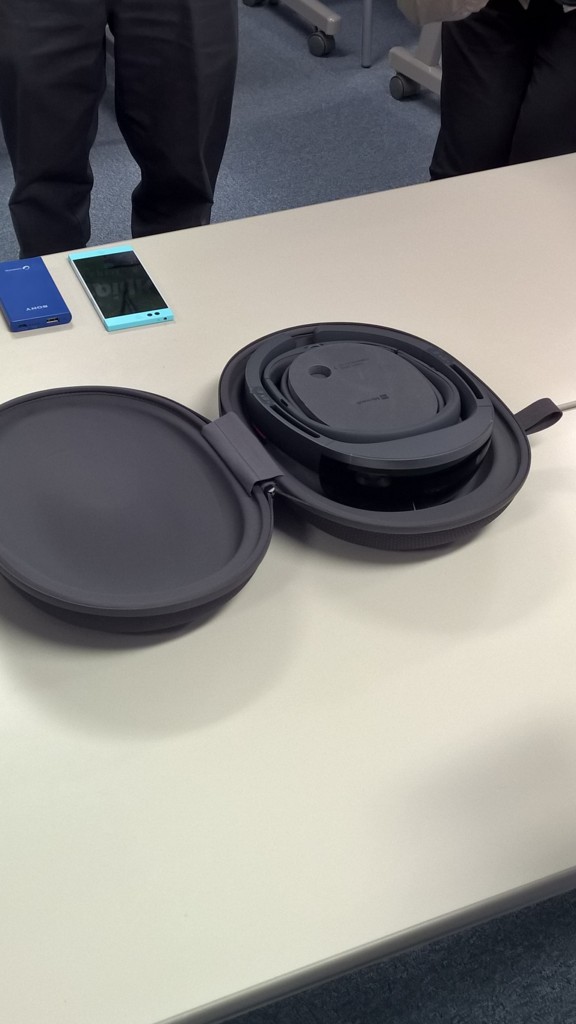
中を開けると湯たんぽ登場!

f:id:okazuki:20160429140902j:plain

この中にHoloLensが入ってます。本体は割と小さくて軽い感じ。この中でWindows 10が動いてるなんて信じられない。

f:id:okazuki:20160429141445j:plain

正面にカメラが大量についてます。

f:id:okazuki:20160429150616j:plain

人がかぶるとこんな感じ。(Powered by id:ytabuchi)

f:id:okazuki:20160429150757j:plain

かぶった感じ

ホログラフィックと現実が混ざり合った世界?といった感じの夢でしょうか。 親指と人差し指をぱちんと合わせるようなジェスチャーで視線を合わせてるところをクリックするような夢のような世界でしょうか。

詳しくは

Silkyfeelという id:c-mitsubaさんの会社で!

silkyfeel.jp


ReactivePropertyの後始末

$
0
0

久しぶりのReactivePropertyネタです。

ReactiveProperty, ReadOnlyReactiveProperty, ReactiveCommand等は、地味にIDisposableを実装しています。 IDisposableを実装しているということは、Disposeをしないといけないということになります。

Disposeしなくてもいいケース

ただ、必ずしもDisposeしないとまずいかというとそうでもありません。例えば以下のようなケース。

public ReactiveProperty<string> Input { get; } = new ReactiveProperty<string>();

自己完結してるような時は特にDispose必要ありません。

Disposeしないといけないケース

他のIObservableをソースとしてReactivePropertyなんかを作ったときは、内部動作としてSubscribeをしているので、Disposeを呼ぶ必要があります。例えば以下のようなケースです。

public ReactiveProperty<string> Name { get; }

public Ctor(Person model)
{
    // ObservePropertyでPropertyChangedを購読して、それをSubscribeしている!this.Name = model.ObserveProperty(x => x.Name).ToReactiveProperty();
}

こういう時は、ReactivePropertyを持っているクラスが不要になったタイミングでDisposeを呼んでやらないと、予期せぬ動作をすることがあるかもしれません。

Disposeを楽にする方法

1つ1つDisposeを呼んで回るのは大変なのでReactive ExtensionsのCompositeDisposableに、Addしていって一括Disposeができるようにするのが楽でいいです。

private CompositeDisposable Disposable { get; } = new CompositeDisposable();

// RPの定義public ReactiveProperty<string> PropA { get; }
public ReactiveProperty<string> PropB { get; }

public Ctor()
{
    this.PropA = hogeObservable.ToReactiveProperty();
    this.PropB = fugaObservable.ToReactiveProperty();
    // Disposeを集めておくthis.Disposable.Add(this.PropA);
    this.Disposable.Add(this.PropA);
}

public SomeCleanupMethod()
{
    // 一括Dispose!this.Disposable.Disopose();
}

ただ、ReactivePropertyを生成するのと、CompositeDisposableに集めるのと別ステートメントになってめんどくさいです。ということで、IDisposableの拡張メソッドとしてAddToメソッドを提供しています。これを使うと以下のように書けるようになります。

private CompositeDisposable Disposable { get; } = new CompositeDisposable();

// RPの定義public ReactiveProperty<string> PropA { get; }
public ReactiveProperty<string> PropB { get; }

public Ctor()
{
    // RPを作りつつCompositeDisposableに登録できるthis.PropA = hogeObservable.ToReactiveProperty().AddTo(this.Disposable);
    this.PropB = fugaObservable.ToReactiveProperty().AddTo(this.Disposable);
}

public SomeCleanupMethod()
{
    // 一括Dispose!this.Disposable.Disopose();
}

まとめ

ということで、後始末はきちんとしましょう!そして、楽に後始末するためにはCompositeDisposableとAddToメソッドを使いましょうということでした。

Windows FormsからWPFやUWPに来て戸惑うこと

$
0
0

Buttonに文字を設定するのにTextじゃないということ。

Contentプロパティに設定しないといけないというやつですね。 ふむふむ、コンテンツね…って覚えたらTextBlockはTextプロパティなのかよ!という理不尽な扱いを受けてしまいます。

これの見分け方なんですが、文字列以外も表示したいというものはContentというケースが多いです。例えばButtonって画像表示したりしたいですよね?ListBoxItem(ListBoxの1要素)にもテキスト1行じゃなくて複数行テキストと画像とかを組み合わせて表示したいですよね(WinFormsだとオーナードローとか使ってたケース)

そういったケースに対応するためにContentを設定するコントロール(親を辿っていくとContentControlというのに行きつきます)があります。こいつの何がすごいって適当なものを設定したら、いい感じに解釈して表示してくれるところです。画像なら画像。コントロールとかを設定したらコントロール、文字列を設定したら文字列みたいな。

詳しくは以下の記事を見てみて下さい。

blog.okazuki.jp

ContentPresenter クラス (System.Windows.Controls)

このContentというプロパティへの抵抗が無くなったら割とすんなり次のステップにいけるのではないかと思います。 次のステップはレイアウトコントロールですね。

XAML系プラットフォームでは、WinFormsのときみたいな絶対値とアンカー(だっけ)の指定とかで位置を決めるのではなく、Panel(複数のコントロール)をまとめて配置する責任を持ったコントロールがあります。縦や横に並べたり、折り返して並べたり、格子状に区切られた領域に配置したりetc...。

こうすることで、要素を結構柔軟に配置することができます。しかも簡単に。 WinFormsだと、サイズ変更イベントとかをハンドリングして位置計算してたようなものでも、割とさくっとくめたりします。

レイアウトコントロールについては以下を見てみてください。

blog.okazuki.jp

blog.okazuki.jp

blog.okazuki.jp

blog.okazuki.jp

blog.okazuki.jp

最後にリスト系コントロールです。ListBoxとかDataGridのやつ。 これはItemsSourceというプロパティにコレクションを突っ込んだらいい感じにテンプレートにデータを当てはめて表示してくれるってやつです。ContentControlの複数表示版です。これを見ておきましょう。

blog.okazuki.jp

これで、単一項目の要素と複数項目の要素を表示ができて、それらを好きに配置できるようになります!後は必要に応じて調べていったらいいでしょう。UWPとタイトルに入ってるけど、完全にWPFの記事紹介になってますね。すいません。でも基本は同じだから!

ReactivePropertyの英語ドキュメントを更新しました

PrismのApp.configのエディタ

$
0
0

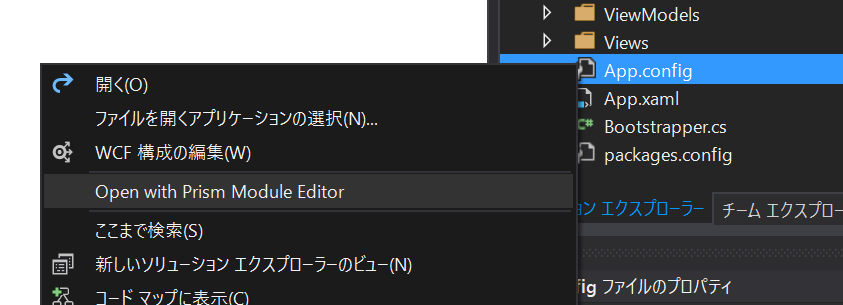
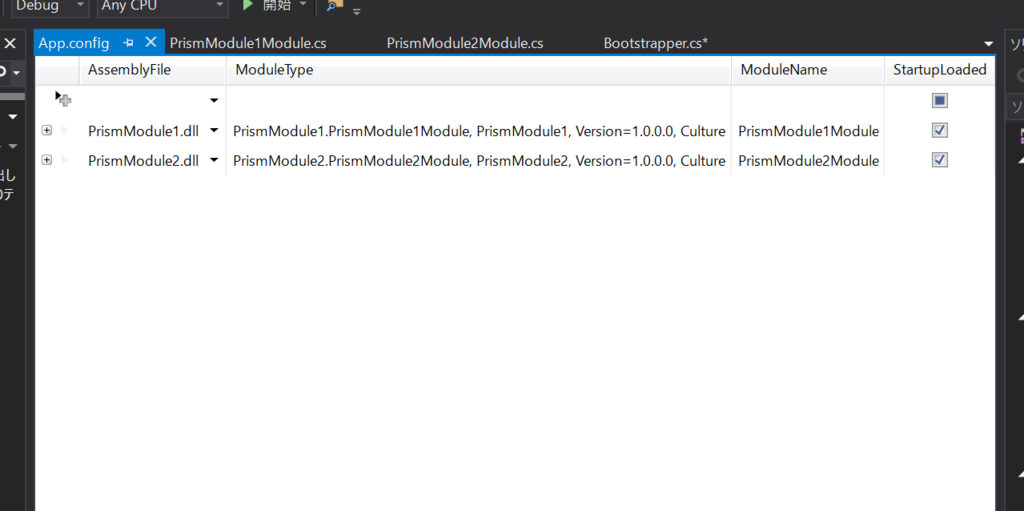
Prismのテンプレートパッケージを入れるとApp.configのエディタが追加されます。

visualstudiogallery.msdn.microsoft.com

App.cinfigを右クリックするとOpen with Prism Module Editorというのが表示されます。

f:id:okazuki:20160503042140p:plain

これでApp.configを開くと以下のようにモジュールをGUIで編集できます。

f:id:okazuki:20160503042011p:plain

今まで手書きでApp.configを編集するのは大変だったのでコードで書いてたけど、これがあるならApp.configの構成を試してみてもいいかもと思いました。

Xamarin版Prismの次のバージョンでの変更点

$
0
0

Xamarin版PrismのPrism.Formsですが、Xamarin Evolve 2016が終わってから更新頻度が上がってます。 次のリリースに向けて動き出してるって感じですね。

ただ、5月7日にPrism.Formsについてセッションをする身としては、次のバージョンがいつ出るのかドキドキしてます…。

INavigationServiceのメソッド名の変更

破壊的変更ですね。

といっても順当な変更だと思います。今までTaskを返す非同期メソッドだった画面遷移のNavigateメソッドとGoBackメソッドの名前がNavigateAsyncGoBackAsyncになります。 これでawaitつけて呼び出すのを忘れることが少なくなりそう。

Xamarin.Formsのバージョンの変更

v2.3.0.38-pre2を参照するようになりました。 2.2系の安定板じゃなくてPreview版を見るんですね。

IApplicationProviderの追加

ユーザー的にはあまり関係ないインターフェースが追加されました。 こいつは、Application.Current.MainPageを隠匿するためのインターフェースで、ApplicationProviderのインスタンスにMainPageというプロパティがあって、こいつにアクセスすると内部でApplication.Current.MainPageを返すという挙動をします。

主にPrism内部でのUnitTest用途で追加されたクラスになります。

まとめ

Xamarin.FormsのPreviewをまだターゲットにしてるあたり、正式リリースは、もうちょい先なのかな?という気がする今日この頃です。

Viewing all 1388 articles
Browse latest View live


<script src="https://jsc.adskeeper.com/r/s/rssing.com.1596347.js" async> </script>