PrismってXamarinにも対応してるんですよね(Previewですけど)ということで、Hello worldしながら、基本的な手順をやっていこうと思います。
プロジェクトの新規作成
まず、プロジェクトの新規作成を行います。Cross-Platform/Blank App (Xamarin.Forms Portable)を選択します。プロジェクト名は、ここではXamarinPrismHelloWorldにしました。UWPのターゲットバージョンをいくつにするかとか聞かれるのでOKを押してプロジェクトを作成します。
私の場合だけなのかもしれませんが、Xamarin.Formsのプロジェクトを作ったらAndroidのエミュレータ起動できない状態になることがあるのですが、そういう時は一度ソリューションを閉じて開きなおすことで解決します。
Prism.Formsの追加
まず、AndroidのプロジェクトからXamarin.FormsとSupport系のライブラリの参照をNuGetから削除しておきます。これをしないとコンパイルエラーが出る状態になってしまうので気を付けよう。

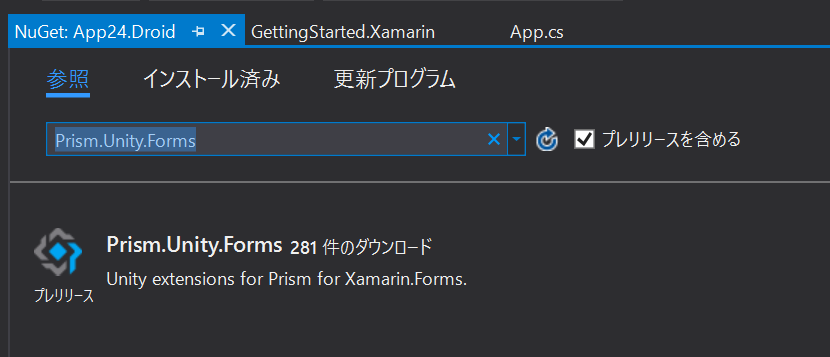
次に、Prism.Unity.FormsをNuGetから全プロジェクトに追加します。

Appクラスの書き換え
PrismApplicationを継承するように書き直します。
using Prism.Unity;

namespace App24
{
    publicclass App : PrismApplication
    {
        protectedoverridevoid OnStart()
        {
            // Handle when your app starts
        }

        protectedoverridevoid OnSleep()
        {
            // Handle when your app sleeps
        }

        protectedoverridevoid OnResume()
        {
            // Handle when your app resumes
        }

        protectedoverridevoid OnInitialized()
        {
        }

        protectedoverridevoid RegisterTypes()
        {
        }
    }
}
ここには、後で、初期画面に遷移するような処理を追加します。
Viewの作成
次にViewを作成します。Viewは、Views名前空間に定義します。Views/MainPageを作成します。もちろんXAMLで!
<?xml version="1.0" encoding="utf-8"?><ContentPage xmlns="http://xamarin.com/schemas/2014/forms"xmlns:x="http://schemas.microsoft.com/winfx/2009/xaml"x:Class="App24.Views.MainPage"><Label Text="Hello world"VerticalOptions="Center"HorizontalOptions="Center" /></ContentPage>
Appクラスへの追記
ページを作ったらAppクラスのRegisterTypesで画面としてUnityのコンテナに登録します。登録にはUnityContainerに定義されている拡張メソッドのRegisterTypeForNavigationを使用します。 ページを登録したら、OnInitializedでMainPageに遷移する処理を書きます。
using App24.Views;
using Prism.Unity;

namespace App24
{
    publicclass App : PrismApplication
    {
        protectedoverridevoid OnStart()
        {
        }

        protectedoverridevoid OnSleep()
        {
        }

        protectedoverridevoid OnResume()
        {
        }

        protectedoverride async void OnInitialized()
        {
            // MainPageに画面遷移
            await this.NavigationService.Navigate("MainPage");
        }

        protectedoverridevoid RegisterTypes()
        {
            // ページを登録するthis.Container.RegisterTypeForNavigation<MainPage>();
        }
    }
}
実行
実行すると以下のように画面が表示されます

ViewModelの追加
次にViewModelを追加してみます。PrismにはViewとViewModelを命名規約(カスタマイズは可能)によって紐づける機能があります。 この機能を有効化するにはViewにViewModelLocator.AutowireViewModel="True"を追加する必要があります。なのでMainPage.xamlは以下のような感じになります。
<?xml version="1.0" encoding="utf-8"?><ContentPage xmlns="http://xamarin.com/schemas/2014/forms"xmlns:x="http://schemas.microsoft.com/winfx/2009/xaml"xmlns:prism="clr-namespace:Prism.Mvvm;assembly=Prism.Forms"prism:ViewModelLocator.AutowireViewModel="True"x:Class="App24.Views.MainPage"><Label Text="Hello world"VerticalOptions="Center"HorizontalOptions="Center" /></ContentPage>
次にViewModels名前空間にMainPageViewModelという名前でViewModelクラスを作成します。ViewModelクラスはViewのクラス名 + ViewModelという名前で作ります。
以下のような感じでコマンドもつけてみましょう。BindableBaseというクラスはPrismが提供しているINotifyPropertyChangedのデフォルト実装クラスになります。
using Prism.Commands;
using Prism.Mvvm;
using System;

namespace App24.ViewModels
{
    publicclass MainPageViewModel : BindableBase
    {
        privatestring message;

        publicstring Message
        {
            get { returnthis.message; }
            set { this.SetProperty(refthis.message, value); }
        }

        public DelegateCommand UpdateMessageCommand { get; }

        public MainPageViewModel()
        {
            this.UpdateMessageCommand = new DelegateCommand(() => this.Message = DateTime.Now.ToString());
        }
    }
}
これに合わせてViewも書き換えます。
<?xml version="1.0" encoding="utf-8"?><ContentPage xmlns="http://xamarin.com/schemas/2014/forms"xmlns:x="http://schemas.microsoft.com/winfx/2009/xaml"xmlns:prism="clr-namespace:Prism.Mvvm;assembly=Prism.Forms"prism:ViewModelLocator.AutowireViewModel="True"x:Class="App24.Views.MainPage"><StackLayout HorizontalOptions="Center"VerticalOptions="Center"><Label Text="{Binding Message}" /><Button Text="UpdateMessage"Command="{Binding UpdateMessageCommand}" /></StackLayout></ContentPage>
実行すると以下のように表示されます。ボタンを押すとLabeのTextが更新されます。
まとめ
こんな感じでPrism.Formsのプロジェクトを作っていきます。後は、ViewやViewModelを追加していって作っていくだけです。 その他の機能についてはおいおい説明していこうと思います。
因みに
拡張機能でPrismで検索して出てくるPrismのテンプレートパックをインストールすると、ここらへんの下準備をしてくれたプロジェクトテンプレートが追加されてるのでそれを使うと幸せです。

